
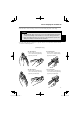
User Manual


5
A
E
D
G
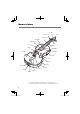
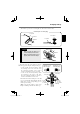
• Using the notches in the left and right side
f
holes as a guide, refer to the diagram below
and make sure that the bridge is properly positioned. If the bridge is not properly posi-
tioned, place the instrument on a stable surface, slightly loosen the strings, then gently
position the bridge using both hands. Also, make sure that each string is set in its groove.
The side of the bridge with the trademark
(the side facing the tailpiece, the vertical
side) should be aligned with a line running
between the two
f
hole notches that face
the center of the violin.
[On the YVN100S/200S/500S]
Bridge
Bridge
“
f
”
hole
The center of the bridge should be aligned
with a line running between the two
f
hole
notches that face the center of the violin.
[On the YVN100G/200G/500G]
Bridge
Bridge
“
f
”
hole
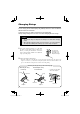
Before Playing the Instrument
■
About the Bridge
The instrument is shipped from the workshop with its bridge properly set and aligned on
the instrument’s top.
After confirming that the bridge is in proper alignment, tune the instrument.
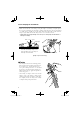
• Four notches in the bridge provide proper spacing between the strings.
Make sure that each string is set in its corresponding groove as shown in the illustration
below.
4th string
1st string
Groove
Body top
[Looking from the tailpiece]
Caution
• To obtain the best tone quality and performance from the YVN100S/200S/500S, it
is important that the bridge is properly set as shown in the diagram above. Refer
to the illustrations above when adjusting the bridge.
02yvnwc44220En.indd502yvnwc44220En.indd5 08.10.74:17:46PM08.10.74:17:46PM