
User Manual


12
6
7
B
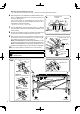
Rack
frame
F
Xylophone Main Unit
8,9
Diagram A
(Above 23°C: Shallow notch)
Diagram B
(Below 23°C: Deep notch)
Bass side
Treble side
Resonators
(Natural tone side)
Resonator rest
2
1
Resonators
(Accidental tone side)
Sideboard
B
Rack frame
Marker
Mounting frame
L bracket
Notch
Resonator rest
Sideboard
Next, attach the instrument to the rack.
* Do not let the resonators hit against the legs or other part of the frame during their installation.
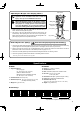
Washer
I
Spring washer
Knob head
bolt
6
Align the bolt holes on the underside of the sideboard with the holes
on the L-shaped bracket attached to the rack frame and set the in-
strument
F
onto the rack.
Use the white marker* on the sideboard (on its outer side) as
an aid when aligning. The marker should be centered on the L-
shaped bracket for proper alignment.
* The YX335 does not have a white marker.
7
Use the supplied bolts, washers, and spring washers
I
attached
to the instrument to attach the instrument from the underside of the
rack (4 locations).
8
First pass the resonators through the instruments from underneath
the rail and then mount the treble end into the resonator rest.
9
Next, mount the bass side. Pass the end of the resonators through
the space in the center of the resonator rest as shown in the dia-
gram, and fi t it into the notch in the resonator rest.
When room temperature is 73.4°F (23°C) and above,
set the
resonators into the shallow notches of the resonator rest (Diagram A).
When room temperature is 73.4°F (23°C) and below,
set the
resonators into the deeper notches of the resonator rest (Diagram B).
10
Use the same procedure to install the other set of resonators.
After assembly is complete, fi rmly tighten all bolts.
To disassemble, follow the assembly steps in
reverse order.