
Product Manual


9
INSTALLING AND ADJUSTING THE HANDLE
Installing the Handle
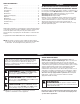
1. Push the handle down onto the upper shaft housing (Fig. 5).
Make sure the hex bolt hole faces to the left (Fig. 5).
2. Insert the bolt into the hex bolt hole and push it through (Fig. 6).
Place the washer onto the bolt (Fig. 6). Screw the wing nut onto
the bolt, but do not tighten the wing nut completely (Fig. 6) .
3. Hold the unit in the operat
ing position (Fig. 14). Move the handle
u
p or down the upper shaft housing to a comfortable location
(Fig. 6). Make sure the handle is positioned beyond the end of the
safety label (Fig. 6).
4. Tighten the wing nut until the handle is secure.
Adjusting the Handle
If the handle requires adjustment:
1. Loosen the wing nut (Fig. 6).
2. Hold the unit in the operating position (Fig. 14). Move the handle
up or dow
n the upper shaft housing to a comfortable location
(Fig. 6). Make sure the handle is positioned beyond the end of the
safety label (Fig. 6).
3. Tighten the wing nut until the handle is secure.
Fig. 5
Handle
Fig. 6
Bolt
Washer
Wing Nut
Upper
Shaft
Housing
Hex Bolt Hole
Safety Label