Operator's Manual 21" Three-in-One Lawn Mower Model E465 (Picture may vary from actual model.) IMPORTANT: Read safety rules and instructions carefully before operating equipment. Warning: This unit is equipped with an internal combustion engine and should not be used on or near any unimproved forest-covered, brush-covered or grass-covered land unless the engine's exhaust system is equipped with a spark arrester meeting applicable local or state laws (if any).
TABLEOFCONTENTS Content Page 3 6 7 10 11 Important Safe Operation Practices Slope Gauge Assembling Your Lawn Mower Know Your Lawn Mower Operating Your Lawn Mower Content Service & Adjustments Maintaining Your Lawn Mower Troubleshooting Illustrated Parts List Page 12 15 17 18 Warranty Back Cover FINDINGMODELNUMBER This Operator's Manual is an important part of your new lawn mower. It will help you assemble, prepare and maintain the unit for best performance. Please read and understand what it says.
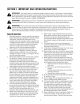
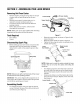
SECTION1: IMPORTANT SAFEOPERATION PRACTICES WARNING" This symbol points out important safety instructions which, if not followed, could endanger the personal safety and/or property of yourself and others. Read and follow all instructions in this manual before attempting to operate this machine. Failure to comply with these instructions may result in personal injury. When you see this symbol--HEED ITS WARNING.
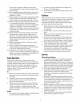
yourfooting,releasethebladecontrolhandle 2. Do not mow slopes greater than 15 degrees as immediately andthebladewillstoprotatingwithin shown on the slope gauge. threeseconds. 3. Do not mow on wet grass. Unstable footing could 16.Mowindaylightorgoodartificiallight.Walk,never cause slipping. run.Stopthebladewhencrossinggraveldrives, walkwaysorroads. Children 17.
9. Neverremovegascapor addfuelwhiletheengine ishotor running.Allowenginetocoolatleasttwo minutesbeforerefueling. 10.Neveroverfillfueltank.Filltanktonomorethan½ inchbelowbottomoffillernecktoprovidespacefor fuelexpansion. 11.Replacegasolinecapandtightensecurely. 12.If gasolineisspilled,wipeitofftheengineand equipment. Moveunittoanotherarea.Wait5 minutesbeforestartingtheengine. 13.
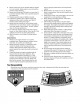
SIGHT AND HOLD THIS LEVEL WITH A VERTICAL TREE 91 A POWER POLE A CORNER OF A BUILDING OR A FENCE POST I t.O lULl a. WARNING &i Z lULl Do not mow on inclines with a slope in excess of 15 degrees (a rise could overturn and cause serious injury. If operating a walk-behind your footing and you could slip, resulting in serious injury. Operate RIDING mowers up and down slopes, never across the face Operate WALK-BEHIND mowers across the face of slopes, never up of approximately 2-1/2 feet every 10 feet).
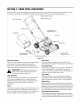
SECTION3: ASSEMBLING YOURLAWNMOWER RemovingUnitFromCarton • Remove staples, break glue on top flaps or cut tape at carton end and peel along top flap to open carton. • Remove loose parts if included with unit (i.e., operator's manual, hardware pack etc.). Cut corners and lay carton down flat. Remove packing material. Roll or slide unit out of carton. Check carton • • Lower Handle \ , Lift lower handle Grass Bag Upper Handle / Lift upl handle thoroughly for loose parts.
Insert post of cable ties that are on lower handle into the holes provided on the lower handle. The holes may be on the inside or outside. Pull cable ties tight and cut off the extra. See Figure 5 below. Cable Tie • • • Post on Join the rear frame and front frame assembly as shown in Figure 7A. Place the bag over the frame (black plastic side is the bottom of bag). Slip the openings in the side of the plastic channels on the bag over the hooks on the grass catcher frame.
Convertingto SideDischarge • -4 • Your mower has been shipped as a mulcher. To convert it to a side-discharge mower, lift the mulching plug. Slide the two hooks on the sidedischarge deflector under the hinge pin on the mulching plug assembly. Lower the mulching plug. See Figure 10. Do not remove the side mulching plug at any time, even when you are not mulching. Mulching Plug Figure 9 RemovingGrassCatcher • Lift the rear discharge door on the mower.
SECTION4: KNOWYOURLAWNMOWER Read this owner's manual and safety rules before operating your lawn mower. Compare the illustrations in Figure 11 with your lawn mower to familiarize yourself with the location of various controls and adjustments.
SECTION5: OPERATING YOURLAWNMOWER (inside the rubber boot) is fastened securely over the metal tip on the spark plug. GasandOilFill-Up _i • StartingEngine WARNING" fuel tank or when engine is Never runningfill or hot. Do indoors, not smoke when filling up the fuel tank. Service the engine with gasoline and oil as instructed in the separate engine manual packed with your mower. Read the instructions carefully. ,i_ WARNING: Never run engine indoors or in enclosed, poorly ventilated areas.
preventing proper discharge of grass clippings, poor mulching conditions, and could cause you to slip and fall. New grass, thick grass, or wet grass may require a narrower cut. For a healthy lawn, always cut off one-third or less of the total length of the grass. Lawn should be trimmed in fall as long as there is growth. NOTE: For best results in mowing, keep the cutting height position high until you have determined which cutting height is preferred.
BladeMountingTorque: Center bolt: 450 in.lbs, minimum, 600 in.lbs, maximum. To SharpenBlade: • The blade can be sharpened with a file or on a grinding wheel. Do not attempt to sharpen the blade while it is still on the mower. Loosen this screw • Follow the original angle of grind as a guide. Make sure that each cutting edge receives an equal amount of grinding to prevent an unbalanced blade.
\ ReplacingBatteryPack • • ,_ Remove the battery pack from the handle panel for replacement only. Do not separate the batteries for any reason. Dispose of batteries properly. When replacing battery pack in handle panel, battery pack must be positioned with the positive terminal to the right side and the negative terminal to the left side of the panel. Replacing the battery pack incorrectly will cause serious damage. The positive lead on the wire harness has the smaller connector.
SECTION7: MAINTAININGYOURLAWNMOWER Pivot Points • ,_ WARNING" the Always stopwire the before engine and disconnect spark plug performing any maintenance work or adjustments on your lawn mower. handle must operate freely in both directions. The cutting height adjustment levers should be able to move easily. CleaningtheMower • Lubricate the pivot points on the blade control handle, lower bail hadle, and the cutting height adjustment lever at least once a season with light oil.
Inspect muffler periodically, and replace if necessary. Damaged mufflers or spark arresters can create a fire hazard. Make sure to avoid muffler and surrounding areas while the mower engine is hot because temperature of these areas of the engine may exceed 150°F. NOTE: We do not recommend the use of pressure washers or garden hose to clean your un#. They may cause damage to electric components, spindles, pulleys, bearings or the engine.
SECTION8: TROUBLE-SHOOTING GUIDE Problem Possible Cause Corrective Action Engine fails to start 1. 2. 3. 4. Blade control handle disengaged Spark plug wire disconnected Fuel tank empty, or stale fuel Blocked fuel line 1. 2. 3. 4. Engage blade control handle Connect wire to spark plug Fill up tank with fresh gasoline Clean fuel line 5. 6. Faulty spark plug Engine flooded 5. 6. Clean, adjust gap, or replace Wait a few minutes and start again 1. 2.
SECTION9: PARTSLISTFORMODELE465 2 / 1\ I( \\ 111\ 07 X104 io 103 16 1 11 @ 112 23 / \\ \ 24 _%30 80, 29 57 79 35 34 37 _5 \\ 39 3% 94 56 4g 50 70 64 37 IMPORTANT: For a proper working machine, use Factory Approved Parts. V-BELTS are specially designed to engage and disengage safely. A substitute (non OEM) V-Belt can be dangerous by not disengaging completely.
ModelE465 Ref. No. 1. 2. 3. 4. 5. 6. 7. 8. 9. 10. 11. 12. 13. 14. 15. 16. 17. 18. 23. 24. 25. 26. 27. 28. 29. 30. 31. 32. 33. 34. 35. 36. 37. 38. 39. 40. 41. 42. 43. 44. 46. 47. 48. 49. 50. 51. 52. 53. 54. 55. 56. 57. Part No.
MANUFACTURER'S LIMITED WARRANTY The limited warranty set forth below is given by MTD LLC with respect to new merchandise purchased and used in the United States, its possessions and territories. "MTD" warrants this product against defects in material and workmanship for a period of two (2) years commencing on the date of original purchase and will, at its option, repair or replace, free of charge, any part found to be defective in materials or workmanship.