Operator's Manual SNOW THROWER MODEL 7L3 IMPORTANT: READ SAFETY RULES AND INSTRUCTIONS CAREFULLY Warning: This unit is equipped with an internal combustion engine and should not be used on or near any unimproved forestcovered, brush-covered or grass-covered land unless the engine's exhaust system is equipped with a spark arrester meeting applicable local or state laws (if any). If a spark arrester is used, it should be maintained in effective working order by the operator.
TABLEOFCONTENTS Content Page 3 5 6 7 Important Safe Operation Practices Assembling Your Snow Thrower Know Your Snow Thrower Operating Your Snow Thrower Adjusting Your Snow Thrower 10 Content Maintaining Your Snow Thrower Servicing Your Snow Thrower Trouble Shooting Illustrated Parts List Page 12 12 16 18 Warranty 28 FINDINGMODELNUMBER This Operator's Manual is an important part of your new snow thrower. It will help you assemble, prepare and maintain the unit for best performance.
SECTION1: IMPORTANT SAFEOPERATION PRACTICES Wk_ v{p erosr]:f_v rxw]psru_qwvd_ k]vw_xfJrqv/z klfk_iqrw_r_zhg/frx_ hqgdqjhu_kh shuvrqdo vd_ dqg_us_rsh_ ri {rxuvhcidqg_khuvlUhdg%dqg_r_z _klv_xf_rqv_ _k_ p dqxdoeh_rth dwhp s_j #_rrshud_h_k_ p dfkl_hlIdlxth_rfrp s_ z i_ _khvh%_w_xf_rqv_ d {#_hvx_l_shuvrqdo l_mu{iZkhq_ rx#_hh#k_v{p er_ khhg%_v z du_]qj.
5. Never runanengine indoors orinapoorly ventilated MAINTENANCE ANDSTORAGE area.Engine exhaust contains carbon monoxide, an 1. Never tamper with safety devices. Check their proper odorless anddeadly gas. operation regularly. Refer to the maintenance and 6. Donotoperate machine whileunder theinfluence of adjustment sections of this manual. alcohol ordrugs. 7. Muffler andengine become hotandcancause aburn.Do 2. Before cleaning, repairing, or inspecting machine disengage all controls and stop engine.
SECTION2: ASSEMBLING YOURSNOWTHROWER NOTE: References to right or left side of the snow thrower are determined from behind the un# in the • operating position. The "operator's position" is defined as standing directly behind the snow thrower, facing the handle panel. • • Unpacking • Remove screws from the top sides and ends of the shipping crate. Set panel aside to avoid tire punctures or personal injury. Remove and discard plastic bag that covers unit. Remove any loose parts included with unit (i.e.
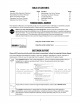
SECTION3: KNOWYOURSNOWTHROWER Drive Control / Auger Control Lock ., Tilt Control Heated Switch Headlig er Control Chute Assembh g Control Electric Primer___J Directional _Button _ia_-er- I_Q Choke_ _ _SoWxtCh Control Sgf_t_YnKey T _ _ Throttl_ Shoe Aug _)))_J_ _Recoil Staanr t_r Control Figure 5 ChuteTilt Control all instructions and warnings on the WARNING: Read, understand, and follow machine and in this manual before operating.
Tochangethedirectioninwhichsnowisthrown,turn chutedirectional controlasfollows: • Crankclockwise todischarge totheleft. • Crankcounterclockwise todischarge totheright. The headlight is on whenever the engine is running. HeatedHandlesSwitch TrackLockLever This switch is located on the right side of the snow thrower dash panel. To activate the heated handles, toggle the switch to the right to generate heat within the handle grips.
• ToStartEngine • • • Attach spark plug wire to spark plug. Make certain the metal loop on end of the spark plug wire (inside the boot) is fastened securely over the metal tip on the spark plug. Make certain the auger and drive controls are in the disengaged (up) position. Move throttle control up to FAST position. Insert ignition key into slot and snap in place. See Figure 5. Do not turn key. NOTE: Engine will not start unless ignition inserted into ignition slot in carburetor cover.
ToEngage Augers Clean-OutTool • The clean-out tool is conveniently fastened to the rear of the auger housing with a mounting clip. Should snow and ice lodge itself in the chute assembly during operation, proceed as follows to safely clean the chute and chute opening: To engage the augers and start throwing snow, squeeze the auger control against the left handle. Release to stop the augers.
Operating Tips • • • NOTE: Allow the engine to warm up for a few minutes. The engine will not develop full power until it reaches operating temperature. and the surrounding areas may exceed WARNING: The temperature of the muffler 150°F. Avoid these areas. • • • For the most efficient snow removal, remove snow immediately after it falls. Discharge the snow downwind whenever possible. Slightly overlap each previous path. Set the skid shoes 1/4" below the shave plate for normal usage.
If adjustment is necessary: • • • • Loosen the jam nut on the drive cable. Adjust the cable as necessary. Refer to Figure 7. Retighten the jam nut to secure the cable when correct adjustment is reached. Reassemble the frame cover. Reconnect the upper shift rod to the lower shift rod by reinserting the hairpin clip removed earlier and sliding the shift rod connector back down into place.
SECTION6: MAINTAININGYOURSNOWTHROWER WARNING: Before lubricating, repairing, or inspecting, disengage all controls and stop engine. Wait until all moving parts have come to a complete stop. Disconnect spark plug wire and ground it against the engine to prevent unintended starting. Always wear safety glasses during operation or while performing any adjustments or repairs. is free of grease in order to relieve pressure. Auger Shaft At least once a season, remove the shear bolts on the auger shaft.
Augers • • • The augers are secured to the spiral shaft with two shear bolts and hex lock nuts. If you hit a hard foreign object or ice jam, the snow thrower is designed so that the bolts may shear. Refer to Figure 13. If the augers will not turn, check to see if the bolts have sheared. Replacement shear bolts and hex lock nuts have been provided with the snow thrower. When replacing bolts, spray an oil lubricant into shaft before inserting new bolts.
• • Support • Auger Support Remove six self-tapping screws from the frame cover underneath the snow thrower. Using a 7/8" wrench to hold the shaft, loosen, but do not completely remove, the hex bolt and bell washer on the left end of gear shaft. See Figure 19. Lightly tap the hex nut to dislodge the ball bearing from the right side of frame before removing the hex nut and bell washer from left end of shaft.
• • • • Remove the four screws from the friction wheel assembly. See Figure 20. Remove the friction wheel rubber from between the friction wheel plates. Reassemble new friction wheel rubber to the friction wheel plates and hub, tightening the four screws in rotation and with equal force. Position the friction wheel assembly up onto the pin of the shift rod assembly, and slide the shaft through the assembly. Reassemble in reverse order.
SECTION8: TROUBLESHOOTING Problem Engine fails to start Cause Remedy 1. Fuel tank empty, or stale fuel. 1. 2. 3. 4. 5. 6. 7. 8. Blocked fuel line. Choke not in the ON position Faulty spark plug. Safety key not in ignition switch on engine. Spark plug wire disconnected. Primer button not being used properly. Fuel shut-off valve closed (if equipped). 2. 3. 4. 5. 6. 7. 8. 1. 2. Unit running on CHOKE. Blocked fuel line or stale fuel. 1. 2. 3. Water or dirt in the fuel system. 3. Loss of power 1.
NOTES 17
SECTION9: PARTSLISTFORMODEL7L3 33_ 80 31 23 13 28 \\ 78 \11 Part of handle panel for reference only 9 2 5\\ 22 11 \19 15 76 J 75 70 74 75 10_ 72 18
Model7L3 Ref. No. 1. 2. 3. 4. 5. 6. 7. 8. 9. 10. 11. 12. 13. 14. 15. 16. 17. 18. 19. 20. 21. 22. 23. 24. 25. 26. 27. 28. 29. 30. 31. 32. 33. 34. 35. 36. 37. 38. 39. 40. 41. 42. Part No.
Model7L3 3 2 11 .15 14 \ 12 22 36 41 37 39 42 2O
Model7L3 Ref. No. 1. 2. 3. 4. 5. 6. 7. 8. 11. 12. 13. 14. 15. 16. 21. 22. Part No. 712-0116 756-0178 784-5632B 710-0459A 738-0281 736-0174 732-0611 712-3068 05931A 741-0309 710-0451 705-5226 684-04129 712-04063 731-2635 731-2643 Ref. No. Part Description Part No. Lock Jam Nut 3/8-24 Flat Idler 24. 26. 790-00087 710-0726 Auger Idler Arm Hex Cap Screw 3/8-24 x 1.50 Shoulder Screw Wave Washer 27. 28. 29. 30. 725-0157 712-04065 741-0245 784-5580 Extension Spring Hex Nut 5/16-18 33. 34.
Model7L3 26 3 11 10 16 19 16 19 16 \ \\ 12_ 15 \ I I 21 16 13 23\ \ 14 18 25 20 \\\ '24 22 I
Model7L3 Ref. No. 1. 2. 3. 4. 5. 6. 7. 8. 9. 10. 11. 12. 13. 14. 15. 16. 17. 18. 19. 20. 21. 22. 23. 24. 25. 26. 27. Part No. 71o-0896 731-1324 732-071o 71o-0627 71o-3oo5 05896A 748-0234 756-0987 754-0346 756-0986 736-0270 710-0230 756-0313 710-1245B 712-0181 756-0569 710-0602 736-0505 754-0430B 756-0967 736-0247 736-0331 710-0696 748-0360 710-0654A 629-0071 732-0705 Part Description Hex Washer Screw 1/4-14 x.625 Belt Cover Extension Spring Hex Screw 5/16-24 x.75 Hex Cap Screw 3/8-16 x 1.
Model7L3 22 23 25 /,, 19 26 29 .... 27 20 \"-_ 19..........
Model7L3 Ref. No. 1. 2. 3. 4. 5. 6. 7. 8. 9. 10. 11. 12. 13. 14. 15. 16. 17. 18. 19. 20. 21. Part No. 784-5648 710-0896 748-0190 732-0264 712-0711 736-0105 684-0021 746-0898B 656-0012A 784-5689A 713-0413 746-0897 750-0997 711-1042 684-0042C 736-0160 714-0474 741-0563 736-0242 710-0538 710-0875 Ref. No. Part Description 22. 23. 24. 25. 26. 27. 28. 29. 30. 31. 32. 33. 34. 35. 36. 37. 38. 39. 40. 41. Frame Cover AB Screw 1/4-14 x.
Model7L3 44 41 2 56 48 j3 5 10 30 16 20 40 35 23 / 37 27 22 30 31 25 14 18 15 17 26 13
Model7L3 Ref. No. 1. 2. 3. 4. 5. 6. 7. 8. 9. 10. 11. 12. 13. 14. 15. 16. 17. 18. 19. 20. 21. 22. 23. 24. 25. 26. 27. 28. Part No. 720-0223 710-0726 784-5642 710-0157 736-0242 684-0038 710-0459A 712-0214 748-0353A 750-0547 784-5609 684-0009 712-0346 731-1292 736-0272 731-1538A 631-0032 750-0995 738-0140 736-0406 750-0909 712-04063 618-0044 684-0024 710-1231 784-5639 711-0911 713-0233 Ref. No. Part Description 29. 30. 31. 32. 33. 34. 35. 36. 37. 38. 39. 40. 41. 42. 44. 45. 46. 47. 48. 49. 50. 51. 52. 53.
MANUFACTURER'S LIMITED WARRANTY FOR: YaRD.MaN TM ® The limited warranty set forth below is given by MTD LLC with respect to new merchandise purchased and used in the United States, its possessions and territories. "MTD" warrants this product against defects in material and workmanship for a period of two (2) years commencing on the date of original purchase and will, at its option, repair or replace, free of charge, any part found to be defective in materials or workmanship.