
Operator`s manual


9
Recoil Starter
• With engine running, pull starter rope with a rapid,
continuous full arm stroke three or four times.
Pulling the starter rope will produce a loud clattering
sound, which is not harmful to the engine or starter.
• To stop engine, move throttle control to “stop” or
“off” position.
• Remove ignition key (DO NOT turn key) to prevent
unauthorized use of equipment.
NOTE: Do not lose ignition key. Keep it in a safe place.
Engine will not start without ignition key.
• Wipe all snow and moisture from the carburetor
cover in the area of the control levers. Also, move
control levers back and forth several times.
To Engage Track Drive
• With the engine running near top speed, move the
shift lever into one of the six FORWARD positions
or two REVERSE positions. Select a speed
appropriate for the snow conditions that exist.
• Squeeze the auger control and the augers will turn.
Release it and the augers will stop.
• Squeeze the drive control and the snow thrower will
move. Release it and drive motion will stop.
• NEVER move shift lever without releasing drive
control.
To Engage Augers
• To engage the augers and start throwing snow,
squeeze the auger control against the left handle.
Release to stop the augers.
Auger Control Test
IMPORTANT:
Perform the following test before
operating your snow thrower for the first time and at the
start of each winter season.
Check the adjustment of the auger control as follows:
• When the auger control is released and in the
disengaged “up” position, the cable should have
very little slack. It should NOT be tight.
• In a well-ventilated area, start the snow thrower
engine as instructed earlier in this section under the
heading Starting Engine. Make sure the throttle is
set in the FAST position.
• While standing in the operator’s position (behind
the snow thrower), engage the auger.
• Allow the auger to remain engaged for
approximately ten (10) seconds before releasing
the auger control. Repeat this several times.
• With the engine running in the FAST position and
the auger control in the disengaged “up” position,
walk to the front of the machine.
• Confirm that the auger has completely stopped
rotating and shows NO signs of motion.
IMPORTANT:
If the auger shows ANY signs of rotating,
immediately return to the operator’s position and shut
off the engine. Wait for ALL moving parts to stop before
re-adjusting the auger control.
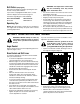
• To readjust the control cable, loosen the hex jam
nut on the auger control cable “Z” fitting.
• Rotate the coupling end of the cable
counterclockwise to provide more slack.
• Retighten the hex jam nut. See Figure 7.
• Repeat Auger Control Test to verify proper
adjustment has been achieved. Repeat the
previous steps to provide more slack in cable, if
necessary.
Figure 7
Clean-Out Tool
The clean-out tool is conveniently fastened to the rear
of the auger housing with a mounting clip. Should snow
and ice lodge itself in the chute assembly during
operation, proceed as follows to safely clean the chute
and chute opening:
• Release both the Auger Control and the
Drive/
Auger Control Lock.
• Stop the engine by moving the throttle to the stop
position.
• Remove the clean-out tool from the mounting clip.
• Use the shovel-shaped end of the clean-out tool to
dislodge and scoop any snow and ice which has
formed in and near the chute assembly.
WARNING: Never use your hands to clean
snow and ice from the chute or auger
housing. Use the clean-out tool or a stick to
unclog.
• Refasten the clean-out tool to the mounting clip on
the rear of the auger housing, and restart the
engine.
• While standing in the operator’s position (behind
the snow thrower), engage the auger control for a
few seconds to clear any remaining snow and ice
from the chute assembly.
Auger
Control
Z-End
Jam Nut
Auger
Control Cable