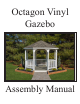
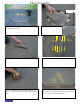
Octagon Vinyl Gazebo Assembly Manual
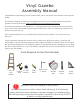
Vinyl Gazebo Assembly Manual Congratulations on purchasing your new Gazebo. Thank you for your purchase and welcome to the YardCraft Family. This manual is designed to simplify the assembly process, however we recommend having an experience carpenter involved in the project. Please read through the entire manual before starting! The Gazebo put together for this manual was a 12’ Octagon Gazebo. This manual can also be used for other sizes. It took 2 men, approximately 8 hours using the tools shown.
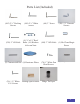
Parts List (Included) (465) 2 1/2” Decking Screws (100) 2 1/2” White screws (520) 2’’ 6D Nails (8) 3/8”x6 1/4” Roof Bolts. (16) Washers & Acorn Nuts (1) Concrete drill bit (8) Hurricane Plates (30) 1 5/8” White S. S.
Parts List (8) Double 2x4 Floor Joist (8) Floor Band Board (8 of each size) Diagonal Floor Joist (2) Floor Joist Connection Plate (8 of each size) Decking (8) Floor Trim (8) Posts (8) Brace Section (7) T Rails, (77) Spindles, (7) Bottom Rail (8) Double 2x4 Rafter (8 of each size) Tongue & Groove Boards (8) Roof Band Board (1) Compression Ring (8) RoofTrim (8) Tar Paper 4
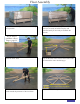
Floor Assembly Floor Joist Set your Gazebo Package as close to the building site as possible. Remove protective shrink wrap. Do not unwrap until you are ready to build. Keep dry and protected until you are ready to assemble the Gazebo. If you did not Rafter purchase a floor, skip to page 12. Notched End Locate the Floor Joists. Lay out the Floor Joists. Ensure the notched ends are towards the center and facing up. Notice the angle cut. Place the Long Point towards the outside.
Floor Assembly Align the short point of the 2x4 Band Board with the long point of the Joist and fasten Band Board to Joist using two (2) 3’’ Brown Screws through pre-drilled holes. Align long point of adjacent 2x4 Band Board and attach to Joist using 3’’ Screws through pre-drilled holes. Install remaining Band Boards using previous steps. Locate the Connection Plates and place the Connection Plate into the notched Joists as shown. The four holes in the center will not be used with this configuration.
Floor Assembly 45° 45° 22.5° 45° 22.5° Locate the Diagonal Floor Joists. 22.5° Place the 45° angle against the Double Joist and the 22.5° against the Band board Pre-drilled Holes in Band Board Place all Single Joists into place as shown. Align the center of the 2x4 Single Joists with the pre-drilled holes in the 2x4 Band Board. Fasten using two (2) 3’’ Screws through pre-drilled holes. Fasten the 45° angled end to the Double 2x4 Joist Using two (2) 3’’ Screws.
Floor Assembly Longest Floor Board Locate the longest Floor Boards. Place each of the long Floor Boards around the perimeter of the floor. Alignment Align Floor Board at center of Double Joist. Make sure the overhang is consistent along the entire outside edge. Fasten Floor Board to Joist using two (2) 2 1/2” Decking Screws through pre-drilled holes. Continue around the outside of the floor and attach all remaining long Floor Boards.
Floor Assembly Pre-drill one 3/16” hole directly above each Diagonal Floor Joist and one hole in the center into Band Board. Then fasten using one (1) 2 1/2” Decking Screw at each pre-drilled location. Pre-drill each deck board and attach to joists below, as shown in previous step. Second Floor Board Locate the second longest Floor Boards. Lay out all the second longest Floor Boards before attaching any of them. Ensure angled ends are Tight together. There will be a small gap between each row.
Floor Assembly Center Deck Boards Continue to install the remaining Deck Boards, as shown in previous steps. Locate the Center Deck Boards. Screw Locations Place Center Deck Boards as shown. Space Deck Boards equally. Fasten Center Deck Boards to Joist using twelve (12) 2 1/2” Decking Screws through all pre-drilled holes. Using a 3/16” Drill Bit, drill through the decking into the single joist and fasten using 2 1/2” Deck Screws. One (1) Screw in each Deck Board.
Floor Assembly Band Board Vinyl Floor Trim Locate the Vinyl Floor Trim. Place the Vinyl Floor Trim Under the Deck Boards and flush with the corner of the 2x4 Band Board. Fasten the Vinyl Floor Trim to the 2x4 Band Board using 1 5/8” White Screws through pre-drilled holes. Fasten at three (3) locations. Align adjacent Vinyl Floor Trim and fasten, as shown in previous steps. Install all remaining Vinyl Floor Trim.
Post and Rail Assembly Long point facing inside of gazeobo Railing Inserts Locate the Door Post. (Door Post has two Railing Inserts only) (Ensure the long point is facing up and towards the inside of the gazebo) Locate the Bottom Rail Pieces Slide Bottom Rail onto the Railing Insert, making sure the Spindle holes are facing up. Use the provided Spacer Block to hold the other end. (Note: make sure the Bottom Rail is tight against the Post.
Post and Rail Assembly Place the Spindles into the Bottom Rail. Working your way across place the Spindles into the holes of the T Rail. Fasten T Rail to Railing Inserts on the inside and outside using one (1) 1’’ Pan Head Screw through pre-drilled holes. Locate a Standard Post with Four Railing Inserts Slide top and bottom Railing pieces onto Railing Inserts as Shown. Push Railing sections tight against post and attach using one (1) 1’’ Pan Head Screw through pre-drilled hole, as shown.
Post and Rail Assembly Install all remaining Railing Sections, as shown in previous steps. Your gazebo should look the same as the above assembly with railings installed. Locate the Brace Sections. Place the Grooved Slot over vinyl sleeve. Brace Section Post Ensure Brace Section is tight against the Post. 14 Center Brace Section On Post and Fasten using 2 1/2” White Screws Through all Pre-drilled Holes.
Post and Rail Assembly Install remaining Brace Sections, as shown in previous steps. Your gazebo should look the same as the above assembly with Brace Sections installed. Measure the opening at the top of the doorway. Now measure the bottom of the doorway and adjust the Post to make the same dimension as the top. Floor Splice Center Post on floor splice. Space each post an equal distance from the edge of the Floor.
Post and Rail Assembly After all Posts and the Doorway are equally spaced and aligned, Fasten all the Posts to Floor at each corner using four (4) 2 1/2”White Screws. If You did not purchase a floor with your gazebo, follow the next 2 steps to fasten the post. Center Mark Make a mark at the Center of where you want the gazebo. Measure Equal distance from the Center Mark to each Post. 16 If Attaching to concrete, use 1 3/4” Concrete Screws. If attaching to Wood Deck, use 2 1/2” White Screws.
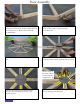
Roof Assembly 2x4 Double Rafter Prepare Roof Bolts by putting one (1) Acorn Nut and one (1) Washer on one end of the Roof Bolts as shown. Do not tighten Nut. Locate the Double 2x4 Rafters. Align these two holes Place the Double 2x4 Rafter into the slot at the top of the Post and align the hole in the Rafter to the holes in the Brace Section. Place the Roof Bolt through the predrilled holes in the Brace Section. Nut Washer Put a Washer and Acorn Nut on the opposite end and hand tighten.
Roof Assembly Locate the Compression Ring. Lift Compression Ring into place and pull rafters down against the lip. Attach Rafters to Compression Ring from the bottom up using two (2) 3’’ Screws per Rafter. Install another Rafter as Shown in previous steps. Continue to install the next Rafter opposite the third Rafter. Continue to install all remaining Rafters, as shown in previous steps. Ensure all Rafters are fastened to the Compression Ring. Two (2) 3” Screws into each Rafter.
Roof Assembly Roof Band Board Locate the Roof Band Board. Place edge of Roof Band Board in center of the Rafter. Fasten the Roof Band Board to the Rafter using two (2) 3’’ Screws through pre-drilled holes. If the Roof Band Board is Short on the opposite side push up on the 2x4 Double Rafter as shown on next step. Push up on the Double Rafters in the center until the Roof Band Board is center of the Rafter and fasten using two (2) 3’’ Screws through pre-drilled holes.
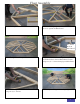
Roof Assembly Align Here Fasten Here Lift next Roof Band Board into place. Align the end with the previously installed Roof Band Board and attach with two (2) 3” screws. Continue by attaching all remaining Roof Band Boards to Rafters. Tighten Roof Bolts at all Post locations, using a 5/8” socket and wrench. 1x6 T&G Board Locate the Tongue & Groove Boards, start with the longest one. 20 Center at both ends Align Here Center Tongue & Groove Board at Rafter Splice, align flush with Band Board.
Roof Sheeting Fasten Tongue & Groove Boards to Rafters at each end using two (2) 2” Nails per End. Align the Tongue & Groove Board to the Band Board and fasten in the center using one (1) 2” Nail. Fasten each board along both ends using (2) 2” Nails Locate the second longest Tongue & Groove Board and place the Tongue into the Groove and fasten at each end using two (2) 2’’ Nails. Work your way towards the peak of the roof, repeating the process shown in previous steps.
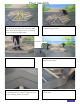
Roof Sheeting Hurricane Plate Locate the Hurricane Plates and bend slightly in the center. Place the Hurricane Plate on top of the Tongue & Groove Boards. Center the Hurricane Plate between the two roof panels and fasten the Hurricane Plate to the Rafters and the Band Board below using twelve (12) 3” 10D Nails. Hurricane Plate Installed. Install all remaining Hurricane Plates at each splice, as shown in previous steps.
Roof Facia Vinyl Fascia Board Locate the Vinyl Facia Board. Align the top of the Facia Board with the top of the Tongue & Groove Boards and flush with the 2x4 Band Board at each end. (3) Screw Locations Fasten Vinyl Facia to 2x4 Band Board at each end using one (1) 1 5/8” White Head Screws through pre-drilled holes. Fasten Vinyl Facia to 2x4 Band Board in the center using one (1) 1 5/8” White Screw. Align Here Align adjacent Vinyl Facia and attach to 2x4 Band Board, using previous steps.
Tar Paper Align at the bottom Locate the Tar Paper. Start by placing the Large piece at the bottom as shown. Overlap Fasten Tar Paper to Tongue & Groove Boards using a Hammer Tacker. Place the Small piece of Tar Paper on top of the Large piece and overlap the Tar Paper by 2 inches. Fasten Tar Paper, as shown in previous steps. Ridge Tar Paper Install all remaining Tar Paper on roof. 24 Locate the Ridge Tar Paper.
Tar Paper Center the Ridge Tar Paper and fasten at the bottom using a Hammer Tacker. Roll Tar Paper up the Ridge and fasten Tar Paper to Ridge approximately every 6 inches. Install remaining Ridge Tar Paper, as shown in previous steps. Tar Paper installed.
Congratulations! Enjoy your new Gazebo! YardCraft.com Info@YardCraft.