Save This Manual for Future Reference Plate Compactors Operator’s Manual MODEL NUMBER YC0850 SERIAL NUMBER PURCHASE DATE Both model number and serial number may be found on the main label (see Page 2, Figure 1a & Figure 1b). You should record both of them in a safe place for future use. FOR YOUR SAFETY READ AND UNDERSTAND THE ENTIRE MANUAL BEFORE OPERATING MACHINE Tame the Great Outdoors TM 29140US25M100.
Your new YARDMAX™ plate compactor offers quality construction, and is easy and safe to operate. With proper use and care, it is designed to give you many years of dependable service.
Plate Compactor » Operator’s Manual MODEL AND SERIAL NUMBERS Carefully read through this entire operator's manual before using your new unit. Pay attention to all cautions and warnings. This unit is a gasoline engine driven plate compactor. It is perfect for creating optimal density for the foundation of any paving project. It is easy and safe to operate. With proper use and care, it should give you many years of dependable service.
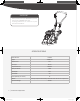
support Have questions about your YARDMAX equipment? Call us at 844-YARDMAX, email us at support@yardmax.com, or contact us via your favorite social media site. Specifications Model Number Engine 79 cc Start Type Recoil Compaction Force 1850 lbs Blows per Minute 5900 Plate Depth 12.5" Plate Width 20" Travel Speed (ft per minute) 75 Operation Weight | YARDMAX Displacement Wheels 3 YC0850 Fold-up transport wheels always attached to the vibrator for anytime use.
Plate Compactor » Operator’s Manual Symbols The rating plate on your machine may show symbols. These represent important information about the product or instructions on its use. Read these instructions carefully. No smoking, sparks, or flames. Wear eye protection. Wear hearing protection. Keep your hands clear from all rotating parts. Wear protective gloves. Do not touch parts that are hot from operation. Serious burns may result. Wear safety footwear. Keep children and bystanders off and away.
PERSONAL SAFETY Do not permit children to operate this machine at any time. Keep children, pets, and other people not using the unit away from the work area. Be alert and shut off unit if anyone enters work area. Keep children under the watchful care of a responsible adult. Do not operate the machine while under the influence of drugs, alcohol, or any medication that could affect your ability to use it properly. Dress properly. Wear heavy long pants, boots, and gloves.
Plate Compactor Loosen the fuel tank cap slowly to relieve any pressure in the tank. » Operator’s Manual When fuel is spilled on yourself or your clothes, wash your skin and change clothes immediately. Never overfill the fuel tank. Fill the tank to no more than 1/2” below the bottom of the filler neck to provide space for expansion as the heat of the engine can cause fuel to expand. Store fuel in containers specifically designed and approved for this purpose.
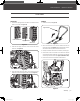
CONTENTS SUPPLIED Your YARDMAX plate compactor comes partially assembled and contains the following: 1 2 3 7 OPTIONAL-SOLD SEPARATELY 4 6 8 HARDWARE KIT 5 9 1. Main Machine M10 × 30 ×2 2. Handle 2 3. Folding Wheels Kit 4. Paving Pad (Optional-sold separately) TOUCH-UP PAINT 5. Clamp Plate (Optional-sold separately) 6. Air Filter 7. Operator’s Manual & Engine Manual Orange X1 Light Gray X1 3 8. Tools for Spark Plug Assembly 9.
Plate Compactor » Operator’s Manual ASSEMBLY This plate compactor was partially assembled at the factory. To assemble your machine follow the below instructions. AIR FILTER HANDLE 1. P ut the filter sponge element and filter core element into the filter cover in order. (See Figure 2a) 1. Unfold the handle. (See Figure 3a) Upper Handle Filter Core Element Filter Sponge Element Filter Cover Figure 3a Figure 2a 2. Slide the two tongue of the filter cover into the slots of the filter seat.
M10 × 70 (×2) 2. Before compacting, fold up the Wheel Kit. (See Figure 4b) 1 2 M5 (×1) Figure 3c M5 ×1 M10 × 70 ×2 1 Wheel Axle Couple FOLDING WHEELS KIT 11 mm 1. Line up the holes in the link plates and engine deck. Secure the wheels using the nuts, washers, and bolts found in hardware packet #2. Do not overtighten the bolts, leave the wheel assembly so that it can be released with ease.
Plate Compactor » Operator’s Manual KNOW YOUR MACHINE FEATURES AND CONTROLS Throttle Control Lever Upper Handle Lower Handle Muffler Oil Drain Hose Fuel Tank Belt Guard Engine ON/OFF Switch Exciter Base Plate Recoil Starter Choke Lever Know Your Machine 29140US25M100.
OIL DRAIN HOSE ENGINE ON/OFF SWITCH Running the engine with dirty oil can cause premature engine wear and failure. Changing oil regularly is extremely important. The flexible oil drain hose is equipped to drain oil into appropriate receptacle. (See Figure 6) The engine switch has two positions. OFF - engine will not start or run. ON - engine will start and run. RECOIL STARTER HANDLE The recoil starter handle is used to pull-start the engine. 1 FUEL SHUT-OFF VALVE The fuel shut – off has two position.
Plate Compactor » Operator’s Manual OPERATION ADD OIL TO ENGINE IMPORTANT: DO NOT OVERFILL! The engine is shipped without oil. Do not start the engine before adding oil. See engine manual for oil capacity, oil recommendation, and location of fill cap. 1. Make sure the compactor is on a flat, level surface. 2. R emove the oil fill cap/dipstick to add oil.
4. P ull the recoil starter until engine compression has become difficult to pull. Let the recoil return to the home position, then pull quickly to start the engine. Repeat steps as needed. Fully open the choke and set the throttle to the FAST position, before operating the unit. Rapid retraction of the starter cord (kickback) will pull your hand and arm toward the engine faster than you can let go. Broken bones, fractures, bruises, or sprains could result.
Plate Compactor » Operator’s Manual MAINTENANCE Maintaining your compactor will insure long life to the machine and its components. heck the condition of the V-belt(s). If any V-belt is cracked, 3. C frayed, or glazed, it should be replaced as soon as convenient. PREVENTIVE MAINTENANCE 4. C heck the V-belt tension by squeezing them in the center. The normal deflection on each side should be 3/8"(9mm) to 1/2"(13mm) with moderate pressure from your thumb or finger. (See Figure 7b) 1.
Engine Mount Bolt (×2) LOOSEN TIGHTEN Engine Connecting Plate 11 mm Jam Nut 13 mm Figure 8c Figure 8a 17 mm 18 mm Exciter Pulley V-Belt Clutch Pulley 30 mm Figure 8d Engine Mount Bolt (×2) 3. T ighten the engine mount bolts. 4. A ttach the belt guard. 11 mm If the engine can't be moved to the back of plate any more, the belt may have to be replaced. REPLACING V-BELT(S) 13 mm 2. R emove the belt guard to access the V-belt. (See Figure 7a) Figure 8b 17 mm 2.
Plate Compactor 7. M ove the engine back by hand until reach the right belt tension, Refer to the Figure 7b to check the belt tension. Then lock the jam nut. » Operator’s Manual 5. R emove pipe plug from top of exciter housing. Tilt housing upside down so oil drains from exciter. Examine oil for metal chips as a precaution to future problems. (See Figure 9b) 8. Fasten the four engine mount bolts. 9. Attach the belt guard.
STORAGE Refer to the Engine Manual for information on storing your engine. At the end of the season (or if the plate compactor will not be used for 30 days or longer), follow the storage instructions below. 1. R un the engine until the fuel lines and carburetor are empty and it stops due to lack of fuel. 2. Allow the engine to cool. 3. Lubricate the machine as instructed. 4. Clean the exterior of the engine and the plate compactor thoroughly. 5.
Plate Compactor » Operator’s Manual LIFTING / TRANSPORTING See technical data for the weight of the machine. To avoid burns or fire hazards, let engine cool before lifting / transporting machine or storing indoors. The unit can be lifted by the handles in front and back of the unit. (See Figure 11) The unit must be transported in the upright position to prevent fuel from spilling. Do not allow the machine to rest on its side or its top.
TROUBLESHOOTING Problem Engine fails to start Cause 1. S park plug wire disconnected 1. Attach spark plug wire securely to spark plug 2. O ut of fuel or stale fuel 2. Fill with clean, fresh gasoline. hrottle control lever not in 3. T correct starting position 3. Move throttle control lever to start position 4. C hoke not in ON Position 4. Throttle must be positioned at choke for a cold start 5. Blocked fuel line 5. Clean the fuel line 6. F ouled spark plug 6.
Plate Compactor » Operator’s Manual PARTS DIAGRAM YC0850 Parts Diagram 29140US25M100.
YC0850 PARTS LIST No. 21 | Description QTY. No. Description QTY.
Plate Compactor » Operator’s Manual Optional Paving Pad Kit - YCP320 No. Description QTY. 1* Paving Pad 1 2* Clamp Plate 1 3* Lock Washer 10 2 4* Bolt M10×30 2 5* Nut M10 2 Parts List 29140US25M100.
yardmax.com Tame the Great Outdoors TM 1850 W Winchester Rd, Suite 106 29140US25M100.indd 23 | Libertyville, IL 60048 | 844-YARDMAX (844-927-3629) | info@yardmax.