
User Manual


Marquee™ P2P Bridge
PRELIMINARY Quick Start Guide
MNL-500267-001 – Rev ED2 3 Aug 2004
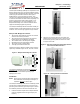
Figure 8 – Installation of the Optional YDI Surge
Protected DC Injector
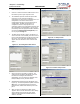
7. Plug the antenna coaxial cable into the N-type
female connector of the unit as shown in Figure 9.
Plug the AC Adapter into an AC outlet and connect
it to the “DC Power” jack on the Cat 5 DC Power
Injector. Perform antenna alignment procedures at
both sites. Proper antenna alignment is crucial for
the correct operation of the Marquee Bridge 49
system and should only be accomplished by
experienced professionals. After that your
installation is complete.
WARNING: The P2P must be operated with a
proper antenna or microwave terminator plugged
into the N-type female jack of the unit. Operating
the unit with nothing connected to the antenna jack
may result in damage to the TX section of the unit
which will not be covered by the factory warranty
and will be a billable repair.
Figure 9 – Connecting the Antenna Coaxial Cable to
the P2P
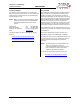
LEDs
The Green LED is steady on when power is applied
(Figure 10).
Figure 10 – Marquee P2P Bridge LEDs
Installing the Management Software
The Windows -based YDI Configurator software can be
installed on a PC or workstation running Windows
98/ME, 2000, NT, or XP. This software has a GUI
(Graphical User Interface), which makes it easy to use.
The program allows you to locally or remotely perform
the following procedures:
• Display a list of units running on the local network
• Display and edit the current configuration of the
units
• Save and load configurations
IMPORTANT: Your Marquee P2P Bridge units must
be on the same subnet as the computer with the YDI
Configurator installed, or have a routable IP address, in
order to access it. If not, you will get a status of Offline
for the unit (see the Status column in Figure 10) even if
the LEDs show activity. To configure the units, change
the IP address of your computer to a 10.1.1.x sub-net.
Once you have access to the unit, you can then assign
a new IP address to it by clicking on the Setup tab and
IP Host button.
Note that the YDI Configurator program is also used to
manage AP-Plus units. Therefore you will see many
grayed out options, features and settings. These only
become available when you are connected to an AP-
Plus, Orinoco AP, or router that has all these features
available.
To install the YDI Configurator in Windows, insert the
YDI CD-ROM included in the Marquee kit into the
appropriate drive of your computer. Using your
Windows Explorer, open the directory \Management
Software\YDI Configurator and run the Set Up
program (YDI Configurator vx.xx.exe). Simply follow the
instructions on the screen which will guide you through
the entire process. After completing the YDI
Configurator installation, you are ready to set up your
system.
NOTE: For detailed information about the YDI
Configurator, please refer to the online help,
available by pressing F1 or clicking Help->
Index from the main screen.
Configuring the Marquee P2P Bridge
The Marquee P2P Bridge is shipped from factory pre-
configured for bridging operation and with the proper
transmit power settings. The two units are set with the
following default IP addresses:
10.1.1.10
and
10.1.1.11
The default read/write password is public.
Some of the parameters that you may need to change
are the following:
• IP addresses
AC Power
RJ-45 Ethernet Connector
To Switch, Router or PC
To
Marquee
Power
Supply
YDI Surge Protected DC
Injector
Ground
Wire
NOTE: The regular DC injector supplied with your kit is connected the same
way but it does not have a ground wire
Green LED)
Plug Antenna Coaxial
Cable Here