
User Manual


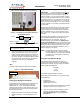


Table Of Contents

Marquee Bridge™ (UNII)
Quick Start Guide PRELIMINARY
2 MNL-500266-001 – Rev ED1
Figure 4a – Latching Bracket to Pole Mount
Figure 4b – Securing the Latches to the Pole Mount
Bracket
3. Ensuring that there is no DC power applied to the
DC Power Injector, plug the round connector of the
outdoor Ethernet cable into the rear jack of the unit
(Fig. 5), making sure the notch is correctly aligned
with the tab on the jack as shown in Figure 6, then
turn the round locking nut clockwise as you push in
until it securely fastens onto the jack.
WARNING: Please verify that the round connector
is properly plugged into the rear jack of the antenna
prior to connecting DC power because it is possible
to push it in the wrong way if enough force is used.
If DC Power is applied while you are attempting to
insert the round connector into the jack, it is
possible that, as you rotate the plug in an effort to
find the key, DC power pins will momentarily touch
the Ethernet pins. If this happens the Ethernet
circuitry on the board will be damaged. Any
harm caused by this action will not
be covered by
the factory warranty and will be a billable repair.
Figure 5 – Connecting the Outdoor Ethernet Cable
Plug Round Connector of the
Outdoor Ethernet Cable Here
Figure 6 – Plugging the Round Connector
4. Attach the other end of the outdoor Ethernet cable
to the Cat 5 DC Power Injector at port RJ-45
labeled “To ANT.”
NOTE: The Cat 5 DC Power Injector is not in a
waterproof enclosure and must be protected
from the weather. It can be permanently
mounted to a surface using the double stick
tape found on the back of it.
5. Connect the Ethernet cable labeled “To PC or
Router” from the Cat 5 DC Power Injector to your
router, switch or hub. If you connect to a computer
or PC, a crossover cable or adapter will be needed.
6. If your unit is placed on a non-metal pole or
structure, install a #6 AWG insulated ground cable
(not provided) to the ground connector in the back
of the radio as shown in Figure 7. Use a self-
threading screw and a flat washer to fasten the
earth lug. This provides safeguard against lightning.
For maximum protection, YDI also recommends the
use of its optional surge protected DC Injector
available from your YDI dealer (part No. 304-
800620-002). This DC Injector has an additional
wire to be connected to ground as shown on Fig. 8.
Jun 2004