
Product Card


9
3. Click the “Adapters” tab, and click “Select Network Adapter”, then “Have Disk”.
4. Insert the provided disk, and specify the path “a:\windownt” then click “OK”.
5. When the program finds the driver, click “OK” at the next window.
3.3.3 Network Environment Setup
1. Click “Start”, “Settings”, “Control Panel”.
2. Double click the “Network” icon.
3. Click on “WL2400 (IEEE 802.11)”, “Properties”.
4. Click on “Operating Mode”.
5. Select “Instawave”, and set the channel number to the one used by other wireless stations or Access
Points that you want to communicate with.
3.3.4 TCP/IP Protocol Setup
If you wish to use another protocol such as IPX/SPX, then skip this section.
Installing TCP/IP
1. Click “Start”, “Settings”, “Control Panel”.
2. Double click the “Network” icon.
3. You should see the line “TCP/IP -> WL2400 (IEEE 802.11)”.
4. If not, then click “Add…”, “Protocol”, “Microsoft”, “TCP/IP”, “Ok”.
Manual TCP/IP configuration:
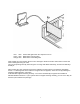
If you have an access point that is attached to a LAN, which has a DHCP (Dynamic Host Configuration
Protocol) server then you don’t have to do anything. Windows will automatically request configuration
information from that server, such as an IP address, DNS server settings. The access point will forward
DHCP messages and any broadcast messages.
If you don’t have a DHCP server, then you have to assign the configuration manually.
There are IP addresses that are reserved for private LAN use. No one in the Internet uses these
addresses. They begin with 192.168.0.1 and end with 192.168.254.254. We will use them here.
If you have a gateway to the Internet, such as a stand-alone router, or a computer with a proxy server or
modem sharing software, then you will need the gateway address of that computer. If you don’t have a
gateway, then skip steps 5, 6 and 7.
To specify the configuration manually, do the following:
1. From Control Panel, Network, click on "TCP/IP -> WL2400 (IEEE802.11)", “Properties”.
2. Click on “IP Address”, “Specify IP Address”.