
User Manual


4
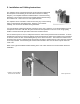
5. Installation and Cabling Instructions
The amplifier can be mast mounted using the steel U-bolt included with
the unit (Refer to the drawing at the end of the manual for a cabling
diagram). The amplifier should be installed with the connectors facing
downward. Use an open-end wrench to carefully tighten the bolts using
the included nuts. Take care not to over-tighten the bolts.
The amplifier can be mounted to a flat surface using any of the mounting
holes on the brackets mounting flanges. However, for maximum
reliability, the connectors should be facing downward.
It is very important to waterproof the RF connectors on the amp. However, it is recommended that you do
not tape the connectors until after all system tests have been performed. Be sure to use a high quality
weather resistant electrical tape and/or other water sealant method.
The DC Power Injector is not in a waterproof enclosure and must be protected from the weather. It can be
permanently mounted to a surface by putting screws through the two holes on the bottom of the enclosures.
To do this, remove the four screws holding the top cover on the enclosure. Then mount the bottom of the
enclosure using screws or bolts through the two holes in bottom. Replace the top cover when the enclosure
is securely mounted. Avoid touching the circuit board mounted to the cover of the DC injector when the
cover is off.
Refer to the Typical Installation Details drawing at the end of this manual for more information about the
installation.
Amplifier in typical installation.
Shown with the YDI Model Y2414 Yagi Antenna.