NeoGate TG Series Installation Guide NeoGate TG Series Installation Guide Version: V1.1 Yeastar Technology Co., Ltd. Date: Sept. 2, 2014 http://www.yeastar.
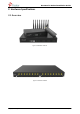
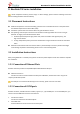
NeoGate TG Series Installation Guide Contents 1. Preparation before Installation.................................................... 4 2. Hardware Specifications ........................................................... 6 2.1 Overview ............................................................................................................................................................. 6 2.2 LED Indicators and Ports .....................................................................................
NeoGate TG Series Installation Guide About NeoGate TG Series VoIP GSM Gateway NeoGate TG Series is a series of VoIP GSM gateway connecting GSM Network to VoIP Network directly, which can support two-way communication: GSM to VoIP or VoIP to GSM. It is the best solution ever to connect IP-based telephone systems, softswitches, and IP-PBXs to GSM network; and also the best fallback solution when landline goes down.
NeoGate TG Series Installation Guide 1. Preparation before Installation Please make sure the following devices are available before installation: Contents of the box Upon receiving NeoGate gift box, please open the package and check if all the items are supplied as NeoGate TG100 Packing List (See Sheet 1), NeoGate TG200 Packing List (See Sheet 2), NeoGate TG400 Packing List (See Sheet 3), NeoGate TG800 Packing List (See Sheet 4), and NeoGate TG1600 Packing List (See Sheet 5).
NeoGate TG Series Installation Guide Antenna PC 8 Mounting ear PC 2 Screws PC 8 Grounding stud and nut Pair 1 Rubber feet PC 4 8 screws (φ3.
NeoGate TG Series Installation Guide 2. Hardware Specifications 2.1 Overview Figure 2-1 NeoGate TG Series Figure 2-2 NeoGate TG1600 http://www.yeastar.
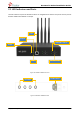
NeoGate TG Series Installation Guide 2.2 LED Indicators and Ports The LED indicators and ports of NeoGate TG Series are straightforward. Take the front panel and rear panel of NeoGate TG400 and TG1600 as an example. LAN POWER GSM PORT STATUS RESET RUN SIM CARD SLOT Figure 2-3 NeoGate TG400 Front Panel ANTENNA POWER INLET Figure 2-4 NeoGate TG400 Rear Panel http://www.yeastar.
NeoGate TG Series Installation Guide ANTENNA SIM CARD SLOT GSM PORT STATUS Figure 2-5 NeoGate TG1600 Front Panel LAN POWER POWER INLET RESET PROTECTIV E EARTH POWER SWITCH RUN CONSOLE Figure 2-6 NeoGate TG1600 Rear Panel LED Power Indication Power status RUN NeoGate status 1-16 GSM port status http://www.yeastar.com Status Description On The power is switched on. Off The power is switched off. Blinking NeoGate is running properly. Not Blinking/Off NeoGate goes wrong.
NeoGate TG Series Installation Guide Ports Antenna ports Ethernet ports Description For the connection of GSM Antennas. NeoGate TG Series provides 1 10/100 adaptive RJ45 Ethernet ports, marked as LAN. -LAN port: LAN port is for the connection to Local Area Network (LAN). Press the reset button to restore the factory defaults. Please make sure that you want to reset, because once reset the previous configurations would be erased automatically. For the connection of a power adapter.
NeoGate TG Series Installation Guide 3. NeoGate TG Series Installation To avoid unexpected accident, personal injury or device damage, please read the following instructions before installing NeoGate TG Series Gateway. 3.1 Placement Instructions Ambient Temperature: to avoid overheating, please do not run NeoGate TG Series in the place where the ambient temperature is above 104°F (40°C). Ventilation: please make sure that the device has good ventilation around.
NeoGate TG Series Installation Guide 3.2.3 Power Connection Once users have made sure that device installation, cable connection and power type are correct, please switch on the power. Then NeoGate will start booting. In the meantime, users would see that the “POWER” and “RUN” indicator lights turn on. Please switch off the power before plugging or unplugging the cables. 3.2.
NeoGate TG Series Installation Guide 4. NeoGate TG Series Basic Configurations 4.1 Factory Defaults NeoGate TG Series provides web-based configuration interface for administrator and account user. The user can manage the device by logging in the Web interface. The factory default IP address: LAN: 192.168.5.150; Access path: http://[IP address] User Name: admin; Password: password Default SIP UDP port: 5060 4.
NeoGate TG Series Installation Guide Figure 4-2 NeoGate Admin Configuration Interface Via the configuration interface, the admin can make all the system configurations, including network settings (LAN, Firewall, VPN, DDNS, VLAN, etc.); system parameters configuration (time zone, password, etc.); internal settings (Web access port, etc.); route lists; module lists; call logs (search, download); firmware update and reset, etc.
NeoGate TG Series Installation Guide VoIP trunking, and Mobile to IP or IP to Mobile routes. Please refer to Administrator’s Guide for details. 4.5 Reset to Factory Defaults If you forget the new IP address or the password of admin, or in other cases that you would like to restore the factory defaults, please reset the device following the below instructions: Please press the “RESET” button located in the back panel with a paper clip or a pencil tip.