Electric Exmoor & Dartmoor Installation and User Instructions For use in Great Britain and the Republic of Ireland. This product is suitable for use in the stated countries. To install the product in other countries it is essential to obtain translated instructions and in some cases the product may require modification. Contact Yeoman Stoves to obtain further information. IMPORTANT For use with 230v 50Hz electricity supply only.
CONTENTS Covering the following models: Exmoor - Small YM-E9001FLA Dartmoor - Single Door YM-E5201FLA - Double Door USER INSTRUCTIONS 3 1. Important Information & Health and Safety 3 2. Operating Instructions 4 3. Maintenance 5 4. Removing & Replacing Doors 6 INSTALLATION INSTRUCTIONS 7 Technical Specifications 7 Site Requirements 7 YM-E5202FLA DIMENSIONS FOR FIRE & OPENING Exmoor 6 Dartmoor 6 1. Fitting Stoves 8 2. Fault Finding 8 3.
USER INSTRUCTIONS How to Use these Instructions 1.10 This appliance must stand on a clean, level, firm surface. Do not stand the fire on a carpet. Ensure that furniture, curtains etc. are positioned no closer than 1m and the fire stands on a surface that can withstand temperatures of 90°C for prolonged periods. Do not allow rugs to be placed within 500mm of the front of the stove. The contents of Sections 1, 2 and 3 apply to all the models in our Electric Range.
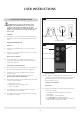
USER INSTRUCTIONS 1 2. Operating instructions WARNING! Do not operate the appliance if it is damaged or has malfunctioned. If you suspect the appliance is damaged or has malfunctioned call a qualified service engineer to inspect the appliance, and replace any part of the electrical system if necessary, before reuse. GENERAL 2.1 The appliance can be operated by the infrared handset or the manual controls on the bottom right hand side of the stove.
USER INSTRUCTIONS 1 2 3 4 Maximum Medium Minimum Maximum plus blue & green flame effects 3. maintenance 3.1 ALWAYS UNPLUG FROM MAINS SUPPLY BEFORE CLEANING OR UNDERTAKING ANY MAINTENANCE CLEANING Turning On the Heat: 2.13 When turning on the heater you must always press the 1kW button. Do not start the fire using the 2kW setting. 3.2 Only clean the outer casing when it is cold. Do not use abrasive cleaners. 2.14 It is NOT advisable to run the heater without the flame effects switched on. 3.
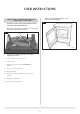
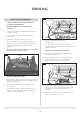
USER INSTRUCTIONS Take care not to damage the plastic screen when replacing the fuel bed. 4. REMOVING & REPLACING DOORS & removal of fuel bed 4 WARNING: DOOR CASTINGS ARE EXTREMELY HEAVY SEEK ASSISTANCE BEFORE REMOVAL. Please note: The fuel bed is secured by 2 x screws on the lower panel on the front of the stove. 3 Screws Fuel bed AR2165 AR2391 Take care not to damage the plastic screen when replacing the fuel bed. 4.1 Turn the right rose on the door facia. 4.2 Open the door. 4.
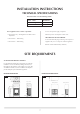
INSTALLATION INSTRUCTIONS TECHNICAL SPECIFICATIONS These instructions cover the following models: Exmoor - Small YM-E9001FLA Dartmoor - Single Door YM-E5201FLA - Double Door YM-E5202FLA These appliances have 3 modes of operation: A 230v 13amp 50Hz supply is required —Flame effect only - with brightness and flame colour Maximum power consumption is 2064 watts adjustment THIS APPLIANCE MUST BE EARTHED —Flame effect + 1kW heating A 1.
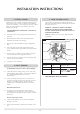
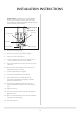
INSTALLATION INSTRUCTIONS 3. HOW TO WIRE a plug 1. FITTING STOVES Most stoves are heavy and do not require anchoring to the hearth or floor, but in certain circumstances the appliance can become unstable e.g. when leaning on the stove. If this is likely, secure the appliance to the hearth or floor with suitably strong fixings. If you need to change the plug supplied with this fire, follow the instructions below. The instructions assume that the wire has been cut.
INSTALLATION INSTRUCTIONS EUROPEAN PLUG - Suitable for use in Austria, Belgium, Bulgaria, Czech Republic, Denmark, Estonia, Finland, France, Greece, Hungary, Germany, Italy, Latvia, Lithuania, Luxembourg, Netherlands, Poland, Portugal, Romania, Slovakia, Slovenia, Spain & Sweden 4 Typical European Plug Type 15/16/17 Neutral wire Live wire Earth wire Outer Insulation Cable grip 3.1 Dispose of the old plug safely. 3.2 Ensure the new plug is not cracked or chipped. 3.
SERVICING 6 SERVICING REQUIREMENTS Push fasteners Front LED board THIS APPLIANCE MUST ONLY BE SERVICED BY A SUITABLY QUALIFIED PERSON. BEFORE UNDERTAKING ANY WORK ON THE APPLIANCE: 1.1 Switch off the appliance and isolate it from the mains by unplugging the unit. 1.2 Wait for at least 10 minutes until the appliance has cooled down. Plugs AR2393 1.3 Following the appropriate instructions from User Instructions, Section 4, remove the door and glass front. 1.
SERVICING REPLACING THE MOTOR & EFFECTS UNIT REPLACING THE MIDDLE LED BOARD The middle LED board is attached to the motor unit but can be replaced individually (see Diagram 9). 8 Motor unit Rear LED board 9 Plug AR2394 Middle LED board 1.14 The motor & effects unit is attached by 4 x screws located at the rear of the appliance. It may be necessary to move the appliance from its location to gain access to the rear of the stove. Remove the 4 screws on the lower rear casing. AR2395 1.
SERVICING 1.31 Tilt the heater casing forward and carefully remove the heater assembly (see Diagram 12). REPLACING THE HEATER ASSEMBLY 1.28 To access the heater assembly remove any loose top plates or panels before moving the stove and carefully lay the stove on its back. 12 1.29 Remove the 5 x screws securing the heater casing to the bottom of the firebox (see Diagram 10). 10 Screws AR2398 1.
Spare Parts List Parts Description Part No.
A division of Stovax Ltd Falcon Road, Sowton Industrial Estate, Exeter, Devon, England EX2 7LF Tel: (01392) 474500 Fax: (01392) 219932 E-mail: yeoman@stovax.com www.yeoman-stoves.co.