
User's Manual


Do not transmit with high output power for extended periods; the
transceiver may overheat.
Do not operate the transceiver when vehicle engine is stopped. The
vehicle engine may not be started due to low battery.
Do not use incompatible accessories from other manufactures. It
could result in damage and or malfunction to the accessory and or to
the radio.
PREPARATION
Various electronic equipment in your vehicle may malfunction if they are not
properly protected form the radio frequency energy which is present while
transmitting. Typical examples include electronic fuel injection, anti-skid
braking and cruise control. If your vehicle contains such equipment, consult the
dealer for the make of vehicle and enlist his/her aid in determining if they will
perform normally while transmitting
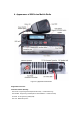
Power Cable Connection
The transceiver operates in 12V negative ground system only! Check the
battery polarity and voltage of vehicle before installing the transceiver.
1. Check for an existing hole, conveniently located in the firewall, where the power cable
can be passed through.
• If no hole exists, use a circle cutter to drill a hole, then install a rubber grommet
2. Run the power cable though the firewall and into the engine compartment.
3. Connect the red lead to the (+) battery terminal and the black lead to the negative (-)
battery terminal
•Place the fuse as close to the battery as possible
4. Coil the surplus cable and secure it with a retaining band.
• Be sure to leave enough slack in the cables so the transceiver can be removed for
servicing while keeping the power applied.