User Manual Page 1 of 18
Precaution and Notice .......................................................................................................................3 A. Basic Operation............................................................................................................................4 1. Understanding Product Components.....................................................................................4 1.1 Front components...................................................................................
Federal Communications Commission (FCC) Statement You are cautioned that changes or modifications not expressly approved by the part responsible for compliance could void the use’s authority to operate the equipment FCC- Class B This equipment has been tested and found to comply with the limits for a Class B digital device, pursuant to part 15 of the FCC Rules. These limits are designed to provide reasonable protection against harmful interference in a communications.
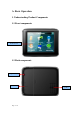
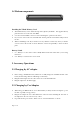
A. Basic Operation 1. Understanding Product Components 1.1 Front components Touch Screen 1.
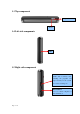
1.3 Top components Charge Indication Power 1.4 Left-side components MIC 1.5 Right-side components T-flash Card Slot Inbuilt with a memory card, including the programs and maps necessary for the system, do not remove during use. Mini-USB Port Use it to connect computer for data transmission.
1.6 Bottom components Installing the T-flash Memory Card ¾ ¾ ¾ ¾ The T-flash memory card contains the map data required by the PND. It is supplied already placed into the slot on the side of the PND. Once the card is installed, it can not be removed during the operation of the device. If you need to remove the card, switch the unit off first, push the card in and it will eject from the slot.
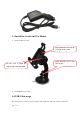
2.3 Install the Cradle and Car Mount ¾ Install car Mount System Step2: Install the holder into the Car cradle by the sockets l k l Use the screw to adjust the angle and direction of the PND ¾ Step1: Push the screw to lock onto car glass Install PND into the holder 2.4 USB Cable usage The USB cable is provided for system upgrades.
Microsoft Active Sync® or as a mass storage media. You can select the mode in the “System-Sys Info-USB” menu. For upgrade and more information about Microsoft Active Sync, please visit Microsoft web. 3. GPS Initial Start Up First start up should be in an open location without obstructions. Hold still while getting up to 4 GPS satellite signals. Then you can program your trip.
Main Interface 1. Navigation Tap the “Navigation” icon to enter the navigation function interfaces. Refer to the Navigation software and Map usage from the user manual. 2. Music 1. Tap ”Music” icon on the main interface to enter the music playback function as the interface of document list: 2.
Repeat Random File shift Tap the REPEAT icon to repeat the selected file. Tap the RANDOM icon to randomly play the files loaded on the card. Tap” Next” to play the next file and Tap “Previous” to play the previous piece of music. Tap the “X” to return the of file list interface. 3. Photo 1. Tap the “photo” icon on the main interface to enter the picture browse function as the interface of document list: 2.
Previous Next File shift Full Screen Document Name 3. 4. 5. Tap “Previous” button to display the previous picture, tap “Next” button to display the next picture.
6. Tap the “X” to return the of image list interface. 4. E Book 1. Tap the “E-book” icon on the main interface to enter the electronic book function as the interface of document list: 2. Tap on the document with the touch pen to enter the following interface: Document shift Document Name Page select Current Page/ Total Page 3. 4. Tap “Previous Page” button to turn to the previous page and tap “Next Page” to turn to the next page.
5. Tap the “X” to return the of E Book list interface. 5. Video 1. Tap “Video” icon on the main interface to enter the Video playback function as the interface of document list: 2.
Full Screen File shift Progress 3. Tap “Full Screen” button to play the movie in full screen. 4. During play in full screen, double tap the screen to return to the interface above. 6. System 1.
2. Tap the “Volume” button to enter the interface of sound setting as follows: 3. Tap the “Power” button to enter the interface of power setting as follow: 4.
5. Tap the “Date & Time” button to enter the setting interface to adjust the date & time as follows: 6.
7. Tap the “System Information” button to enter the System Info settings as follows: ¾ Tap the “USB” to set the USB working mode. ¾ You can calibrate the touch screen if it is not responding accurately to your stylus taps. 1. Tap the Calibration button on the System info. Screen. 2. Tap to the calibration indicated on the screen.
3. Tap and hold at the center of the target. 4. When the target moves to another position, tap and hold at the center of the new target. 5. Repeat each time to complete the calibration process. When completed, tap screen to return to the Settings screen. This document is for guidance only and does not form part of any contract, and may be subject to change without notice.