VIDEO DOORBELL User Manual Please read the user manual before use
CONTENTS 1. Product Description ..……………………… 1-2 2. Paired with Door Chime ....................……. 3 3. Download APP and Connect ..………….... 4-6 4. Setting ...............………………………….... 7 5. Share Device ………………………………. 7 6. Remove Device ……………………………. 8 7. More Services ……………………………... 9 8. Product Installation....……………………... 9-10 9. Functions …………....……………………... 11 10. FAQ ..……………………………………...
1 . Product Description USB Port Light Sensor Waterproof Cover Reset MIC Camera PIR Sensor TF Card Slot Doorbell Button (Power On&Off: Long press 5s) Indicator Light Speaker Anti-theft Hole (camera can be locked by a screw) External Power Port (AC&DC12-24V/1A) Technical Parameters APP TuyaSmart Power Supply 2*18650 5200mAh Battery (charge 4-8h for first use, charge adapter: 5V/2A>2A.
Sensor type 1/3” CMOS Pixel 2-mega pixel Min llluminance Min Color 0.01Lux@F1.2 Color 0.01Lux@F1.2 Black and White 0.001Lux@F1.2 Viewing Angle 170° Shutter 1/25~1/100,000 per second IR 4pcs 5mm 850nm LED Video Compression Standard Compression Output Bit Rate H.264/H.265 32Kbps~2Mbps Maximum Image Resolution 1920×1080 Frame Rate 1~25 per second Audio Full duplex audio Storage TF Card (Max.
2. Paired with Door Chime Volume Previous music Next music Set Video doorbell is turned on before pairing with the door chime: Video doorbell can be used with door chime (products already have been paired in factory.) If you need to replace the video doorbell, increase or decrease the doorbell quantity, please follow steps below: 1. Learning code pairing Press and hold “Set” button for about 3 seconds, the door chime will ring (Bird voice), press the video doorbell 2 times within 30 seconds.
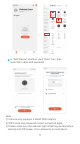
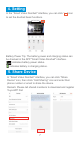
3. Download APP and Connect TuyaSmart is available for both IOS and Android. Search the name “TuyaSmart” in APP Store or scan the QR-code to download the APP. Support Download APP(IOS&Android) Set Up Router This device only supports 2.4GHZ wifi router, does not support 5GHZ router, please set the relevant parameters of the router before WIFI configuration. WIFI password is not allowed to include special characters such as ~!@#$%^&*() etc.
ðİ Ôøð 2 In "Add Device" interface, click "Next" icon, then enter WIFI name and password. Note: 1) Camera only supports 2.4GHZ WIFI network. 2) WIFI name and password mustn’t exceed 24 digits. 3) Please make sure the indicator light is flashing quickly before entering into WIFI page. If not, please try to reset device.
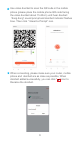
3 Use video doorbell to scan the QR code in the mobile phone (please place the mobile phone QR code facing the video doorbell about 15-20cm) until hear doorbell “dong dong” sound prompt and doorbell indicator flashes blue. Then click “I Heard a Prompt” icon. I Heard Heard a Prompt Prompt 4 When connecting, please make sure your router, mobile phone and doorbell are as close as possible. When doorbell added successfully, you can click " " icon to Rename the doorbell.
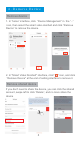
4. Setting In the "Smart Video Doorbell" interface, you can click " to set the doorbell basic functions. " icon Smart Video Doorbell Battery Power Tip: The battery power and charging status can be checked in the APP "Smart Video Doorbell" interface. indicates battery power status. indicates battery in charging status. 5. Share Device In "Smart Video Doorbell" interface, you can click "Share Device" icon, then chick "Add Sharing" icon and enter their phone number or email to share the device.
6. Remove Device Remove device 1. In “home” interface, click “Device Management” in the “...” icon, then select the smart video doorbell and click “Remove Device” to remove the device. My home 2. In "Smart Video Doorbell" interface, click" " icon, and click “Remove Device" at the end of setting interface to remove it. Remove shared device If you don't need to share the device, you can click the shared account, swipe left to click “Delete”, and no more share the device.
7. More Services If you want to experience more services, you can click “Me” icon, then click “Third-Party Voice Services”>>“More>” (like Alexa, Google Assistant etc. voice service) or “Featured” (like Cloud Storage, Message Notification etc. service), but it may have charge for the service. Please check the app tips for specific fees. PSHHC 8.
2 Fix the doorbell back plate to the wall (make sure smooth & dust-free surface), and press about 30 seconds to fix it. 3 Fix the doorbell to the back plate, then fix with anti-theft screw. 2. Screw installation: 1 Use the doorbell back plate to locate the hole, drill the hole and fix the screw rubber plug to the hole. 2 Fix the doorbell back plate with screws to the rubber plug. 3 Fix the doorbell to the back plate with anti-theft screw.
9. Functions Two Way Audio When the visitor push the doorbell button, you will get a call notification. You can see and hear the visitor if get through the call in your APP. PIR Motion Detection Call notification will be sent to your phone APP when movement is detected. Share Device The doorbell can be shared with families and friends and they can also preview online. Record Record every moment using SD card storage or cloud storage.
Q: When does the doorbell need to be reset? And how to reset? A: It needs to be reset when the doorbell couldn’t work well normally or can’t be connected to the phone. You can use the screwdriver or other tooling to press the Reset hole for about 10 seconds to reset. Q: How to do if repeated adding failed? A: After adding failed for first time, please reset the doorbell or power off, then try to add again. And it only supports 2.4GHZ WIFI router, please make sure you are using a 2.
This device complies with part 15 of the FCC Rules. Operation is subject to the following two conditions: (1) this device may not cause harmful interference, and (2) this device must accept any interference received, including interference that may cause undesired operation. Any changes or modifications not expressly approved by the party responsible for compliance could void the user's authority to operate the equipment.