User’s Manual Daqstation DX1000/DX1000N/DX2000 Multi Batch Function (/BT2) User’s Manual IM 04L41B01-03E 2nd Edition
Thank you for purchasing the Daqstation DX1000, DX1000N, or DX2000 (hereafter referred to as the DX). This manual describes the operating procedure for the DX Multi Batch function (/BT2 option). Please use this manual in conjunction with the DX1000/DX1000N User’s Manual (IM04L41B01-01E) or the DX2000 User’s Manual (IM04L42B01-01E).
Conventions Used in This Manual Unit K k Denotes 1024. Example: 768 KB (file size) Denotes 1000. Markings Improper handling or use can lead to injury to the user or damage to the instrument. This symbol appears on the instrument to indicate that the user must refer to the user's manual for special instructions. The same symbol appears in the corresponding place in the user's manual to identify those instructions. In the manual, the symbol is used in conjunction with the word “WARNING” or “CAUTION.
Applicable Recorders The models outlined in this section can be equipped with the Multi Batch function. In this manual, the terms “DX1000” and “DX2000” refer to the following models. DX1000: DX1006, DX1012, DX1006N, and DX1012N DX2000: DX2010, DX2020, DX2030, DX2040, and DX2048 What This Manual Explains This manual explains the DX Multi Batch function. For details on the DX’s standard operations, see the DX1000/DX1000N User’s Manual (IM04L41B01-01E) or the DX2000 User’s Manual (IM04L42B01-01E).
Contents Conventions Used in This Manual............................................................................................ ii Applicable Recorders............................................................................................................... iii What This Manual Explains..................................................................................................... iii Chapter 1 Description of the Multi Batch Function 1.1 1.2 Chapter 2 Settings 2.1 2.2 2.
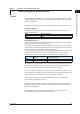
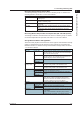
Chapter 1 1.1 Recording and Saving Data 1 The Multi Batch function allows you to record and save the measured data from multiple batches separately (per batch). You can also apply the Multi Batch function to multiple consecutive processes. The diagram on the following page gives a general overview of the Multi Batch function. Number of Batches Number of Batches 2 to 6 2 to 12 Recordable Channels On the trend, digital, and bar graph displays, channel data is displayed in preset groups.
1.
1.1 Recording and Saving Data 1 Recording and Saving You can start and stop recording for each batch group individually. Or, you can start and stop recording across all batch groups simultaneously.
1.1 Recording and Saving Data • Relay Output when Stopping Recording (/F1 and /F2 Options) When the relay action is set to memory sampling on a DX with the /AS1 advanced security option, relay output starts when memory start occurs for any of the batches, and relay output stops when memory stop occurs for all the batches. For an explanation of this feature’s settings, see section 2.9 in the User’s Manual.
1.1 Recording and Saving Data 1 Recording Display Data and Event Data Item Scan interval Data record Display data Event data Description 1 second, 2 seconds, or 5 seconds. The same scan interval is used for all batch groups. One of either display data or event data. The same type of data is recorded for all batch groups. The same display data sampling interval (trend interval) is used for all batch groups. Use Free mode when recording event data. You cannot select Trigger mode.
1.1 Recording and Saving Data Data file This section briefly explains the makeup of the data files. Shaded entries are the same as with DXs without the Multi Batch function. Item Display data and event data Manual sampled data Report data Measured data File header Batch text Batch comment Measured data File header Report data File header Snapshot data file Description Saves the data from each batch group to a separate file. Each batch group’s alarm and message information is also saved.
1.1 Recording and Saving Data File name sequence number for display data and event data Description 1-character batch group identifier + 5-digit number + 1-character delimiter sequence number Batch group identifier Number Delimiter A, B, C, D, E, F, G, H, J, K, L, or M (A is used for batch group 1, B is used for batch group 2, ... M is used for batch group 12). A number that indicates the file’s order of occurrence. The number ranges from 00001 to 99999. After 99999, the number returns to 00000.
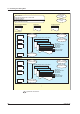
1.2 Display There is a batch overview mode and a batch single mode. In batch overview mode, information common to all batch groups is displayed. In batch single mode, information for each batch such as measured data and alarms is displayed. Batch Overview Mode This section outlines the information displayed in batch overview mode. Name Status display section Display Details See the following figure. BATCH OVERVIEW Shows the status of all batch groups. See the figure on the following page.
1.2 Display 1 Batch Overview Description of the Multi Batch Function Single batch group See below for details. Sections outside of the range of the number of supported batch groups are displayed in grey. 2 3 Index Batch identification bar Displays the batch identification number and file header. Blue: Selected (by using the arrow keys). Recording status Green: Recording White or Black:* Not recording Batch number Lot number * Based on the background display settings.
1.2 Display Batch Single Mode This section outlines the information displayed in batch single mode. Name Status display section Display Details See the following figure. TREND The target batch group’s trend display. The target batch group’s historical trend display. The target batch group’s digital display. The target batch group’s bar graph display. Customized display screen. Shows the status of all channels for the target batch group. 4-Panel display for the target batch group.
Chapter 2 2.1 Settings Settings for the Multi Batch Function 1 Specialized Settings for the Multi Batch Function 2 Enabling the Multi Batch Function Settings First, enable the Multi Batch function. The measured data in internal memory is cleared when you enable or disable the Multi Batch function. However, updating the number of batches used with the Multi Batch function does not clear the measured data in internal memory.
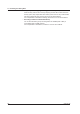
2.2 Setting the Multi Batch Function This section explains the specialized settings for the Multi Batch function. For details on other settings, see the User’s Manual. Setup Screen • Multi Batch Function Press MENU (to switch to setting mode), hold down FUNC for 3 s (to switch to basic setting mode), and select the Environment tab > Batch. • Group Set, Trip Line Settings for the DX1000 Press MENU (to switch to setting mode), and select the Multi batch tab > Group set, Trip line > Group set.
2.2 Setting the Multi Batch Function Settings for the DX2000 Press MENU (to switch to setting mode), and select the Multi batch tab > Group set, Trip line. * You can also display the Multi batch tab’s setup screen by selecting the Menu tab > Group set, Trip line. 1 2 Settings 3 Index • File Header and Data File Names Press MENU (to switch to setting mode), and select the Multi batch tab > File header, File name. For the DX2000, select the Multi batch tab > File header, Data file name.
2.2 Setting the Multi Batch Function Setup Items • Batch > On/Off Select Multi Batch. Setting On Off MultiBatch Description Enables the single batch feature. For details, see section 6.3 in the User’s Manual. Disables the batch feature. Enables the Multi Batch function. • Batch > Lot-No. digit Set the lot number digits to 4, 6, or 8. Select Off to disable lot numbers.
2.2 Setting the Multi Batch Function 1 • Trip line > 1, 2, 3, 4 Select On for the trip lines that you want to display. • Trip line > Position 2 Set the position in the range of 0 to 100% of the display width. The default colors are red, green, blue, and yellow. If want to change a color, you can select from 24 available colors. • Trip line > Width • File header > Characters Enter a header comment to write into data files.
2.3 Using the Event Action Function The event action function performs a specified action when a specified event occurs. For example, you can use the event action function to write a message when an alarm occurs. When you use the multi batch function, you have to specify the batch group to perform the action on. In the above example, you could configure the DX to write a message to batch group 2 when an alarm occurs.
Chapter 3 3.1 Operations Starting/Stopping Recording, and Saving Data Procedure 1 2 • Starting Recording from Batch Overview Mode Follow the procedure below when the batch overview mode screen is displayed. 1. Press START. 2. Press the numeric soft keys that represent the batch groups you want to start Index recording. Green: Recording White or Black: Not recording Setting 1, 2, 3, ... All Description The batch group number. All batch groups currently not recording.
3.1 Starting/Stopping Recording, and Saving Data 4. Select Input, and press DISP/ENTER. The text field screen of the specified batch group appears (release numbers 4 and later). The settings that you made in setting mode appear here. Select a text field number, enter text, and press DISP/ENTER. The start recording screen will appear. The text fields that you specify here will only be saved to the measured data file whose recording you are starting.
3.1 Starting/Stopping Recording, and Saving Data 1 • Starting Recording from Batch Single Mode Follow the procedure below when the batch single mode screen is displayed. 1. Press START. The start recording screen appears. * On DXs with the /AS1 advanced security option, recording will not start, even if you press START in setting mode. 2. Confirm or change the batch number (Batch name-No.) and lot number, and enter comments for the batch.
3.1 Starting/Stopping Recording, and Saving Data • Stopping Recording from Batch Overview Mode 1. Press STOP. The batch group selection window appears. 2. Press the numeric soft keys that represent the batch groups you want to stop recording. Green: Recording White or Black: Not recording Setting 1, 2, 3 ... All Description The batch group number. All batch groups currently recording. The stop recording screen appears. When You Select a Single Batch Group 3.
3.1 Starting/Stopping Recording, and Saving Data 1 • Stopping Recording from Batch Single Mode 1. Press STOP. The stop recording screen appears. 2. Use the arrow keys to move the cursor to Yes, and press DISP/ENTER. Recording stops for the batch group. When all batches stop recording, the report function (/M1 and /PM1 options) also stops. 2 3 Operations Index • Automatically Saving Data For information on automatically saving data with the Multi Batch function, see section 1.1.
3.2 Starting, Stopping, and Resetting Computations (/M1 and /PM1 Options) • All computations start and stop together at the same time. You cannot start or stop computations for each batch group separately. • You can reset the values calculated on computation channels separately for each batch group. • When you reset a calculated value, the flags in use are also reset to zero.
3.2 Starting, Stopping, and Resetting Computations (/M1 and /PM1 Options) 1 Resetting the Values Calculated on the Selected Batch Group’s Computation Channels Follow the procedure below when the batch single mode screen is displayed. 1. Press FUNC. 2 The FUNC key menu appears. 2. Press the Math reset soft key. The values calculated on all computation channels* for the displayed batch group are reset. Only the flags being used on the computation channels are cleared to zero.
3.3 Switching Between Batch Overview Mode and Batch Single Mode Procedure • Switching From Batch Overview Mode to Batch Single Mode When Batch Overview Is Displayed 1. Use the arrow keys to select a batch group. The selected batch group’s batch identification bar is displayed in blue. 2. Press DISP/ENTER to open the display selection menu. 3. Use the arrow keys to select BATCH VIEW. 4. Press the right arrow key to open the submenu. 5.
3.4 Using Batch Overview Mode 1 Follow the procedure below when the batch overview mode screen is displayed. 2 Procedure • Opening the Display 1. Press DISP/ENTER to open the display selection menu. 3 2. Use the arrow keys to select a menu item. When there is a submenu, select a Operations submenu item, and press DISP/ENTER. The selected display appears. Index BATCH OVERVIEW For operating instructions, see section 3.3. CUSTOM DISPLAY For operating instructions, see IM04L41B01-04E.
3.4 Using Batch Overview Mode • Loading Display and Event Data Even when in batch overview mode, you can use the following procedure to load display or event data and display the corresponding historical trend. MENU (to switch to setting mode), and select the File tab > Load display data or Load event data > press the CF or USB soft key > select the file and press DISP/ ENTER Take note of the following points regarding loading of data. • You can load any batch group’s data.
3.5 Using Batch Single Mode 1 Follow the procedure below when the batch single mode screen is displayed. In batch single mode, only the selected batch group’s data is displayed. Procedure 3 1. Press DISP/ENTER to open the display selection menu. 2. Use the arrow keys to select a menu item. When there is a submenu, select a submenu item, and press DISP/ENTER. The selected display appears. TREND, DIGITAL, and BAR For operating instructions, see section 4.2 in the User’s Manual.
3.5 Using Batch Single Mode • Using the FUNC Key You can use the FUNC key for the following operations. For operating procedures, see the reference for each respective operation. Entries marked with a † function the same as in batch overview mode.
3.6 Writing Messages 1 This procedure shows how to write messages for batch groups. 2 Setup Screen • How to Write Messages Press MENU (to switch to setting mode), hold down FUNC for 3 s (to switch to basic setting mode), and select the Environment tab > View, Message. 3 Operations Index • Message Settings For details on the message settings, see section 5.4 in the User’s Manual.
3.6 Writing Messages Procedure • Writing Messages or Free Messages For the operating procedure when the batch single mode is displayed, see section 5.4 in the User’s Manual.
3.7 Using the Favorite Key 1 For details on the setup screen, settings, and operating procedures, see section 5.15 in the DX1000/DX1000N User’s Manual and section 5.16 in the DX2000 User’s Manual. 2 When You Set Action to Favorite When You Set Action to History Mode Batch overview mode Batch single mode IM 04L41B01-03E Action Does not switch to the historical trend display with the currently displayed data. Note that the DX does not display an error message.
3.8 Displaying Text Field Settings Procedure • Procedure in Batch Overview Mode 1. In operation mode, press FUNC. The FUNC key menu appears. 2. Press the Text field soft key. The batch group number soft keys are displayed. 3. Press a batch group number soft key. The text field settings appear. • Procedure in Batch Single Mode 1. In operation mode, press FUNC. The FUNC key menu appears. 2. Press the Text field soft key. The text field settings for the currently displayed batch group appear.
3.9 Changing the FUNC Key Menu and the Display Selection Menu You can change the contents of the FUNC key menu, which is displayed when you press the FUNC key, and the display selection menu, which is displayed when you press the DISP/ENTER key. Procedure 2 3 For details on the FUNC key menu when the Multi Batch function is enabled, see sections 3.4 and 3.5, “Using the FUNC Key.” Operations • Changing the FUNC Key Menu Index For the operating procedure to change the FUNC key menu, see section 5.
3.10 Saving to USB Flash Memory (/USB1 Option) Procedure • Connecting USB Flash Memory 1. Connect a USB flash memory device to the DX USB port. After the message, “USB device has been connected.” appears, you can use the USB flash memory device. 2. In operation mode, the DX displays selectable memory operations. Use the arrow keys to select an operation, and then press DISP/ENTER.
Index Index Numeric 4-panel display........................................................................ 1-7 A all save.................................................................................. 3-18 applicable recorders................................................................... iii auto increment......................................................................... 2-4 B C calculated values, resetting..................................................... 3-6 change message..........
Index R recordable channels................................................................ 1-1 recording, starting.................................................................... 3-1 recording, starting and stopping.............................................. 1-3 recording, stopping.................................................................. 3-4 report, starting and stopping.................................................... 1-3 report data.....................................................