HIP2P IP Camera Client User Manual Version:6.
HIP2P IP Camera Client User Manual Foreword Thank you for using our products. The IP camera client is used to implement centralized monitoring, storage, management, and control of all front-end network video surveillance equipment (including network video servers and network cameras).
HIP2P IP Camera Client User Manual Content 1. Installation description.................................................................................................................... 5 1.1. Installation requirement....................................................................................................... 5 1.2. Installation step.................................................................................................................... 5 2. CMS client details description.............
HIP2P IP Camera Client User Manual 2.11.3. Modify user permission.........................................................................................26 2.11.4. Modify user password........................................................................................... 26 2.12. Log....................................................................................................................................27 2.12.1. Log save time...................................................................
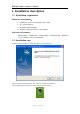
HIP2P IP Camera Client User Manual 1. Installation description 1.1. Installation requirement Hardware environment: 1、Pentium IV series, CPU frequency above 2.0G 2、2G or more memory 3、Hard disk 120G or higher 4、Display resolution of 1024 × 768 or higher Software environment: Windows2000 / WindowsXP / Windows2003 / WindowsVista / Windows 7/8/10, Windows XP is recommended. 1.2.
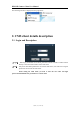
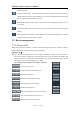
HIP2P IP Camera Client User Manual The following interface is displayed in the program bar: 2. CMS client details description 2.1. Login and Description 【Login】 When login, the default user is admin, password is blank. Click the "Confirm" button directly to enter the main interface of the CMS client. 【Exit】 Only users with admin permissions can exit the CMS client, users with user and guest permissions cannot exit the CMS client.
HIP2P IP Camera Client User Manual 2.2.
HIP2P IP Camera Client User Manual One key to add device Click to switch to the video playback interface Click to switch to remote video playback interface Click to switch to the setting interface Click to switch to the log operation interface Log out users and switch users Click to exit the client ◆Device tree: 【List mode】 User-configured list level to display areas, settings, and channels 【Current screen】 Display the devices connected to the current screen, only in list mode ◆Real-time preview: Ele
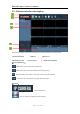
HIP2P IP Camera Client User Manual manual recording Picture snapshot button. After selecting the window to snapshot the picture, click the snapshot button to achieve picture snapshot. If you click the snapshot button continuously, you can snapshot max 2 pictures in 1 second.
HIP2P IP Camera Client User Manual 【Add device】 ◆Search and add devices in LAN: Click the search button,the client will search out all the devices in the LAN at this time, then select the devices to be added in the search list. After selecting the area, click the button to add the device, it can add the selected device to the area.
HIP2P IP Camera Client User Manual recommended to use an i3 CPU or more and an independent graphics card. Display screen description: :It indicates that there is no device connected to this channel. If connected, the OSD information of the device will be displayed :Intercom status, when the icon changes to indicate that the channel is intercoming, otherwise the channel is not open intercom; :Monitoring status.
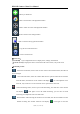
HIP2P IP Camera Client User Manual Right-click on any area and it will pop up as shown on the right: 【Connect all】 Connect the device in the selected area 【Start area manual recording】 Enable manual recording of the device in the selected area 【Stop area manual recording】 Stop manual recording of the device in the selected area 【Picture quality】Choose different picture quality according to different network environments: HD and SD 【 All Auto-adjust screens 】 The selected area device adjusts the screen displ
HIP2P IP Camera Client User Manual of presets supported by the camera. 【Preset setting】 Select the window that needs to set the preset point, then select the preset point number, and click the "Preset" button, then the preset point is set successfully. 【Preset call】Select the window needed to call the preset point, then select the preset point number, and click the "call" button. You must set the preset point before selecting the call.
HIP2P IP Camera Client User Manual 【Common record length】The size of a single record file: the system sets the video length to 5 minutes by default. The length of a single video file can be set to 1-30 minutes. If you want to modify the video duration, please modify and save in the normal record length. 【 Alarm duration 】 You can set the length of alarm recording, the default is 10 seconds, 5-60 seconds can be set. 【The remaining disk starts to reclaim space】 The selectable range is 1G ~ 50G.
HIP2P IP Camera Client User Manual 2.7. Local record playback 2.7.1. Time search playback Video playback button, click this button to continue playback after the video playback finished Stop playback button, click this button to stop playback during video playback Single-frame playback button. Click this button during video playback to perform single-frame playback. Each click plays a frame of image screen.
HIP2P IP Camera Client User Manual 2.7.2. Search file playback Step 1: Select the video file type and device channel Step 2: Select the search time and click the "Search" button, the system will display the qualified video files in the device tree; Step 3: Select the playback window and double-click the video file to playback the video file. Playback supports the same video file in four windows at the same time; 2.8. Remote video playback and download 2.8.1.
HIP2P IP Camera Client User Manual 2.8.2. Remote video download After searching out the remote video file, right-click on the video file to be downloaded, the download file button will appear, click to pop-up download interface, click Start, and the video file will start download.
HIP2P IP Camera Client User Manual 2.9. Parameter setting Before modifying device parameters, please connect related devices, as shown on the right: Connect the device 2.9.1.
HIP2P IP Camera Client User Manual 2.9.2. Image parameter WDR: Check the box in front of WDR, it indicates that WDR is on. WDR level is 1-30 optional Exposure mode: can set three modes: auto, indoor, outdoor. Default is auto mode. Image priority mode: You can set priority of illumination and frame rate; Infrared light control: can be set to auto, on, off. Select on is black and white mode; select off is color mode.
HIP2P IP Camera Client User Manual 2.9.4.
HIP2P IP Camera Client User Manual Note: This function only apply to some models; External alarm Can set to open the external alarm ON and OFF; only support the devices with alarm input and output; Alarm linkage Can set Email alarm and send alarm picture; Save picture to FTP server; Save video to FTP server; Relay output Save picture to SD card; Save video to SD card; Alarm sound Alarm preset Email set Sender mailbox take QQ mailbox as an example: Smtp server:smtp.qq.
HIP2P IP Camera Client User Manual FTP setting FTP setting: FTP server:Fill in the erected FTP address; server port:Fill in the FTP port; Username and Password fill in the username and password set in the FTP server Create directory automatically: If selected, the directory will be created automatically. The directory name is today’s date. Alarm time setting SUN to SAT represents a week, in days; 0 to 23 represents a day, in half an hour. 2.9.5.
HIP2P IP Camera Client User Manual 2.9.6. SD Card Enable plan record: enable timed recording; Stream type: video streams have main stream and sub stream optional; Video length: 15 seconds-900 seconds can be set, the default is 600 seconds; Format SD card: can format SD card Recording time can be set; the right picture shows green is the recording time; 2.9.7.
HIP2P IP Camera Client User Manual 2.9.9. Login information Can modify password of the device 2.9.10. System Network time synchronization Set NTP server, synchronization interval, time zone, etc. Device information Can obtain the current information of the device; including the device name, software version, IP address, MAC address, etc .; can restart the device and restore factory settings 2.9.11.
HIP2P IP Camera Client User Manual 2.9.12 Motion detection Can set the area of motion detection for the camera 2.10.
HIP2P IP Camera Client User Manual 2.11. User management The factory default administrator user name is admin and the password is blank. After logging in, the administrator can add users, delete users, and set user permissions. User permissions are: admin, user, guest.
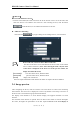
HIP2P IP Camera Client User Manual Step 3: Enter the new password and click the "Save" button 2.12. Log Log type: 【All logs】 Record all system information 【System log】Record user login, logout, and user matching information 【Operation log】 Record all operation information of the user 【Alarm log】 Record alarm information of the device 2.12.1.
HIP2P IP Camera Client User Manual 2.13. Other management 【Connection timeout】connection timeout can be set to 5-60 seconds 【Log save time】There are four options: one month, two months, three months, and six months. The logs in the CMS client will not be deleted within the set time. 【Snapshot format】Refers to the image format captured by the client. There are two formats: JPG and BMP.
HIP2P IP Camera Client User Manual 3. Video format conversion Enter the program bar and open "264 Converter" The following interface appears: The steps are as follows: Select the file: select the video file to be converted; Select the path: set the save path after conversion; File name: the file name after conversion; Conversion type: the type of file to be converted (including H.