OWNER’S MANUAL MANUEL DE L’UTILISATEUR TYPE: YS1010 Manual-Owners-DJM806-7v0.
IMPORTANT SAFETY INSTRUCTIONS INSTRUCTIONS PERTAINING TO A RISK OF FIRE, ELECTRIC SHOCK, OR INJURY TO PERSONS. INSTRUCTIONS RELATIVES AU RISQUE DE FEU, CHOC ÉLECTRIQUE, OU BLESSURES AUX PERSONNES. CAUTION: AVIS: TO REDUCE THE RISK OF ELECTRIC SHOCK, DO NOT REMOVE COVER (OR BACK). NO USER SERVICEABLE PARTS INSIDE. AFIN DE REDUIRE LES RISQUE DE CHOC ELECTRIQUE, N’ENLEVEZ PAS LE COUVERT (OU LE PANNEAU ARRIERE). NE CONTIENT AUCUNE PIECE REPARABLE PAR L’UTILISATEUR.
Introduction Your new DJM806 Mixer/Amplifier is designed and built to provide long-term trouble free performance. Drawing on thirty-five years of experience in the design and manufacturing of powered mixing consoles, Yorkville engineers were able to optimize the design of the first high-powered DJ mixer.
Feature Details Mic Channels (MIC 1, MIC 2, MIC 3 ) Inputs Each mic channel is mono and has a combination XLR/¼-inch TRS (balanced) microphone connector. The XLR segment is optimized for low-impedance microphones and is wired Pin 1= Ground, Pin 2 = in phase and Pin 3 = reverse phase. It will accept line-level signals, however the GAIN control will need to be turned to a lower setting to prevent clipping. The ¼-inch Tip-Ring-Sleeve wiring is; Tip=in phase, Ring=reverse phase and Sleeve=Ground.
Stereo Channel Inputs (CH1, CH2, CH3 ) Inputs & Selector Buttons The DJM806 features internal RIAA phono equalizers on Channels 1 and 2. Those channels will directly accept the output from turntables with the channel input selector up in the Phono position. There are also CD/TAPE/LINE inputs on all three-program channels, which may be activated with the input selectors. This way, you can connect up to six different sources via these three channels and punch them in as desired.
maximum signal level before Clip activity on the channel, or for roughly a “0” average reading on the meter. Also adjust the channel EQ as desired, then put the program on hold awaiting insertion and take the channel off Cue. d) When you are ready to insert the program, simply bring up the channel level.
Master Features IMPORTANT! The mixer section of the DJM806 will remain operational if the built-in power amp ever shuts down. The Main outputs would be used to connect another power amp in this instance. Master Fader The Master Fader determines the Main system’s level along with the channel faders. Leave at a low setting when playing quietly to reduce bus noise, and for mixing convenience.
Digital Effects Processor - General The internal Digital Effects Processor is a full 16-bit, 20kHz bandwidth DSP-based effects subsystem developed by Applied Research & Technology in Rochester, New York. It has been custom programmed with 255 effects ranging from reverb to echo and special effects. The selection of effects was determined in collaboration with a panel of sound engineers experienced in live performance mixing.
Power Amplifier Power Amplifier Features • A total output of 800 watts with well-proven, reliable Audiopro technology. • Industry leading specifications for distortion, damping, and efficiency. • Comprehensive protection against low or even shorted loads, overheating and DC damage to speakers. • A combination of standard ¼-inch and high-current Speakon™ output connectors. Power Amplifier - General The DJM806 has an 800 watt stereo power amplifier. Each channel has an input sensitivity of +4dBv (1.
Connect one or two 8-ohm speakers or one (only) 4-ohm speaker to each channel. When connecting the Speakon’s™, push them in firmly. Push the tab and pull to disconnect. User tip: To connect two (8-ohm) speakers to one or both of the DJM806’s powered output channels via the Speakon™ connectors, run a single Speakon™ -equipped cable, e.g.
General Operating Instructions 1. Connect the AC power cord to a 120Volt AC grounded power outlet (220 to 240 Volts in export units). 2. Switch on the Power and turn the Main and Monitor Master controls to Off for now. 3. Connect low, or high impedance microphones to either the 3-pin XLR or ¼-inch segments of the Mic1, 2, and/or 3 inputs. 4. Connect stereo sources to Channels 1, 2, and 3 with RCA-ended patch cords. Now set the input selector buttons for the inputs you are using. 5.
Specifications Number of Channels (MIC 1/2/3) Low, Mid, High Stereo Channel EQ (CH 1/2/3) Low, Mid, High Channel Effects Yes Monitors Effects N/A Crossfader (Function / Length) Inputs - 1/4" / XLR Combi Inputs - RCA (unbal) Mute Switches Line / Phono Level Switches Clip /Mute LED VU Meter Headphone Monitor Features Internal Effects Effects Send Channel Fader - 60mm,Cue Fader- 60mm 3, Mic 1/2/3 6 pair All Channels (Cue Switch) Ch 1/2/3 All Channels, Effects Section, Amp 12 LED with Floating Peak Sw
Introduction Votre nouveau Mixeur/Amplificateur Yorkville DJM806 a été conçu et construit de façon à offrir une performance fiable pour plusieurs années à venir. Tirant sur trente années d’expérience dans la conception et la fabrication de mixeurs amplifiés, les ingénieurs de Yorkville ont été capables d’optimiser le concept de la table de mixage amplifier pour DJ.
Detaild des Caracteristiques Entrees Pour Microphone (Mic 1, Mic 2, Mic 3) Entrees Chaque canal est mono et doté d’une prise pour microphone combo XLR / ¼-pouce PointeBague-Manchon (symétrique). Le segment XLR offre un meilleur rendement avec microphone à basse impédance. Il est branché comme suit: tige 1 = masse, tige 2 = en phase, tige 3 = phase renversée. Cette prise permet l’utilisation de signaux niveau ligne mais pour prévenir l’écrêtage, il sera nécessaire de réduire le niveau du contrôle de gain.
DEL d'Ecretage Le circuit de DEL d’Ecretage de chaque canal surveille tous les étages électroniques actifs du circuit de canal. Le circuit de DEL d’Ecretage capturera et exposera les impulsions de signal s’approchant à 3dB endessous du niveau d’écrêtage. Voir la section contrôle de gain pour plus d’information à ce sujet. Entrees de Canal Stereo (CH1, CH2, CH3) Entrees et Bouton Selecteur Le DJM806 est doté sur les canaux Channel 1 et Channel 2 d’égalisateurs phono RIAA.
b) Appuyez sur le bouton Cue du canal. Ce canal a maintenant proéminence dans votre casque d’écoute. c) Avec signal présent au casque d’écoute, réglez le gain du canal de façon à obtenir un niveau maximum avant l’écrêtage sur ce canal ou une moyenne de lecture à “0” sur l’échelle de diode. Ajustez aussi l’égalisateur. Le programme en attente, attendez ensuite le moment désiré pour l’insérer et enlevez le Cue de sur ce canal.
Caracteristques de la Section Maitresse IMPORTANT! Si l’amplificateur interne cesse de fonctionner, la section de mélangeur du DJM806 continuera de fonctionner. Dans ce cas, les sorties Main seraient utilisées pour acheminer le signal à un amplificateur externe. Fader Maitre Avec les faders de canal, ce contrôle détermine le niveau général du système. Pour faciliter le mélange et réduire le niveau du bruit lors de performance à bas niveau, gardez ce fader à un réglage bas.
Unite de Traitement Numerique - Aperçu General Conçu par la firme Applied Research & Technology de Rochester, New York, le processeur interne d’effets numériques 16 bit, offre une largeur de bande de 20 kHz. Il a été spécialement programmé pour offrir 255 effets variant du reverb à l’écho et aux effets spéciaux. La sélection d’effets a été déterminée en collaboration avec un groupe d’ingénieurs qui avaient pour but de choisir des effets d’usage courant pour les performance en direct.
Amplificateur de Puissance Caracteristique de l'Amplificateur de Puissance • Une puissance de sortie total de 800 watts grâce à la technologie fiable et éprouvée Audiopro. • Spécification de distorsion, amortissement et efficacité à la fine pointe de la technologie. • Protection efficace contre les charges trop basses ou court-circuitées, contre la surchauffe ou les dommages causés aux H.P. par un CC aux sorties. • Combinaison prise ¼-pouce et Speakon pour les branchements de sortie.
Conseil: Voici comment brancher deux haut-parleurs (8-ohm) à une ou aux sorties du DJM806 à l’aide de câbles équipés de connecteurs Speakon®: A partir de la sortie du DJM806, acheminez un câble équipé de connecteur Speakon® (tel les modèle SP2-25SS ou SP2-50SS de Yorkville avec connecteurs Speakon® aux deux extrémités) à une des enceintes. Branchez ensuite un deuxième câble d’une enceinte à l’autre avec le jack parallèle.
Instructions d’Opération Générale 1. Branchez le cordon d’alimentation CA à une prise 120 Volts avec mise à la terre CA. (220 à 240 Volts pour certain pays). 2. Réglez les fader Main et Monitor Master en position fermé et mettez ensuite l’appareil en marche. 3. Branchez des microphones à basse ou haute impédance aux prises XLR ou ¼pouce de canaux MIC 1, 2 ou 3. 4. Branchez les sources de signal stéréo aux prises RCA des canaux CH1, 2 ou 3.
Spécifications Nombre de canaux Égalisateur de canal Mono Égalisateur de canal stéréo (MIC 1/2/3) Graves, Médianes, Aiguës (Canaux 1/2/3) Graves, Médianes, Aiguës Effets de canal Oui Effet sur retour N/A Crossfader (Fonction/ Longueur) Entrées - ¼" / XLR Combi Entrées - RCA (asym) Commutateurs Mute Commutateur de niveau Ligne / Phono DEL Clip /Mute VU mètre Caractéristiques de monitoring par casque d’écoute Effets Internes Envoi aux effets Curseur de canal - 60mm,Curseur Cue - 60mm 3, Mic 1/2/3 6 pai
21
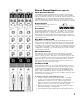
A ROOMS DIGITAL EFFECTS TABLES I HALLS & THICKENING DELAYS 1 2 3 4 5 6 7 8 9 10 11 12 13 J CHAMBERS / PLATES & THICKENING DELAYS 1 0.8s Warm Chamber + 50ms doubling delay 2 0.8s Bright Chamber + 50ms doubling delay 3 1.2s Warm Chamber + 60ms doubling delay 4 1.2s Bright Chamber + 70ms slap delay 5 1.5s Warm Chamber + 70ms slap delay 6 1.5s Bright Chamber + 80ms slap delay 7 2.5s Warm Chamber + 80ms slap delay 8 2.5s Bright Chamber + 100ms slap delay 9 3.5s Warm Chamber + 90ms slap delay 10 3.
Two & Ten Year Warranty Two &Ten Unlimited Warranty Yorkville's two and ten-year unlimited warranty on this product is transferable and does not require registration with Yorkville Sound or your dealer. If this product should fail for any reason within two years of the original purchase date (ten years for the wooden enclosure), simply return it to your Yorkville dealer with original proof of purchase and it will be repaired free of charge.
WORLD HEADQUARTERS CANADA U.S.A. Yorkville Sound Yorkville Sound Inc.