
Instructions / Assembly


3 | P a g e
Installation
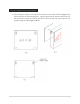
Figure 1
1. Select the position of the fireplace on the wall to which it is to be mounted. Draw a level
horizontal line on the wall at the required height. This line will correspond to the top of
the fireplace so it is important to allow for the extra height of the glass face.
2. Mark the center line of the fireplace on to the horizontal line.
3. Place the Installation Plate along the horizontal line and line up the center “V” cut out
with the center line. See Figure 1.
4. DRYWALL INSTALLATION
Install screws into studs at 4 outside corner screw holes. If studs are not present, install
self drilling hollow wall anchors at the 4 outside corners and
find wood studs with at
least 4 more screws on the mounting plate (two high and two low). Holes are offset to
allow finding wood studs at normal spacing. Attach more screws into larger models as
needed.
5. MASONRY INSTALLATION
If the wall is of a sound masonry construction the attaching holes should be drilled with
a 5/16” masonry drill. First secure the four outside corners. Use the masonry anchors and
screws provided. Double check that a firm, solid attachment is achieved or add
additional anchors as required.
6. If a firm attachment cannot be achieved it may be necessary to install extra support to
the framing. It is most important that the mounting plate is firm and solid and that the
structure is capable of holding the weight of the fireplace and glass face.
7. The mounting plate has four location pins, one at each corner of the plate. See Figure 1.