User Manual 1
TABLE OF CONTENTS SECTION 1: INTRODUCTION 4 Advantages of a YSI 650 MDS to SondeCom 4 Key Features of SondeCom 4 Hardware_Requirements 4 SECTION 2: GETTING STARTED 5 Installing Software 5 Setting up the Sync Manager 5 Connecting to a Sonde 6 SECTION 3: GENERAL SOFTWARE OPERATION 7 The Startup Screen 7 The Sonde Menu Screen 7 Real Time Data Screen 7 View File Screen 8 Kermit Upload Screen 8 PDA File Screen 8 Data Storage in the PDA 8 SECTION 4: SYNCING DATA TO A PC 10 What h
My PDA is fixed on one screen and is not responding to buttons or screen taps. 11 My PDA will not connect with my 6-Series sonde. 11 After using SondeCom, the sonde is sending me funny lines of data when I use my PC terminal.
SECTION 1: INTRODUCTION REGISTER SONDECOM If you do not register SondeCom, then you will not receive upgrades, so please take the time to do so. You can register at http://www.ysi.com/epg/productregistration. SondeCom is a powerful software package that allows the users to interface with their YSI sondes in a very simple manner- much like the YSI 650 Multiparameter Display System (650 MDS).
• Your PC must have a sync manager installed (this is the software that should have come with your PDA). Palm Desktop’s HotSync Manager is a very common example of a sync manager.
SECTION 2: GETTING STARTED Installing the Software Insert your SondeCom CD into your drive and run the setup.exe file. This will install the conduit (the software that synchronizes the data between your PDA and your PC) and will put the SondeCom.prc file into the install folder of all of the users listed in your sync manager. That means that all you have to do in order to install the software onto your PDA is run the install program, then sync your PDA. The program will automatically load onto your PDA.
A window will pop up prompting you to select between Handheld overwrites Desktop and Do nothing. Select whichever action you desire. Then, click ok. If you check the Set as default box, then the action you have selected will be used every time you sync thereafter unless you specifically change it as is described above.
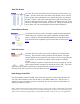
SECTION 3: GENERAL SOFTWARE OPERATION This section describes the general software operation of SondeCom. For information on the options offered in the sonde menus, please refer to your YSI 6-Series sonde manual. Only the functions specific to the PDA software will be described here. The Startup Screen Every time you launch SondeCom, you will see this startup screen. There are only two buttons on this screen: the Sonde button and the PDA File button.
View File Screen The view file screen (accessible from the File menu of the sonde) is very simple. The title of the form is the name of the file that you are viewing. The scroll bar on the right allows you to quickly drag your way through the data. If there is more data to the right, then a right arrow button will appear on the bottom of the screen. If there is more data to the left, then a left arrow will appear at the bottom of the screen.
provide you with an upgrade. Send the email to support@ysi.com with SondeCom Bug Report in the subject. Also, please include the make and model of your PDA and the version of SondeCom that you are using.
SECTION 4: SYNCING DATA TO A PC For details on how to set up the sync option on the PC (ie. to change from Handheld overwrites Desktop to Do Nothing or vice-versa), see section 2: Set up your sync manager. This section explains what happens during a sync and where the files are stored on your PC.
SECTION 5: TROUBLESHOOTING This troubleshooting guide lists some common problems and their solutions. Please check this list before calling YSI customer support. I do not have the Palm OS version 3.5 or higher; how do I upgrade? In order to run SondeCom, you must use Palm OS 3.5 or greater. Many of the PDAs on the market have upgradeable flash ROM.
confusing for a human being. Simply hit the escape key several times until you see the # prompt. From there, you can enter the menu command and proceed as usual.