User Guide
Table of Contents Table of Contents ........................................................................................................................................... i Hello from Coolpad ....................................................................................................................................... 5 Set Up Your Phone ....................................................................................................................................... 6 Parts and Functions .
Phone Calls and Voicemail ......................................................................................................................... 23 Place and Answer Calls ...................................................................................................................... 23 Call Using the Phone Dialer ........................................................................................................ 23 Call Emergency Numbers .........................................................
Wi-Fi .................................................................................................................................................... 49 Turn Wi-Fi On and Connect to a Wireless Network .................................................................... 49 Disconnect Wi-Fi ......................................................................................................................... 50 Hotspot ....................................................................................
Language and Input Settings .............................................................................................................. 76 Wi-Fi Settings ...................................................................................................................................... 77 Data Usage Settings ........................................................................................................................... 78 Hotspot & Tethering Settings .........................................
Hello from Coolpad Thank you for purchasing your Coolpad Belleza mobile phone! Please follow these simple but important instructions for optimal use of your new phone. Application features and functions may vary among countries, regions or hardware specifications. We offer self-service for our smart terminal device users. Please visit the Coolpad Americas official website (at www.coolpad.us) for more information on supported product models. Information on the website takes precedence.
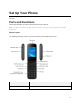
Set Up Your Phone The following topics give you all the information you need to set up your phone and wireless service the first time. Parts and Functions These topics illustrate your phone’s primary parts and key functions. Note: Your phone's screens and apps layouts are subject to change. This user guide uses sample images only. Phone Layout The following illustration outlines your phone’s primary external features and keys. Part Description Receiver Lets you hear the caller and automated prompts.
Headset jack Allows you to plug in either a stereo headset or an optional headset for convenient, hands-free conversations. Volume key Allows you to adjust the ringtone or media volume or adjust the voice volume during a call. Messages key Presses to access the Messages app. Send key Presses to answer or send a call. Presses to enter call log. Navigation key Presses up, down, left or right to navigate. Camera key Presses to access the Camera app.
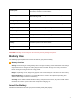
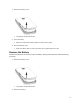
1. Remove the battery cover. Lift gently in the direction shown. 2. Insert the battery. Align the contacts of the battery with the contacts in the phone. 3. Attach the battery cover. Make sure all the tabs are secure and there are no gaps around the cover. Remove the Battery Follow these instructions to remove your phone’s battery. Always power the phone off before removing the battery. 1. Remove the battery cover. Lift gently in the direction shown. 2. Remove the battery.
Lift upward gently as shown. Charge the Battery Follow these instructions to charge your phone’s battery using either the included AC adapter or via a USB connection on your computer. Charge Using the AC Adapter 1. Plug the microUSB connector into the USB port of your phone. 2. Plug the other end of the USB cable into the AC adapter. 3. Plug the AC adapter into an electrical outlet. 4. After charging, disconnect the phone from the charger.
Handling a SIM Card Keep the following in mind when handling a SIM card. ● You are responsible for any damage caused by inserting the SIM card in another-brand IC card reader, etc. Your carrier is not responsible in such a case. ● Always keep the IC chip clean. ● Wipe clean with a dry, soft cloth. ● Avoid applying labels. May damage SIM card. ● See instructions included with SIM card for handling. ● The SIM card is the property of your carrier.
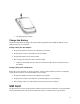
Insert gently with gold IC chip facing downward. 3. Replace the battery cover. (See Insert the Battery.) Make sure all the tabs are secure and there are no gaps around the cover. SD Card Your phone supports the use of an optional SD card (not included) to expand its storage capacity. Some cards may not operate properly with your phone. SD Card Cautions Data: Information stored on an SD card can become lost or changed accidently or as a result of damage.
2. Insert SD card. Insert SD card all the way gently without bending and with terminals facing down. Insert only SD cards. 3. Replace the battery cover. (See Insert the Battery.) Make sure all the tabs are secure and there are no gaps around the cover. Remove an SD Card Follow these instructions to remove an SD card. Always power the phone off before inserting or removing an SD card. 1. Remove the battery cover. (See Remove the Battery.) 2. Remove SD card. 3. Replace the battery cover.
If your phone is not yet activated, see Activate Your Phone for more information. Turn Your Phone Off 1. Press and hold the End key. Your phone will power off. Your screen remains blank while your phone is off (unless the battery is charging). Complete the Setup Screens The setup screens help you set up certain features and preferences on your phone. Once your phone has been turned on, you will see a Welcome message. You can then complete the setup process.
Basic Operations The following topics outline basic features and operations of your phone. Basics The following topics offer an overview of your phone’s basic operations. Home Screen and Applications (Apps) List Most of your phone’s operations originate from the home screen or the apps list. 1. From any screen press the End key to display the home screen. 2. Press the OK key to display the apps list. For information about using the home screen, see Home Screen Basics.
■ From the apps list screen, select Settings . For more information, see Basic Settings. Capture Screenshots You can use your phone’s End key and lower part of volume key to capture screenshots. ■ Press and hold the End key and lower part of Volume key at the same time to capture a screenshot of the current screen. The current screenshot will be captured and stored in the Screenshot album in the phone’s Gallery. From the apps list screen, select Gallery .
1. From home, press the OK key. The apps list opens. 2. Use the Navigation key to select an application and then press the OK key to launch the corresponding application. The application opens. Apps List The apps list expands to include any apps you download and install on your phone. The following table outlines the primary apps that have been preinstalled on your phone. App Function/Service Calculator Perform basic and advanced mathematical calculations.
Browser Browse the Internet to search for information and bookmark your favorite webpages. FM Radio Listen to the radios. Music View and play music. Video View and play videos. Sound Recorder Record sound and play recordings. File Manager View and manage data stored in the phone or in the SD card. Downloads View and manage downloaded files. Settings Access your phone's basic settings menu. Phone Number Follow the instructions below to display your phone’s wireless phone number. 1.
2. Select Airplane mode. Your phone is now in airplane mode. You will see the airplane mode icon in the status bar. To turn off airplane mode: 1. From the apps list screen, select Settings > General settings 2. Select Airplane mode. Your phone’s wireless connection features are now restored. Lock and Unlock Your Screen Your phone allows you to quickly turn the screen on/off when you unfold/fold the phone. Turn the Screen Off When Not in Use ■ To quickly turn the screen off, fold the phone.
Software Update Cautions During update: The phone cannot be used until the software update is complete. It may take time to update your phone’s software. Signal during update: Update your phone where signal reception is good, and do not change location during the update process. Make sure the battery is adequately charged before beginning an update. A weak signal or low battery during an update may cause the update to fail. An update failure may disable the phone.
Update Your PRL This option allows you to download and update the PRL (preferred roaming list) automatically. 1. From the apps list screen, select Settings Update PRL. > Device > About phone > System Updates > 2. Follow the onscreen instructions. The phone will download and install the PRL update and you will see a confirmation when complete.
Your Phone's Home Screen The following topics describe how to use and customize your phone’s home screen, understand the status bar, and use the notification panel. Home Screen Basics The home screen is the starting point for your phone’s applications, functions, and menus. Item Description Status bar The status bar displays icons to notify you of your phone’s status (on the right side) and notifications (on the left side). Time Displays current time. Date Displays current date.
Wi-Fi® active Vibrate Network (full signal) 4G LTE data service Airplane mode Alarm set Battery (charging) Battery (full charge) Missed call New message Change the Home Screen Wallpaper Select and assign your phone’s background wallpaper. 1. From the apps list screen, select Settings > General settings > Display > Wallpaper. 2. Choose wallpaper from Gallery or Wallpapers. 3. Select an image, and press the Left soft key to access the Menu. 4. Select Set as Wallpaper to set it as the wallpaper.
Phone Calls and Voicemail The following topics outline the use of your device’s phone app to place and receive calls, use voicemail, and more. Place and Answer Calls The following topics describe how to directly dial calls, how to answer incoming calls, and how to use the in-call screen options. Adjust In-Call Volume ■ Adjusting Call Volume: Press the Volume key up or down during the call. Troubleshooting Question: Difficulty during call.
As you enter digits, Smart Dial searches for contacts that match. If you see the number you want to dial, use the Navigation key to select the number to place the call immediately without entering the rest of the number. 3. Press the Send key to call the number. The phone dials the number. The call begins when the other party answers. 4. To end the call, press the Right soft key or the End key. The call ends. Troubleshooting Question: Call does not connect.
Call Emergency Numbers You can place calls to 9-1-1 even if the phone’s screen is locked or your account is restricted. To call the 9-1-1 emergency number when the phone’s screen is locked with a screen lock: 1. From the lock screen, press the Navigation key down to enter Emergency call. 2. Press 911 and press the Send key. As long as you are in an area covered by wireless service, the emergency call is placed. To call the 9-1-1 emergency number normally or when your account is restricted: 1.
Mute the Ringing Sound To mute the ringer without rejecting the call, you can press the Volume key. Reject an Incoming Call ■ When a call arrives, press the Right soft key or the End key to reject it. The ringtone or vibration will stop and the call will be sent directly to voicemail. In-Call Screen Layout and Operations While you’re on a call, you will see a number of onscreen options. ● Add call: Press the Left soft key call).
1. From the apps list screen, select Contacts to display the Contacts list. The contacts list appears. 2. Use the Navigation key to select a contact. 3. Press the Send key to call the number.
The phone dials the number. The call begins when the other party answers. 4. To end the call, press the Right soft key or the End key. The call ends. Call from Call Log The call log list lets you quickly place calls to recent incoming, outgoing, or missed numbers. 1. From home, press the Send key, or from the apps list, select Recent Calls log list. to display the call The call log list appears. 2. Select a call and press the OK key to display the call details. 3.
4. To end the call, press the Right soft key or the End key. The call ends. Conference Calling With conference calling, also known as 3-way calling, you can talk to two people at the same time. When using this feature, the normal airtime rates will be charged for each of the two calls. 1. From home, enter a number and press the Send key (or place a call from Log or Contacts). 2.
Use the Call Settings Menu 1. From the apps list screen, select Settings > Device > Call settings. The call settings menu appears. 2. Configure your options. Select a menu item to display its options. Select your options and follow the prompts to set them. Your call settings options are set.
2. Select TTY Full, TTY HCO, or TTY VCO to turn TTY mode on. – or – Select TTY Off to turn TTY mode off. Your phone’s TTY mode is set. Note: When enabled, TTY mode may impair the audio quality of non-TTY devices connected to the headset jack. Warning: 9-1-1 Emergency Calling It is recommended that TTY users make emergency calls by other means, including Telecommunications Relay Services (TRS), analog cellular, and landline communications.
Contacts The Contacts application lets you store and manage contacts from a variety of sources, including contacts you enter and save directly in your phone. Contacts Cautions Information saved in Contacts may be lost or changed if the battery is removed for a long period or left uncharged. Accident or malfunction may also cause loss or change to information. It is recommended that you keep a separate copy of contacts and other important information.
2. Press the Left soft key and select New contact to add a contact. The New contact screen appears. 3. Use the keyboard to enter as much information as you want. [picture]: Select the picture icon to assign a picture to the contact. Name Company Phone Email Address Website Notes Note: To select a type (label) for a phone number, email address, or postal address (such as Mobile, Home, Work, etc.), select the type to the right of the field and select the appropriate type.
2. Enter a phone number and press the Left soft key and select Create new contact. 3. To add the number to an existing contact, select Update existing contact. To add a new contact, select Create new contact. For an existing contact, select the contact name and select a number type for the new number. For a new contact, enter the name and any additional information. 4. Press the Left soft key and select Save. The contact is added.
2. Select a contact to view its details. The contact’s detailed listing appears. Contacts Screen Layout The following illustration show’s your Contacts app layout and describes the various features. Item Description Contact Select to show contact’s details. Search Search contacts. Menu Enter options including New contact, Multi-select, Import, Export, Emergency information, Settings.
Edit a Contact Once you’ve added a contact, you can add or edit any of the information in the entry, assign a caller ID picture, customize with a unique ringtone, and more. 1. From the apps list screen, select Contacts . You will see the Contacts list. 2. Select a contact to view its details. The contact’s detailed listing appears. 3. Press the Left soft key and select Edit. 4. Select any field you want to change or add. See Add a Contact. 5.
Note: To select a type (label) for a phone number, email address, or postal address (such as Mobile, Home, Work, etc.), select the type to the right of the field. Delete a Contact You can delete a contact from the contacts details page. 1. From the apps list screen, select Contacts . You will see the Contacts list. 2. Select a contact to view its details. The contact’s detailed listing appears. 3. Press the Left soft key and select Delete. 4. Press the OK key to confirm. The contact is deleted.
2. Press the Left soft key and select Import. You will see the Import contacts menu. 3. Select Import from .vcf file. 4. Follow the onscreen instructions to complete the import. The contacts are imported and stored in the selected account. Export Contacts You can manually back the contacts up to .vcf file for re-import if needed. Export Contacts to .vcf File 1. From the apps list screen, select Contacts . You will see the Contacts list. 2. Press the Left soft key and select Export.
You will see the Export contacts menu. 3. Select Export to .vcf file. 4. Follow the onscreen instructions to complete the export. The contacts are exported and saved.
Messages With wireless service and your phone’s messages capabilities, you have the opportunity to share information through many different channels, including text and multimedia messages. Text and Multimedia Messages With text messages (SMS), you can send and receive instant text messages between your wireless phone and another messages-ready phone. Multimedia messages, or MMS, can contain text and pictures, recorded voice, audio or video files, or picture slideshows.
5. When done, select Send to send the text message. Send a Multimedia Message (MMS) When you need to add a little more to a text message, you can send a multimedia message (MMS) with pictures, voice recordings, audio or video files. 1. From the apps list screen, select Messages . 2. On the Messages screen, press the Left soft key and select New message. The Compose screen opens. 3. Fill in one or more recipients. You can: Enter phone numbers directly in the To field.
Slideshow. Attach a slideshow. 7. Select Send to send the MMS message. Save and Resume a Draft Message While composing a text or multimedia message, press the Right soft key to automatically save your message as a draft. To resume composing the message: 1. From the apps list screen, select Messages . 2. On the Messages screen, select the message to resume editing it. 3. When you finish editing the message, select Send.
View a MMS Video 1. From the apps list screen, select Messages . 2. On the Messages screen, select the multimedia message or conversation to open it. 3. Select a video and then select Details. 4. Press the Navigation key down to select the video and then select View to view the MMS video. Reply to a Message 1. From the apps list screen, select Messages . 2. On the Messages screen, select a conversation to open it. 3.
● Multimedia messages: Set auto-retrieve, roaming auto-retrieve, and group messaging. ● Notifications: Set notification sound and vibrate. ● Cell broadcasts: Set emergency alerts.
Internet The following topics describe how to connect to and use the Internet on your phone. Browser Your phone’s Web browser gives you full access to both mobile and traditional websites on the go, using 3G, 4G, or Wi-Fi data connections. SSL/TLS SSL (Secure Sockets Layer) and TLS (Transport Layer Security) are protocols for encrypting sent/received data. While in a screen connected by SSL/TLS, data is encrypted to safely send/receive private information, credit card numbers, corporate secrets, etc.
The add to bookmark window opens. 3. Check or change the bookmark title, URL, etc., and then select OK. The Web page is added to bookmarks. Bookmark Options ● Edit: From the browser, press the Left soft key and select Bookmark. Select a bookmark, press the Left soft key and select Edit, edit the bookmark, and then select OK. ● Delete: From the browser, press the Left soft key and select Bookmark. Select a bookmark, press the Left soft key and select Delete.
3. Select an entry. The Web page opens. Browser Settings Customize your experience with the Internet through the browser settings menu. 1. From the apps list screen, select Browser . The browser opens. 2. Press the Left soft key and select Settings, and customize your browser settings. Your browser settings are saved. .
Connectivity The following topics address your phone’s connectivity options, including USB file transfer and tethering, Wi-Fi, Bluetooth, and more. Transfer Files between Your Phone and a Computer You can use the supplied USB cable to connect your phone directly to your computer and transfer music, pictures, and other content files.
5. Select a folder (for example, Music for songs and albums) and copy files to it from your computer. 6. When you are done, disconnect your phone from your computer. The transferred files are now saved to your phone or SD card. Wi-Fi Wi-Fi provides wireless Internet access over distances of up to 300 feet. To use your phone’s Wi-Fi, you need access to a wireless access point.
Wi-Fi is enabled. You will see the names and security settings of in-range Wi-Fi networks. To disable Wi-Fi, press the OK key again to turn Wi-Fi off . 3. Select a Wi-Fi network to connect, enter the password (if it’s not an open network), and then select Connect. Your phone is connected to the Wi-Fi network. You will see ( ) in the status bar. The password, for a household wireless LAN router, is sometimes found on a sticker on the router (WEP, WPA, KEY, etc.).
The Hotspot & tethering window opens. 2. Select Wi-Fi hotspot and press the OK key to turn it on . Hotspot is enabled. To disable hotspot, press the OK key again to turn it off . Note: The best way to keep using the phone as a hotspot is to have it connected to a power supply. Important: Write down the passkey (password) for this communication (shown onscreen). Connect to hotspot 1. Enable Wi-Fi (wireless) functionality on your target device (laptop, media device, etc.). 2.
2. Select USB tethering and press the OK key to turn it on . Tethering is turned on, and your phone’s Internet connection can be shared with a connected device. For USB tethering, connect your phone to the target device with the supplied USB cable. Bluetooth Bluetooth® is a short-range communications technology that allows you to connect wirelessly to a number of Bluetooth devices, such as headsets and hands-free car kits, and Bluetooth-enabled handhelds, computers, printers, and wireless phones.
Data exchange Exchange data with Bluetooth devices. Enable the Bluetooth Feature Use the settings menu to enable or disable your phone’s Bluetooth capabilities. ● Wireless connection to all Bluetooth® functions is not guaranteed for the phone. ● The phone may not connect properly depending on the other device. ● Noise may be experienced with wireless calls and hands-free calls depending on the conditions. To enable Bluetooth 1.
The Bluetooth settings open. 2. Press the OK key to turn Bluetooth on and select Pair new device. Nearby devices appear in the “Available devices” list. 3. Select a device from the “Available devices” list, and follow the onscreen instructions to pair with the device. The Bluetooth device is paired to your phone. Methods to accept a Bluetooth connection differ depending on the devices used. Unpairing from a Paired Device 1. From the Bluetooth settings menu, select Settings unpair.
In the instructions below, Contacts data is being used as an example. Sending Contacts Data via Bluetooth 1. From the apps list screen, select Contacts . You will see the Contacts list. 2. Select a contact to display it, and then press the Left soft key and select Share. 3. Select Bluetooth to send the information via Bluetooth. 4. Select a paired device to receive the data. The contact information is sent. If you see a message to confirm, follow the onscreen instructions.
Camera and Video You can use the camera or video camera to take and share pictures and videos. Your phone comes with a camera that lets you capture sharp pictures and videos. Camera Overview The camera's viewfinder screen lets you view your subject and access camera controls and options. ● Photo: Take photos in Photo mode ● Video: Take videos in Video mode. ● Zoom in: Zoom in your subject. ● Zoom out: Zoom out your subject.
1. From the apps list screen, select Camera . The camera viewfinder appears. 2. Press the Left soft key and select Settings. Take Pictures and Record Videos The following topics teach you how to take pictures and record videos with your phone’s camera. Capturing Pictures/Videos ● File Format for Pictures: File format for pictures is JPEG. ● File Format for Videos: File format for videos is MPEG4.
Avoid Exposure to Direct Sunlight: Be careful not to expose lens to direct sunlight for long periods. May discolor color filter and affect color of images. Take a Picture You can take high-resolution pictures using your phone’s camera. Note: If you have an SD card installed, pictures and videos are stored to the SD card. If no card is installed, pictures and videos are saved to your phone’s memory. 1. From the apps list screen, select Camera . The camera viewfinder appears. 2.
2. Press the Navigation key right to switch to video mode, and then press the OK key. Video recording begins. 3. Press the Left soft key to pause recording. Press the OK key again to stop recording. The camera stops recording and the video is captured and saved to your phone or SD card. View Pictures and Videos Using Gallery Using the Gallery application, you can view pictures and watch videos that you’ve taken with your phone’s camera, downloaded, or copied onto your storage card or phone memory.
The album list opens. 2. Select an album (such as Camera). The list of pictures and videos for the album opens. To select another album, press the Right soft key to return to the Albums tab. 3. Select an image to view the picture or video. The picture opens or the video begins playing. Select a picture or video to view it full screen. When viewing pictures and videos, you can press the Left soft key to open a selection menu and choose what to do with the picture or video.
4. Press the Left soft key and select Share and then on the Share with menu, select Messages. Follow the onscreen prompts to complete and send the message. For more information about sending multimedia messages, see Send a Multimedia Message (MMS). Send Pictures or Videos Using Bluetooth You can select several pictures, videos, or both and send them to someone’s phone or your computer using Bluetooth. 1. From the apps list screen, select Gallery . The album list opens. 2.
Follow the onscreen prompts to complete and send the files. For more information, see Bluetooth.
Productivity Use your phone to stay ahead of the game with calendar, alarm, and more productivity apps. Calendar Use Calendar to create and manage events, meetings, and appointments. Your Calendar helps organize your time and reminds you of important events. Depending on your synchronization settings, your phone’s Calendar stays in sync with your Calendar on the Web.
The New event window opens. 3. Enter an event name, start date/time, end date/time, etc., and then select Save. The event is added to your calendar. View Calendar Events You can display the Calendar in weekly, monthly, or agenda view. 1. From the apps list screen, select Calendar . The Calendar app opens. 2. Select a date and then press the OK key to display events. 3. Use the Navigation key to select an event and then press the OK key. The event details appear.
In event details, press the Left soft key and select Delete and follow the prompts. Calculator Your phone’s convenient built-in calculator lets you perform basic mathematical equations. 1. From the apps list screen, select Tools > Calculator . The calculator app launches. 2. Press keys for calculations. Calculation results appear. Clock Your phone has a clock app that lets you set alarms, view time in time zones around the world, use a stopwatch, and set a timer.
Check the Time You can check the phone any time on your phone. The current time displays in the upper right corner of the status bar. Set Alarms Set multiple alarms using your phone’s Clock app. 1. From the apps list screen, select Clock . The Clock appears. 2. Select the Alarm tab and then press the Left soft key and select New alarm. 3. Set the time, alarm days, ringtone and other alarm options, and then select Save. The alarm is set.
Phone at Alarm Time ● At the set alarm time, the phone sounds the alarm and/or vibrates. ● Stopping an alarm: When the alarm sounds, press the Left soft key to dismiss it, or press the Right soft key to snooze it. Additional Clock Features Your phone’s clock app provides additional useful features including world clock, stopwatch, and timer functions. All features are available from the clock app display. ■ From the apps list screen, select Clock . The Clock appears.
3. Repeat to add multiple cities. Stopwatch The stopwatch lets you time events down to the hundredth of a second. 1. From the clock app, select Stopwatch . 2. Press the OK key to begin timing. 3. Press the OK key again to stop timing. Additional options include Lap to keep track of laps, and Reset to reset the stopwatch to zero. Timer The timer provides a countdown timer for up to 24 hours, 00 minutes, and 00 seconds. 1. From the clock app, select Timer .
2. Set the length of the timer. 3. Press the OK key to begin the timer.
Basic Settings The following topics introduce your phone’s basic settings menus. Basic Settings From the apps list screen, select Settings to access your phone’s settings menu. The table below outlines the top-level settings categories. Category Description Profiles Select general, silent only or vibrate only mode. General settings Enable and set airplane mode, Bluetooth, location, mobile network, display, date & time, and languages &input options.
Profiles Settings The profiles settings menu lets you select general, silent only or vibrate only mode. In general mode, you can control your phone’s audio, from ringtones and alerts to key tones and notifications. General Mode Overview The general mode menu allows you to configure the following options: General Mode Setting Description Volume Set volume for media, ringtones, alarms, etc. Also vibrate for calls Enable vibration with ringtones. Phone ringtone Set your phone’s default ringtone.
Bluetooth Settings Your phone’s Bluetooth® capabilities let you use wireless headsets, send and receive pictures and files, and more. For details on your phone’s Bluetooth usage, see Bluetooth. 1. From the apps list screen, select Settings > General setting. 2. Select Bluetooth. The Bluetooth settings open. 3. Press the OK key to turn Bluetooth on . Bluetooth is enabled. To disable Bluetooth, press the OK key again to turn it off .
● Canceling Pairing: From Bluetooth settings, select Settings and then select Forget. ● next to a paired device name, This setting is available when Bluetooth is enabled. Check Files Received via Bluetooth Transfer: From Bluetooth settings, select Received files, and follow the onscreen instructions. Location Access Settings Your Location Services settings menu lets you select how your phone determines its location (using the wireless networks, GPS satellites, both, or neither).
Display Settings Use the phone's display settings menu to adjust items such as wallpaper, brightness level, sleep, and more. Display Settings Overview The display settings menu allows you to configure the following options: Display Setting Description Brightness level Set the display brightness. Wallpaper Set a wallpaper. Sleep Set a screen sleep duration. Keypad light Set a keypad light sleep duration. Font size Set font size for display. Access Display Settings 1.
Date and Time Settings Use the date and time settings menu either to automatically use the network-provided date and time or manually set these values, as well as select time and date format options. Date and Time Overview The following date and time options may be configured: Date and Time Option Description Automatic date and time Set the date and time automatically via the connected wireless network. Automatic time zone Set the time zone automatically via the connected wireless network.
Language and Input Settings Your phone’s language and input settings let you select a language for the phone’s menus and keyboards, select and configure keyboard settings. Language and Input Settings Overview You can set the following options in the Language and input settings menu: Language and Input Setting Description Language Set the language for your display and menus. Virtual keyboard Set virtual keyboard options. Access Language and Input Setting Options 1.
● Set Virtual Keyboard Options: From the Language and input settings menu, select Virtual keyboard and configure your keyboard options. Wi-Fi Settings The Wi-Fi settings menu lets you turn Wi-Fi on or off, set up and connect to available Wi-Fi networks, and configure advanced Wi-Fi options. For more information about Wi-Fi settings, see Wi-Fi. 1. From the apps list screen, select Settings > Device. 2. Select Data usage and Wi-Fi > Wi-Fi. The Wi-Fi settings menu appears. 3.
To disable Wi-Fi, press the OK key again to turn Wi-Fi off . 4. Select a Wi-Fi network to connect, enter the password (if it’s not an open network), and then select Connect. Your phone is connected to the Wi-Fi network. 5. Configure your Wi-Fi settings. Your Wi-Fi settings changes are saved. The password, for a household wireless LAN router, is sometimes found on a sticker on the router (WEP, WPA, KEY, etc.). Contact the router manufacturer for information.
● Set Amount for Alert when Data Usage Increases: From the Data usage window, select Billing cycle and select Set data warning to set an amount. ● Enable Restrictions on Mobile Data Usage: From the Data usage window, select Billing cycle and select Set data limit to enable restriction. ● With restriction turned on, select Data limit to set the data usage limit.
Advanced Hotspot & Tethering Settings The hotspot & tethering settings menu lets you configure advanced options. ● USB tethering: Share your phone's Internet connection via USB. ● Wi-Fi hotspot: Share your phone's Internet or content with other devices. ● Set up Wi-Fi hotspot: Set up network name, security, password, etc. Storage Settings The storage settings menu lets you manage internal storage on your phone and provides menu choices for an optional SD card (not included). 1.
2. Select Accessibility. 3. Set available accessibility options. Your accessibility settings are applied and saved. About Phone The about phone menu lets you access important phone information. About Phone Overview The following About Phone items may be reviewed or set: About Phone Item Description System updates Check and update phone's software version. Check your phone’s status.
Model Check the phone’s model number. FCC equipment ID Check the FCC ID. Baseband version Check the phone’s baseband version. Kernel version Check the phone’s kernel version. Build number Check the phone’s build number Hardware version Check the phone’s hardware version. Access About Phone Options 1. From the apps list screen, select Settings > Device. 2. Select About phone . 3. Select or view available options. Your phone information is displayed.
3. Set your security options. Your security settings are applied and saved. Screen Lock You can increase the security of your phone by creating a screen lock. When enabled, you have to enter the correct PIN to unlock the phone. Use a Screen Unlock PIN 1. From the Security settings menu, select Screen lock and then select PIN. 2. Enter a PIN, select Next, re-enter your PIN, and select OK to save the setting. The screen lock is set.
Access Reset Settings 1. From the apps list screen, select Settings > Personal. 2. Select Reset. The Reset menu opens. 3. Select Erase all data (factory reset) and follow the prompts to confirm the data removal. The phone will erase all data and reboot.
For Assistance The following topics address areas of support for your phone, including troubleshooting, specifications, account information, warranty information, and customer service contact information. Troubleshooting Check the questions and answers below for troubleshooting solutions for common phone issues. Check Here First Question: Phone freezes/operation is unstable. Answer: Turn the phone on again.
Specifications The following tables list your phone’s and battery’s specifications. Phone Specifications Item Description Dimensions 4.29 inches x 2.18 inches x 0.75 inches Antenna Built-in Network Mode LTE/UMTS/CDMA/GSM Camera Rear camera: 2.0 MP FF Earphone Jack CTIA Standard earphone jack Screen Type TFT Main/Sub Screen size 2.8/1.77 inches Main/Sub Screen Resolution 320x240/160x128 Battery Specifications Item Description Nominal Voltage 3.
Changes or modifications that are not expressly approved by the manufacturer could void the user’s authority to operate the equipment. Part of Statement 15.105: This equipment has been tested and found to comply with the limits for a class B digital device, pursuant to Part 15 of the FCC Rules. These limits are designed to provide reasonable protection against harmful interference in a residential installation.
must be maintained between the user's body and the back of the phone. Third-party belt clips, holsters, and similar accessories containing metallic components should not be used. Body-worn accessories that cannot maintain 0.39 inches (1.0 cm) separation distance between the user's body and the back of the phone, and have not been tested for typical body-worn operations may not comply with FCC RF exposure limits and should be avoided.
● The tested M-Rating and T-Rating for this device (FCC ID: R38YL3321AT) are M3 and T4. Copyright Information ©2020 Coolpad Technologies Inc. Coolpad® is the registered trademark of Yulong Computer Telecommunication Scientific (Shenzhen) Co., Ltd. All Rights Reserved. Google and Android are trademarks of Google Inc. Other trademarks and trade names are the property of their respective owners. Screenshots and product images are simulated; they may differ from the actual product and are subject to change.