
Instructions


STEP 3:
Lift the TYPHOON H3 airframe straight and level. When the LEDs on two motors start to blink green as
illustrated, turn it forward as shown by the red arrow until a tone is heard and the two LEDs turn off.
STEP 4:
Repeat this procedure for all six positions.
If the calibration has been successful, the LEDs under six motor arms will turn green ,also the ST-16S will
pop-up ” Compass calibration completed” on the screen.
IMPORTANT:
If the calibration has failed, all LED Status Indicators will blink red rapidly and the controller
will pop-up a "Compass calibration failed "on the screen, you must repeat the calibration process. If the cal-
ibration continues to fail, either the site of calibration is unsuitable or the compass is defective. Refer to
YUNEEC service center.
Compass Calibration
CAUTION: Do not calibrate the compass in parking garages, close to
buildings or near roads with a metal core. For optimum perfor-
mance, only calibrate TYPHOON H3 in open spaces, far away from
power lines and other metal structures or concrete buildings.
NOTICE: Be sure to perform the compass calibration procedure at
least 11 feet away from the nearest cell phone or other electronic
devices to ensure proper calibration.
STEP 1: Power on the ST16S Ground Station rst and then the air-
craft, and make sure they are connected correctly. If they are not
connected correctly, the telemetry data will not display on the
screen.
STEP 2: Tap the System icon[ ] on the top right corner on the
ST16S, and then enter the aircraft setting interface by tapping
[ ], select the Compass Calibration.
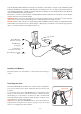
Installing the Propellers
Each arm of the TYPHOON H3 has a letter A or letter B labeled on it. “A”
arms have black center buttons; “B” arms have white center buttons.
Each propeller has an A or B label etched into the blade. “A” propellers
cannot be attached to “B” motors, nor can “B” propeller be mounted to
an “A” motor.
Match the A propellers with the A arms (black center button) and the B
propellers with the B arms (white center button). Place the prop on the
motor, lightly press down and while holding the motor and turn the prop
a quarter turn. A click will be heard and the center button will slightly pop
up. Hold the motor and test propeller security to assure a locked propeller.
Disassembling the propellers
Press and hold the center button into the mounting plate, and then rotate
the propeller in the direction the arrow points to.
IMPORTANT NOTICE:
Always check the props for damage and rough
edges. Damaged props may cause in ight vibrations causing unwanted
ight characteristics. Propellers should be replaced every 20 ight hours.
A
B
B
B
09