IEEE 802.11b/g/n Wireless Media Adapter User Manual V1.1.
Copyright This user manual and the software described in it are copyrighted with all rights reserved. No part of this publication may be reproduced, transmitted, transcribed, stored in a retrieval system, or translated into any language in any form by any means without the written permission of Z-Com Corporation. About This Manual This manual explains Z-Com VUS-100 IEEE 802.
CONTENT CHAPTER 1 INTRODUCTION ............................................................................................................................... 7 INTRODUCTION .......................................................................................................................................................... 7 APPEARANCE .............................................................................................................................................................
ADD/DELETE FLICKR ACCOUNT .............................................................................................................................. 22 MAXIMUM PHOTOS TO RETURN ............................................................................................................................... 24 BROWSE PRIVATE FLICKR NETWORK ALBUM .......................................................................................................... 24 CHAPTER 6 MANAGEMENT .................................
FIGURE FIGURE 1 VUS-100 ........................................................................................................................................................ 7 FIGURE 2 APPLICATION – LOCAL SHARED FOLDER ........................................................................................................ 8 FIGURE 3 APPLICATION – NETWORK ALBUM..................................................................................................................
FIGURE 27 UPGRADE FIRMWARE VIA WEB ................................................................................................................... 33 FIGURE 28 BACKUP/RESTORE SETTINGS VIA UTILITY .................................................................................................. 34 FIGURE 29 BACKUP/RESTORE SETTINGS VIA WEB ....................................................................................................... 35 FIGURE 30 RESTORE FACTORY DEFAULT SETTINGS VIA UTILITY ......
TABLE TABLE 1 VUS-100 LED DEFINITION............................................................................................................................ 11 TABLE 2 VUS-100 FACTORY DEFAULT SETTINGS......................................................................................................... 12 TABLE 3 PRODUCT SPECIFICATIONS ............................................................................................................................. 41 TABLE 4 TECHNICAL TERMS ...............
Chapter 1 Introduction Introduction Thank you for choosing Z-Com VUS-100 IEEE 802.11n Wireless Virtual USB Storage! Compliant with IEEE 802.11b/g/n, this VUS-100 brings you with ideal transmission data rate and wider compatibility as well. As a concept of virtual USB storage, the USB host support is a must for connecting device.
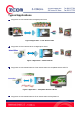
Typical Applications Play photos in local shared folders via digital photo frame Figure 2 Application – Local Shared Folder Play photos in Flickr network album via digital photo frame Figure 3 Application – Network Album Play photos in local shared folders or Flickr network album via compatible Hisense LED TV Figure 4 Application – Compatible Hisense LED TV Play photos in local shared folders or Flickr network album via Play Station 3 Chapter 1 Introduction 8
Figure 5 Application – PS3 Chapter 1 Introduction 9
Chapter 2 Basic Installation System Requirements Before installing and using your VUS-100, make sure your system meets the following requirements: One set of access point compliant with IEEE 802.11b/g/n One set of PC installed with 10/100 Base-TX network adapter Keep the IP address of PC, access point and VUS-100 in the same network segment. By default, VUS-100 is set to 192.168.1.1, configure the IP address of PC to 192.168.1.
VUS-100 (Please refer to Chapter 3 & 4 for configuration details.) Plug VUS-100 out from your computer after configuration, and connect it to the digital photo frame, compatible Hisense LED TV or PS3 to complete installation. LED Definition The following table demonstrates the definition of LED which indicates the network activity of VUS-100.
Chapter 3 Basic Settings Factory Default Settings The VUS-100 is set to default values when you first use it. The following table demonstrates the default settings of VUS-100, you can re-acquire these parameters by resetting the device. If necessary, please refer to Restore Factory Default Settings. Table 2 VUS-100 Factory Default Settings Item Default Value Device Name VUS-100 UPnP Disable IP Address 192.168.1.1 Gateway IP 192.168.1.254 Subnet mask 255.255.255.0 Primary DNS 0.0.0.
Copy the Utility.exe from the attached product CD into your PC, and double-click to run this utility, as shown below: Figure 6 Default Interface of Utility Web-based Management Interface Alternatively, after accessing the wireless network, you can input the IP address (By default it is set to 192.168.1.1) of VUS-100 in the IE address field to login VUS-100 Web-based management interface or use UPnP to login VUS-100 and make configuration.
Figure 7 Basic Settings Device Name You can specify the name of VUS-100 at will. Note that it is 15 characters at most and case-sensitive. UPnP By enabling UPnP, VUS-100 is able to search for available network devices automatically, so as to establish connection with other network devices much faster. IP Settings You can specify and manage the IP address of VUS-100 in this page.
Figure 8 IP Address Assignment Obtain IP Address Automatically By checking this option, VUS-100 will request for an IP address from the network if being connected to the wireless network, then the DHCP server will select an idle IP from its IP pool and allocate it to VUS-100 after receiving this request. Use Fixed IP Address You have to manually specify the IP address, subnet mask, gateway IP, primary DNS and secondary DNS if check this option.
Wireless Basic Settings From the Utility, click Wireless → Basic Settings in the left menu bar to make basic wireless configuration for your VUS-100. Figure 9 Wireless Basic Settings SSID For AP and STA to identify a wireless network, SSID is composed of 32 ASCII characters at most and is case-sensitive. Keep the SSID on VUS-100 and AP identical for connection. By default, it is set to any which means VUS-100 will search and establish connection with the available AP of strongest signal strength.
Wireless Security Settings Figure 10 Wireless Security Settings Auth-Type (Authentication Type) - Open System: Allows connection with any AP. - Shared Key: Encryption and key are required. - WPA-PSK: As a simplified WPA mode, there is no need for special authentication server. This WPA Pre-shared Key mode only requires to input a key in each WLAN nodes (AP, wireless router, adapter, etc) beforehand. - WPA2-PSK: This is a new version of WPA.
- 64 bits: It is composed of 10 hex digits. - 128 bits: It is composed of 26 hex digits. - 152 bits: it is composed of 32 hex digits. - TKIP: Short for Temporary Key Integrity Protocol, it is a dynamic encryption way co-used with WPA-PSK. - AES: Short for Advanced Encryption Standard, it is usually co-used with WPA, WPA2, WPA2-PSK.
The VUS-100 will search for available APs in LAN and establish connection automatically after being powered on. You can view the information of available APs in Site Survey from Wireless. Select the AP you would like to connect and click Join to establish connection. Clicking Refresh allows you to view the real-time site survey list. Wireless Connection Scenario The following picture illustrates typical applications on VUS-100.
Chapter 4 Browse Local Shared Folders Auto-search Shared Folders in LAN Figure 13 Folders Open Folders in the left menu bar; By clicking Scan the VUS-100 will search all the available shared folders in LAN automatically. The scan result will be listed in the dialog box. Browse Several Local Shared Folders Simultaneously VUS-100 allows you to browse more than one shared folder simultaneously if there are several shared folders available in LAN.
Figure 14 Browse Several Shared Folders Chapter 4 Browse Local Shared Folders 21
Chapter 5 Browse Flickr Network Album Add/Delete Flickr Account Click Flickr in the left menu bar to add or delete the account of Flickr network album.
Figure 16 Add Flickr Account After adding an account, you can browse the shared albums under this account; as to the private albums, please refer to Browse Private Flickr Network Album. Note: The length of Flickr user name can not exceed 50 characters. Click “Apply” to save settings after adding or deleting, and reboot the device.
Maximum Photos to Return Figure 17 Maximum Photos to Return Maximum Photos to Return You can specify the number of photos to be browsed in this field, ranging from 1 to 500. Besides from setting the maximum number, you can also specify the size of photos to be browsed. The available size options are: 75×75, 100×100, 240×240, 500×500, 1024×1024, and Original Photo. Note: Original Photo: You have to apply an authority from Flickr if you would like to view the original photo. Usually this is a charge service.
album. Step 1. Add a Flickr account that you will use to browse the private album in Account Name field; Figure 18 Browse Private Flickr Network Album Step 2.
Figure 19 Authentication Step 3. Click the link as shown above: http://www.flickr.
Figure 20 Login Step 4. Input the Username and Password of account that you would like to browse.
Figure 21 Confirmation Step 5. Click OK, I’LL ALLOW IT.
Figure 22 Code Step 6. Type the code that you get into the corresponding field of your Utility, and click Complete Authentication to finish the process. Now you can browse that private Flickr Network Album.
Figure 23 Input the Code Chapter 5 Browse Flickr Network Album 30
Chapter 6 Management View the VUS-100 Basic Information In the Utility, click Status in the left menu bar to view the basic information of your VUS-100. Click Refresh to view the real-time information. All is read-only. Figure 24 Basic Information View Statistics Information In the Utility, click Statistics under Status in the left menu bar to view the data statistics of VUS-100. Click Refresh to view the real-time information. All is read-only.
Figure 25 Statistics Wireless: It illustrates the communication statistics with AP. Folders: It illustrates the communication statistics when browsing the shared folders in LAN. Flickr: It illustrates the communication statistics when browsing the Flickr network album. Firmware Upgrade VUS-100 provides you with multiple options for firmware upgrade.
Figure 26 Upgrade Firmware via Utility - Click to open Management → Upgrade in the left menu bar; - Click Select Firmware File and select the file you would like to upgrade; - Start upgrade by clicking Upgrade; - A prompt indicating successful upgrade will pop up after the firmware has been upgraded; - Reboot VUS-100 to let the new firmware be applied.
- Click Browse to select the file you would like to upgrade; - Click Upload to start firmware upgrade; - Reboot VUS-100 to let the new firmware be applied. Backup/Restore Settings It is strongly recommended backing up configuration information in case of something unexpected. If tragedy hits the VUS-100, you may have an access to restore the important files by the backup. VUS-100 provides two ways to backup and restore settings.
- After confirming, a VUS-100.cfg file will be saved in your local disk. Restore Settings: - A dialog box will pop up by clicking Open, suggesting you select the file that you want to restore, such as C:\VUS-100.cfg; - Click Retrieve, that configuration file will be loaded to your VUS-100; - A window suggesting reboot your VUS-100 will appear. After reboot, new settings will be applied into your device.
Restore Factory Default Settings The VUS-100 provides three ways to restore factory default settings. Restore Factory Default Settings via Utility Figure 30 Restore Factory Default Settings via Utility - Click to open Management → Config in the left menu bar; - By clicking Reset a window will pop up, suggesting you whether to restore factory default settings. Click Yes to start the process. It will take about 120 seconds.
Figure 31 Restore Factory Default Settings via Web - Click to open Management → Configuration; - By clicking Reset a window will pop up, suggesting you whether to restore factory default settings. Click Yes to start the process. Restore Factory Default Settings via Default Button When the VUS-100 is working with power switched on, press the default button for about 3 seconds, then the device will reboot and default settings will be applied. Reboot The VUS-100 provides two ways to reboot.
Figure 32 Reboot via Utility - Click to open Management → Reboot in the left menu bar; - Please wait for about 120 seconds after clicking Reboot, till the reboot process is completed. Reboot via Web Figure 33 Reboot via Web - Click to open Management → Configuration; - By clicking Reboot a window will pop up, click Yes to start the process.
Chapter 7 Troubleshooting FAQ (Frequently Asked Questions) Q 1. How to know the MAC address of my VUS-100? MAC address distinguishes itself by the unique identity among network devices. There are three ways available to know it: • At the bottom of each VUS-100 posted a label with the MAC address, as shown below: • From the VUS-100 utility, open Information in Status to view the MAC address; • From the VUS-100 Web-based management, open Basic Information to view the MAC address. Q 2.
• Whether the Filckr album that you are going to browse is a private one? If so, please apply for an authority; • Whether you have reboot your VUS-100 after configuration? Technical Support Please go to http://www.zcom.com.tw for the latest firmware. If there is any problem or difficulty during installation and usage, please contact local vendor for support. Website: http://www.zcom.com.tw Support E-mail: supportBwa@zcom.com.
Appendix A. Specifications Table 3 Product Specifications SPECIFICATION Model VUS-100 Standards - IEEE 802.11b (Wi-Fi Compatible) IEEE802.11g (Wi-Fi Compatible) IEEE802.11n (Wi-Fi Compatible) IEEE802.3af (Power over Ethernet) IEEE802.
Data Encryption - SSID Broadcast Yes WEP (40, 128, 152-bit) with Passphrase WEP Key Generation TKIP AES MANAGEMENT Web-based Management Yes. Secure SSL Windows-based Utility Yes Firmware Upgrade Utility/ HTTP Save & Load Configuration Utility /HTTP The Configuration File is human-editable.
IEEE 802.11g Best,54, 48, 36, 24, 18, 12, 9, 6 Mbps IEEE 802.11n Draft 2.0 ENVIRONMENT Dimensions 40(L)mmx70(W)mmx10(H)mm Weight <400g Power Supply DC Adapter : +5V DC@1A Operating Temperature 0 ~ 55 ℃ Operating Humidity 10 ~ 95% Non-Condensing Storage Temperature -10 ~ 65 ℃ Storage Humidity 5 ~ 95% Non-Condensing Green policy RoHS Compliant Warranty 12 months Appendix A.
Appendix B. Technical Terms Table 4 Technical Terms Terms Description IEEE 802.11n An extension to 802.11 specification developed by the IEEE for wireless LAN (WLAN) technology. 802.11n builds upon previous 802.11 standards by adding multiple-input multiple-output (MIMO). The additional transmitter and receiver antennas allow for increased data throughput through spatial multiplexing and increased range by exploiting the spatial diversity through coding schemes.
Appendix C. ASCII WEP can be configured with a 64-bit or 128-bit Shared Key (hexadecimal number or ACSII). As defined, hexadecimal number is represented by 0-9, A-F or a-f; ACSII is represented by 0-9, A-F, a-f and punctuation. Each consists of two-digit hexadecimal.
Federal Communications Commission (FCC) Interference Statement This device, IEEE 802.11b/g/n Wireless Media Adapter, complies with Part 15 of the FCC Rules. Operation is subject to the following two conditions: This device may not cause harmful interference. This device must accept any interference received; including interference that may cause undesired operation. This Equipment has been tested and found to comply with the limits for a Class B digital device, pursuant to Part 15 of the FCC rules.