IEEE 802.
Copyright The contents of this publication may not be reproduced in any part or as a whole, stored, transcribed in an information retrieval system, translated into any language, or transmitted in any form or by any means, mechanical, magnetic, electronic, optical, photocopying, manual, or otherwise, without the prior written permission. Trademarks All products, company, brand names are trademarks or registered trademarks of their respective companies. They are used for identification purpose only.
FCC Interference Statement This equipment has been tested and found to comply with the limits for a Class B digital device pursuant to Part 15 of the FCC Rules. These limits are designed to provide reasonable protection against radio interference in a commercial environment. This equipment can generate, use and radiate radio frequency energy and, if not installed and used in accordance with the instructions in this manual, may cause harmful interference to radio communications.
Content Chapter 1: Introduction .............................................................................................. 5 1.1 Five steps to success...................................................................................... 5 1.2 Functions and Features.................................................................................. 7 Chapter 2: Hardware Installation............................................................................... 9 2.1 Panel Layout............................
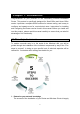
Chapter 1: Introduction Congratulations on your purchase of the outstanding Wireless Broadband Router. This product is specifically designed for Small Office and Home Office needs. It provides a complete SOHO solution for Internet surfing, and is easy to configure and operate even for non-technical users. Instructions for installing and configuring the Router can be found in this manual.
independent of your technical skills. The more advanced and familiar you are with networking terminology, the more you will act intuitively. A beginner will need more support in learning about his new networking equipment. Some chapters are therefore supplemented with additional information, designed for Beginners: 2.
Configuration 1.2 Functions and Features High speed wireless LAN connection 11Mbps data rate incorporating Direct Sequence Spread Spectrum (DSSS). Roaming Seamless roaming within the IEEE 802.11g WLAN infrastructure. IEEE 802.11g compatible Allows interoperability between multiple vendors. Auto fallback 11M, 5M, 2M, 1M data rate with auto fallback. Broadband modem and NAT Router Connects multiple computers to the internet through a broadband (cable or DSL) modem or an Ethernet router.
Firewall All unwanted network packets from outside intruders are blocked to protect your Intranet. The access rule allows you to control access to a network by analyzing the incoming and outgoing packets and letting them pass or blocking them based on the source and destination IP Addresses.
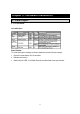
Chapter 2: Hardware Installation 2.1 Panel Layout 2.1.
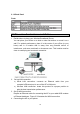
2.1.2 Back Panel Ports: 2.2 Procedure for hardware installation 1. Decide where to place your Wireless Broadband Router. You can place your Router on a desk or other flat surface, or mount it on a wall. For optimal performance, place it in the center of your office (or your home) and in a location that is away from any potential source of interference, such as a metal wall or microwave oven. This location must be close to a wall plug and a network connection. 2.
Use the USB cable to connect your printer to the AP’s USB port . 5. Power on Connect the power adapter to the power socket. Your Router then will automatically enter the self-test phase. During the self-test, the M1 indicator will be lit ON for about 10 seconds, and will then flash 3 times to indicate that the self-test operation has completed. Finally, the M1 will flash continuously once per second to indicate that the AP is in normal operation.
3.1.2 Configuration of your Wireless Client To open a wireless connection to your Router, it is necessary to configure the wireless client device in your PC: 1. SSID: CONNECT2AIR 2. Channel: 10 3. WEP: disabled These parameters can be entered in the User Interface of your network card. Please refer to the documentation delivered with your device. Note: Recent Client Configuration Utilities do detect the wireless settings automatically.
Note: If you have setup your computer to use a static IP address: Please make sure your PC’s IP address is in the same network as the Router’s. In windows 98SE you can type WINIPCFG and in windows 2000/XP you can type IPCONFIG (see appendix) to find out if you are on the same network.
Chapter 4: Router Configuration This product is provided with a Web based configuration interface, that can be accessed through your Web browser, such as Internet Explorer, Netscape Communicator, or any other HTML compatible browsers. This interface can be used in any MS Windows, Macintosh or UNIX based platforms. 4.
Shows the status of the SSID, security setting and access control of the Router. Printer Status. The possible values of printer status include “Ready”, “Not ready”, “Printing…”, and “Device error”. 4.3 Wizard The Wizard section will guide you through the main settings of your Router. You will be prompted to select your ISP (Internet Service Provider). If you would like to use your device strictly as an Router only (no connection to ISP) please select “No ISP”.
4. PPTP a) My IP Address and My Subnet Mask: the private IP Address and subnet mask that your ISP assigned to you. b) Server IP Address: the IP Address of the PPTP server. c) PPTP Account and Password: the account and password that your ISP assigned to you. If you don't want to change the password, leave the field empty. d) Connection ID: optional. Input the connection ID if your ISP requires it. e) Maximum Idle Time: the time of no activity to disconnect your PPTP session.
Whenever there is a request, the DHCP server will automatically allocate an unused IP Address from the IP Address pool to the requesting computer. You must specify the starting and ending address of the IP Address pool. 4. Gateway: Optional, this information will be passed to the client. The Gateway Address would be the IP Address of an alternate Gateway. This function enables you to assign another gateway to your local PC, when the DHCP server assigns an IP Address to your PC. 5.
1. Static IP Address WAN IP Address, Subnet Mask, Gateway, Primary and Secondary DNS: enter the settings provided by your ISP. Clone MAC address: If your ISP requires a specific MAC address to connect to the service, you can enter a specific MAC address or clone the current computer’s MAC address through this link. 2. Dynamic IP Address a) Host Name: optional. Required by some ISPs, for example, @Home.
and DNS configurations. It is not easy to manually configure all the computers and devices in your network. Fortunately, DHCP Server provides a rather simple approach to handle all these settings. This product supports the function of DHCP server. If you enable the DHCP server and configure your computers as “automatic IP allocation” mode, then when your computer is powered on, it will automatically load the proper TCP/IP settings from the AP.
mode for your network environment is strongly recommendated. G only Mode: Come up with a pure high speed 11g network. All 802.11g clients are initiated and operating at high rate. B only Mode: The similar situation as G only mode, except it will create a pure low rate wireless network. All clients are all operates at low rate that legacy 802.11g network introduced.. 5. Radio Channel: The radio channel number. The permissible channels range from Channel 1 to 11 (default is 13).
High2>high1>Middle2>Middle1>Low>None. 1. Wired Equivalent Privacy (WEP) Settings WEP (128 or 64-bit) is used here. WEP Key 1, 2, 3 & 4: When you enable the 128 or 64 bit WEP algorithm, please select one WEP key to be used.
associated IP address of RADIUS and port number, which usually set in 1812, and the secret key which is identified with the given key in RADIUS. After finish adding RADIUS information, return to the page of Wireless Security Settings, you will be allowed to do further configuration of 802.1x as the picture shows up. Hereby you can choose to have either 802.1x with static WEP, with dynamic WEP and WPA-EAP to even more secure your wireless network. 3. 802.
IEEE 802.1x is a standard for network access control (port based), especially introduced for a distribution of encryption keys in a wireless network. The Router supports 802.1x will keep out unauthorized users and perform verification of credentials with RADIUS to allow authorized users to access the network and services. To use 802.1x, you will need at least one common Extensible Authentication Protocol (EAP) method on your authentication server, APs (authenticator) and stations (Supplicant). Also, 802.
characters you input to stations’ WPA-PSK entry. WPA-EAP: Working with RADIUS, systems with WPA-EAP will be employed with an new encryption method called Temporal Key Integrity Protocol (TKIP) implementation with 802.
4.4.6 WDS Settings Peer AP's for Wireless Distribution System (WDS): Normally, Routers are linked to each other via cables. With WDS, you can link Routers via a wireless link instead. This way you can extend the range of your network without having to use cables to link the Routers. When you click Add, you can enter the MAC address of an Router to link to. You also need to enter the peer MAC address in the other Router. You can use up to eight Routers in a WDS.
FCC Caution 1. The device complies with Part 15 of the FCC rules. Operation is subject to the following two conditions: (1)This device may not cause harmful interference. (2)This device must accept any interference received, including interference that may cause undesired operation. 2. FCC RF Radiation Exposure Statement: The equipment complies with FCC RF radiation exposure limits set forth for an uncontrolled environment.