1 Introduction 2 11 Features, — 2 12 TTT, 13 Product Overview . reverence 3 2 sanguinary— a 1 Inserting the Memory Card 4 22 ean 5 23 Adjust Device Position, 5 24 Connecting to Power. 7 25 Set Date & Time. _— 3 26 Default Settings. 3 27 Factory Reset 8 2% Rear Caroms Installation — 9 3 Yong hw ar Dag Cam rr 3 31 Videos. 311 Managing Video & Photo 312 GPs.
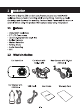
1 Introduction Welcome to buy the Z3D car dash cam. Protect you and your vehicle with real-time video and audio seconding whilst you're driving. Featuring a stealth size design and dual-lens for recording front and back. Please read this manual ‘carefully before sing ths product.
13 Product Overview 4s) (CD ©) Power Button €) TF/MicraSD Can Sat 1D Speaker €) Tumescent Button 5) Front-View Lens © Up Button ® Mic ©) Down Bunion B Usable © OK/Record Button 2) Suction Cup Mount € Mia Usa Port 0) Usa connector: © suction Mount Riot 03 Mini Lisa Part © Mini Usa Port ©) Rear Viewers
ERE] 21 Inserting the Memory Card Insert the memory card, with the pins facing towards the back of the device, nti it cis. into place. Remove Memory Card Push the edge af the memory cans misheard ur you feel it click, then allow it to ash owt unt you can remove it from the soot. Note ‘Supports Micro SD cares up to 25668. » Do not remove or insert memory card whist the device is powered on this may damage the memory card.
22 Installation Please follow the below instructions for mounting your dash cam to your vehicles windshield 1 Slice the car mount into the slot an top of the device until a dick sound is heard. 2 Press the suction cup filmy against your windshield, and rotate the lever clod wise {12 ‘dad to secure.
23 Adjust Device Position L Loosen the rut t wive the device vertical. Ck 1 place and secure by tightening the nut. 2 Swivel the device horizontally for a clear view.
24 Powering the Dash Cam Use only the supplied car charger to parer the dash cam and charge the boot-n 1 Plug the USB cable (13) on the car mount into the car cash cam's USB connector (7. 2 Plug one end of the LSB charging cable into the USA Connector on the car mount (15); 5. Plug the other end into the car charger, and insert that into ‘your vehicles lighter socket. Automatic Power + Once the vehicle's engine is switched on, the dash cam wil automatically power on.
25 Set Date & Time Before using the device, we recommend you set the correct date and ime: 1 The device i recording, short press the 'OK/REC” button (6}o stop and enter Standby Mode. 2 Press the Escapement' button (3) to enter the General Settings menu. 5. Press the Up’ and ‘Down’ buttons select Date/Time and press 'OK/REC button (8) to confirm. 4, Press the Up’ and ‘Down’ buttons adjust the value and then press "OK/REC" button (6) to confirm and move to the next died. 5.
28 Rear Camera Installation 1 Connect one end of the Mini LSB cable into the Mini ISB Part (5) on the dash camera. Convict the other end into the Mini ISB Port (6) an the rear camera. 2 Tum the camera on. The rear-Ens view wil automatically appear on the display screening Dual (PP) format. Tip: To view full-screen, press the Tumescent button (3) to enter the General Settings menu. Use the Up! and ‘Down’ buttons select the Screen Display option and press the button ( to confirm.
3 Using the Car Dash Cam 31 Recording Videos ‘With an SD card inserted and the device connected to power, when the ar ‘engine is switched on the dash cam wil automatically power on and start recording, Whiten the vehicle engine is switched of, the dash cam will automatically save the recording and power off within 10 seconds. Alliteratively, short press the ‘PRECOOK Burton (6 to shortstop video recording manually.
107 “Indicates if device is recording, press 'OK/REC 13 | Rooord/SWp | by iron 8 to stopper recording. 1 | Menu Press ‘Escapement’ button (3) to enter menu. 12 | Preview Press ‘Down’ button (5) to preview video/photo. 14 | Presume | Time and date 33 Adjusting the Settings Customize the video recording and other general settings via the on-screen display (OSD) mem: The device is recording, short press the ‘OK/REC” button (6) to stop and enter Standby Mode.
36 Motion Detection With Motion Detection enabled, video recording is automatically started when movement is detected by the camera lens. After approximately 10 seconds with no movement detected, vied recording is automatically paused. Indispensable feature: Feature Settings > Mason Detect 37 vibration Detection ‘The Vibration Detection feature senses for unusual impacts or collisions detected by the built-in G-Sensor.t automatically triggers the Emergency Video Protection and Parking Mode features.
5. Press the Up’ and ‘Down’ buttons select between Normal Video, Emergency Visa ar Photo, Press the 'OK/REC" button (8) to select or press the 'Escapement' button (3) to rectum to standby made. 4, Press the Up’ and ‘Down’ buttons choose the fie to preview and "OK/REC" button (8) to select 5. Press the 'OK/REC’ button (6) to preview the fie. 6. Press the Musclemen button (3) to reform ta the playlist menu. 311 Managing Video & Photo Files 16a to the Playlist menu (see 3.10).
« GPS Multimedia Player compatible with Microsoft Windows and Apple Mac « GP tracking data mey not ba viewable using other GP Copiers.
Resolute Set the resolution of the | 2560X1440P 30 fos 1 | videos robe recorded. | 2304L296P 30 fps 19201080 60 fps 192010809 30 fps 1280x720P 120 fps 1280x720P 60 fps. 1280x720P 30 fps . . Front Camera, Rear Screen Display | Sets the screen display | for’ Co Set the duration of each Loop Recording | video fla recorded to the | 1 min / 2 mind /3 mind. memory card (se0 34). Votes Sep Sades sunroof “20, +573, 43,10, Exposure Seth cache cam +203, 413,400, 173. 23,10, 473, 53,20 ‘Overmodest ade and .
‘Where should 1 place tha dash cam? « We recommend that you mount the ca dash cam as ease to the center of ‘the windshield as possible, This should nether distract the driver nor bock the drivers view (s2e 24). ‘Why does the dash cam stop recording fare same time? + F motion detection i enabled, the dash cam will automatically stop recording when no movements is redacted for mots then 15 seconds (see 3.61 = Your micro SD care may be full and need to be formatted before using again.
Operating Temperature | -10 to 10 140°F Storage Temperature ROTC] 410 SEF Dimensions Front comers: 382 inch x 197 inch x 128 inch (©7mm x 50mm x 32 Emmy) Rear Carmen: cinch 16 Inch x 13 Inch (545 mmx 40mm x 2mmyLW) Weight Front caner: 3002/35 Rear camera: 14az / 40g Car Charger INPUT: DC 12-24V, OUTPUT: DC 5v 244 GPS Logger Builtin
FCC Statement: “This equipment has been tasted and found ta comply with the limits for a Class B digital device, pursuant to Part 15 of the FEC Rules. These ims are designed ta provide reasonable protection against harmful interference in a residential installation, This equipment generates, uses and can rack ate raid frequency ‘energy and, if not installed and used in accordance with the instructions, may ‘cause harmful interference to radio communications.