
Install Instructions


Page 14 of 18
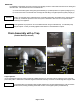
INSTALLING Z-VENT
INTO AN EXISTING MASONRY CHIMNEY
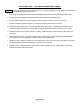
A masonry chimney flue may be used to route Z-Vent through provided that no other appliance is vented directly
into the same flue without a chimney liner.
¾ Prior to beginning the installation make certain that the existing chimney meets all national and local building codes.
¾ The chimney must be cleaned, removing all soot, debris and creosote before installing Z-Vent.
¾ It is recommended to have the vent stack supported from the bottom so that the system is in compression.
¾ Prepare and install the “preferred” support for receiving the vent system at the bottom of the stack.
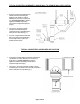
¾ Following the joint procedure (pg. 5, 6) connect the bottom fitting / pipe together. Implementing “best practice” and / or
“preferred” methods assemble the vent system while lowering the flue downwards into the chimney onto the support.
¾
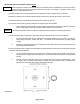
Prepare the chimney cap to receive the Z-Vent Flashing. Install the flashing over the last length of pipe down to the
chimney cap.
¾ Loosely attach the Z-Vent Top Support / Storm Collar to the pipe directly above the flashing leaving approximately 6
inches of pipe for the vertical termination connection and any breaching adjustment.
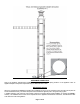
¾ Fasten the Z-Vent Flashing to chimney top using caulking and/or screws. If the top clay tile is still in place, the corners of
the flashing should be notched and flashing plate formed down around clay tile.
¾ Install the Z-Vent Vertical Termination. Adjust the top support and tighten the collar. Apply sealant to upper edge
where the top support collar meets the pipe.
NOTICE