
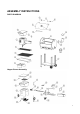
Assembly Instructions


8
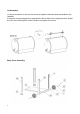
2.Assembling of Hopper
Insert Hopper Assembly II (61) into Hopper Assembly I (3), align the holes. Insert the Bolts
(58) through the holes in the Hopper and Hexagon Kep Nuts (59), then open the Hopper Lid
and tighten it from inside. The four sides are installed in the same way.
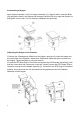
3.Mounting the Hopper to the Chamber
1.Remove the 4 Gaskets and 4 Bolts from the Hopper, open the Lid, insert the Hopper into
the square hole in the Chamber. Attach the 4 Gasket and 4 Bolts that were removed from
the Hopper. Tighten the Bolts by using the Wrench.
2.Locate the RTD Male Plug-In-Connector coming from the Grill Chamber Assembly(1) It will
look like a loose wire with a connector on the end. Locate Connect the RTD Female Plug-In-
Connector coming from the Hopper Assembly (3). Connect the two RTD Plug-In-Connectors
together. Any extra loose wire can be tucked into the gap between the Grill Chamber
Assembly and the Hopper.