
Installation Guide

Installation Instruction
WARNING! SHUT POWER OFF AT FUSE OR CIRCUIT BREAKER
"Note: The installation is for 2, 3, 4 lite, the drawing shown is for representative, not to match your
new fixture."
1900/1901-3V, 9019-3
1. Carefully unpack your new fixture and lay out all the parts on clear area. Take care not to loose any
small parts necessary for installation. The Model No. shown on the drawings are are representative
2. The Universal Crossbar contains several pairs of threaded holes. Find the pair of holes that
match the hole spacing in your fixture Wall Plate, and thread the two Fixture Mounting Screws
part way into the Universal Crossbar and tighten with two Hex Nuts.
3. Secure the Universal Crossbar to the Outlet Box by threading the two Outlet Box Screws
through the Key Holes.
4. Connect the fixture wires to the Outlet Box wires as follows. Connect the White Fixture wire to the
White Supply Wire, Connect the Black Fixture Wire to the Black Supply Wire. Make sure all wire
Connectors are secure and do not easily pull off with the slight tug. If there is no Green Ground Wire
from the Outlet Box, Connect the Fixture Ground Wire to the Cross Bar with the Green Grounding
Screw provided.
5. Once all wires are connected, tuck them carefully into Outlet Box.
6. Place the Wall Plate over the Fixture Mounting Screws, so it protrude through the hole in the Wall Plate .
7. Thread the Finial onto the Fixture Mounting Screws and continue turning until the Wall Plate
is snug against the wall .
8. Slide Glass Shade and Spacer onto Socket, and use Hand Tool to secure Glass shade and Socket Ring
and thread Bulb to Socket
9. Return the power to the Outlet Box and test fixture. Your installation is now complete.
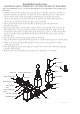
Spacer
Hand Tool
Bulb
Socket Ring
Glass Shade
Wall Plate Finial
Universal Crossbar
White Supply Wire
Hex Nut
Supply Ground Wire
Black Supply Wire
White Fixture
Wire
Outlet Box Screw
Fixture Mounting
Screw
Outlet Box
Socket
Fitter