
Installation Sheet

ASSEMBLY AND INSTALLATION INSTRUCTION
WARNING: SHUT POWER OFF AT FUSE OR CIRCUIT BREAKER!
NOTE: BEFORE INSTALLING, CONSULT LOCAL ELECTRICAL CODES FOR WIRING AND GROUNDING REQUIREMENT.
Installation Steps:
1. Shut off the power at the circuit breaker box. Remove old fixture and all hardware
from Outlet Box.
2. Carefully unpack your new fixture and lay out all the parts on a clear area. Take
care not to lose any small parts necessary for installation.
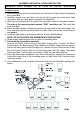
3. Attach the mounting plate to the outlet box using two outlet box screws as shown.
The side of the mounting plate marked “GND” must face out. The outlet box
is not included.
4. Place the glass shade, collaring ring and check ring insert to the lamp holder, lock
them securely with the socket wrench until tight, then remove the socket wrench
and save it.
5. Install the light bulbs in accordance with the fixture’s specifications.
NOTE: DO NOT EXCEED THE MAXIMUM WATTAGE RATING!
6. Guide supply wires through hole in center of mounting plate.
7. Follow wiring instructions carefully:
Connect the White Fixture Wire to the White Supply Wire, Connect the Black
Fixture Wire to the Black Supply Wire. Make sure all Wire Connectors are secure
and do not easily pull off with the slight tug. Connect Ground Wire from the Outlet
Box and Fixture Ground Wire to the Mounting plate with the Green Grounding
Screw provided. Tuck the wire connections neatly into the wall outlet box
8. Place the lamp body’s backplane over the mounting plate, aligning the backplane
holes with screw hole of the mounting plate on side, then lock it securely with
mounting screws.
9. Your installation is now complete. Return the power to the Outlet Box and test the
fixture.