
Installation Sheet

ASSEMBLY AND INSTALLATION INSTRUCTIONS
FOR YOUR SAFETY WARNING: BE SURE THE ELECTRICITY TO THE WIRES YOU ARE WORKING ON
IS SHUT OFF; EITHER THE FUSE IS REMOVED OR THE CIRCUIT BREAKER IS SHUT OFF. GENERAL
You don’t need special tools to install this fixture. Be sure to follow the steps in the order given. Under
no circumstances should a fixture be hung on house electrical wires, nor should a swag type fixture be
installed on a ceiling which contains a radiant type heating system. Read instructions carefully. If you
are unclear as to how to proceed, consult a qualified electrician. NOTE: Proper wiring is essential for
the safe operation of this fixture.
Assembly and Installation Step:
TOOLS REQUIRE:
Phillips (Star) Screwdriver
Small hex key (3mm and 4mm)
Adjustable wrench
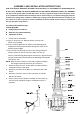
1. Anchor bolt set installation :
a. Dig a 15" deep hole, 15" diameter where you wish your
lantern to be installed.
b. Set the 3 Anchor Bolts into the 3 holes of the Mounting bolt
template and feed the Electric Wire through the center of the
Mounting bolt template.
c. Pour concrete into the hole up to the level of the ground and
sink the anchor set into the concrete. Make sure the top
surface of the Mounting bolt template is level to the ground surface,
and the Anchor Bolts protrude above the Mounting bolt template
surface by 4-1/8".
NOTE: Make sure the concrete is solid and dry before installing
the lamppost.(Usually this takes up to 24 hours.)
2. Attach the Base (2) to the Anchor Bolts, and fasten with the
3 Washers and the 3 Cap Nuts.
3. Attach the Connector to the Base (1), and fasten with 3 Set
Screw.
4. Attach the Connector Cover to the Connector, and fasten
with the Set Screw.
5. Set the entire post and lantern assembly on to the Base (2),
and secure the lamppost using the 3 Washers and the 3
Cap Nuts.