
Installation Sheet

Electric Code. If you are unfamiliar with methods of installing electrical wiring, secure the
services of a qualified licensed electrician.
3. Before starting the installation, disconnect the power by turning off the circuit
breaker or by removing appropriate fuse at fuse box. Turning the power off at the light switch is
not sufficient to prevent electrical shock.
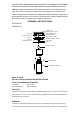
PREPARE THE FIXTURE
NOTE: First turn off electricity
1. Thread nipple into loop until snug. Thread the other end of nipple into the crossbar strap
until snug and secure with the lock washer and hex nut. Note the length of nipple into circular
strap may be adjusted if necessary.
2. Attach the crossbar strap assembly to the ceiling outlet box with screws, the side of the strap
marked "GND" must face out. Tighten screws securely with screwdriver. Determine the
desired hanging height and remove the excess chain with proper chain pliers to avoid
damaging the finish.
3. Open one end of the chain and connect it to the fixture chain loop and close the link. Thread
the wire carefully through the chain links. Place threaded ring followed by canopy over the
chain and allow them to carefully rest on the fixture body. Open the other end of the chain and
attach it to chain loop and close the link. Feed the wires through loop, and nipple.
4. Connect the electrical wires, making sure that all wire connectors are secured. If your outlet
has a ground wire (green or bare copper), connect the fixture’s ground wire to it. Otherwise,
connect the fixture’s ground wire directly to the crossbar using the green screw provided.
ELECTRICAL CONNECTIONS 120V~, 60Hz
Connect white wire(s) from fixture to white neutral wire from supply circuit.
Connect black wire(s) to black hot wire from supply circuit. Connect green wire to green or
bare wire or grounding screw on mounting bracket. In all cases grounding conductor to earth
must be used. Use UL/CSA Listed wire connects suitable for the size, type, and number of
conductors. No loose strands or loose wires should be present. Secure wire connectors with
UL/CSA Listed electrical tape.
Tuck the wire connections neatly into the junction box.
5. Raise the canopy to the ceiling and secure with threaded ring.
6. Installation is complete. Turn on the power at the circuit breaker or fuse box. Turn the light
switch on to activate the fixture.
7. LED replacement, take down the glass with metal parts, unscrew the screws on LED and
pull out LED module, replace LED module by quick connector. Then feed the new LED module
back and secure with screws.
CAUTION: LED fixtures can operate at high temperatures please
use caution when touching during operation or after operation.