
Installation Guide

INSTALLATION AND SAFETY INSTRUCTIONS
FOR YOUR SAFETY WARNING
BE SURE THE ELECTRICITY TO THE W IRES YOU ARE
WORKING ON IS SHUT OFF; EITHER THE FUSE IS REMOVED
OR THE CIRCUIT BREAKER IS SHUT OFF.
GENERAL
You don’t need special tools to install this fixture. Be sure to follow
the steps in the order given. Under no circumstances should a
fixture b e hung on ho use electrical wires, nor should a swag type
fixture be installed on a ceiling, which contains a radiant type
heating system. Read instr
uctions carefully. If you are unclear as
to how to proceed, consult a qualified electrician.
NOTE: Proper wiring is essential for the safe operation of this
fixture.
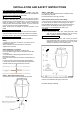
FIXTURE ASSEMBLY
Carefully removed the fixture from the carton and check that all
parts are included as shown in figure. Be careful not to misplace
any of the screws or parts, which are needed to install this fi xture.
INSTALLATION
IMPORTANT: Do not attach fixture directly to outlet box.
STEP 1
A. Prepare to make wire connections. (
Connectors are not
included with fixture.)
Strip and prepare wire ends according to instructions
supplied with connectors.
STEP 2 Make Wire Con nections -
B. Use standard wire connectors to make all wire
B. Connect White Supply W ire from the Post to White Wire
from fixture.
C. Connect Black (or Red) Supply Wire from the Post to
Black Wire from fixture.
D. Connect Ground Wire from the Post to Ground Wire from
fixture.
E. Twist connectors until wires ar
e tightly joined togethe r
.
F. Wrap e ach connection with approved electrical tape and
carefully stu ff all the connected wires in to the Post.
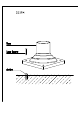
STEP 3 - Attach Fixture Body to Post
A. Secure the Fixture to Post with (3) Mounting Screws.
STEP 5 - Install Bulb
A. This fixture uses standard bulb with a candelabra screw
base. Maximum 60 watts.
B. Insert bulb and screw snugly into place.
STEP 6 Attach Fi xture Hood to Fixture Body -
a. Place the Fixture Hood Assembly ( D) over the top end of
the Center Stem ( E), attach to the t op edge of the Cage.
Pass the Waterproof Washer (F) over the Center Stem (E)
and secure with the Finial (B). Hand t ighten until snug.
Your fixture is now assembled and rea dy to use.
CLEANING
To clean, wi
pe fixtur
e with a soft cloth. Clean glass with a mild
soap. Do not use abrasive materials such as scouring
pads or powders, steel wool or abrasive paper.
ORDERING PARTS
Keep this sheet for fut ure reference, and in case you need to
order replacement p arts. All parts for this fixture can be
ordered from place of purchase. Be sure to use exact
wording from illustration when ordering parts.
Line art shown may not exact ly match the fixture enclosed.
However, the i nstallations do apply to this fi xtur
e.
ITEM NO: 580PHM / 580PHB