
GLIDER 20 USER MANUAL


Doc# 27-0006UM Issued 11/00 Rev 1.0
20
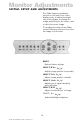
Monitor Adjustments
Step 1: Power Up
After the installation instructions have
been followed:
Turn on power to the computer/
workstation.
Turn on power to the Glider.
The Glider will then:
Illuminate the Power indicator
on the front panel.
Perform self tests.
Search for and automatically
determine the frequencies and sync
type of the incoming video signals.
Illuminate the stby indicator on
the front panel while powering up
and searching for proper sync
signals.
Extinguish the Stby indicator on
the front panel after acquiring
proper sync signals.
Display the video image on the
screen.
Step 2: Adjust Vertical Position
If vertical adjustments are need on
the screen display, press the SE-
LECT button until the V Pos
indicator is illuminated. Press either
the
button to raise the screen
image or the button to lower
the screen image. In most cases, the
image can be adjusted precisely to
center.
NOTE: A black band at the top and
bottom of the display may
be visible at certain
resolutions. This is normal,
as the expanded screen in
some resolutions does not
precisely fit the Glider screen
dimensions.