
GLIDER 20 USER MANUAL


Doc# 27-0006UM Issued 11/00 Rev 1.0
21
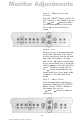
Step 3: Adjust Horizontal
Width
This is the critical step to ensure a
crisp screen image. For a Sharp
display, you must adjust the image so
that it fits precisely within the
boundaries of the screen.
To adjust the horizontal width:
1. Press the SELECT button until the
H Wd indicator is illuminated.
Alternately press the and
buttons to size the screen image
to the exact width of the display.
Adjusting so that there are no
borders on either side of the
display may aid in this process.
2. As you approach the proper
horizontal setting, fuzzy vertical
ghosting bands will appear on
the screen. These can be very
subtle, depending on the image
being displayed.
3. As you continue to make horizon-
tal width adjustments, these bands
will become wider and wider until
the entire screen becomes fuzzy all
over (i.e., no vertical bands), or
crisp all over.
Helpful Hint: A uniformly fuzzy
screen is often the last step before
locking on to the best screen image.
Monitor Adjustments