
GLIDER 20 USER MANUAL

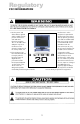


Doc# 27-0006UM Issued 11/00 Rev 1.0
Install Slides
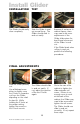
At the back of the
cabinest frame, tighten
the slide mounts to the
cabinet frame.
Make sure to hold the
slide mounts hard
against the rack rail.
8
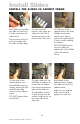
On each slide rail, use
a Phillips screwdriver to
loosen the two adjust-
ment screws toward the
back of the slide rail.
An adjustable wrench
or box wrench may be
used to hold the nut on
the other side of the
slide rail.
On the rear of the
cabinet frame, use
three Phillips screws to
loosely secure the right
and left rear slide
mounts to the cabinet
frame.
DO NOT tighten these
screws fully.
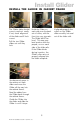
On the front of the
cabinet frame, use three
Phillips screws and
washers per side to
secure the right and left
Z-Lock mounts holding
the sliders.
DO NOT tighten these
screws to allow for
adjustment of the Glider
within the cabinet
frame.
As seen from this
reverse view, align the
slider into the Z-Lock
bracket grooves so all
three screw holes show.
Each slide unit includes
the slide rail, the front
Z-Lock mount and the
rear mount.
The top notch of the Z-
Lock must align with
the slide rail top ridge.
INSTALL THE SLIDES IN CABINET FRAME