VGA Cooler FS-V7 User’s Manual www.fatal1ty.
FATAL1TY STORY Who knew that at age 19, I would be a World Champion PC gamer. When I was 13, I actually played competitive billiards in professional tournaments and won four or five games off guys who played at the highest level. I actually thought of making a career of it, but at that young age situations change rapidly. Because I’ve been blessed with great hand-eye coordination and a grasp of mathematics (an important element in video gaming) I gravitated to that activity.
LIVIN’ LARGE Since my first big tournament wins, I have been a “Professional Cyberathlete”, traveling the world and livin’ large with lots of international media coverage on outlets such as MTV, ESPN and G4TV to name only a few. It's unreal - it's crazy. I’m living a dream by playing video games for a living. I’ve always been athletic and took sports like hockey and football very seriously, working out and training hard.
User’s Manual (English Version) 1. Important Notices 1.1) Please read this manual thoroughly before installation. 1.2) After installing this product on a VGA(Video Graphics Array) card, a PCI slot adjacent to the AGP (or PCIe) slot will become unusable. 1.3) Before installing on a newly released VGA card, please check for compatibility at Fatal1ty’s website* or Zalman’s website**. 1.4) This product is not compatible with Matrox VGA cards and NVIDIA PCX 5*** VGA cards. 1.
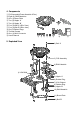
4. Components ① FHS Assembly(Flower Heatsink & Fan) ② Eight (8) RAM Heatsinks ③ One (1) Brace Plate ④ Two (2) Nipple ‘A’ ⑤ Two (2) Nipple ‘B’ ⑥ Four (4) Bolt 'A' (Ø3 x 5mm) ① ⑦ Four (4) Bolt 'B' (Ø4 x 4mm) ⑧ Six (6) Rubber Rings ⑨ Thermal Grease ⑩ One (1) Multi-Connector ⑪ User’s Manual ④ ⑤ ⑥ ⑦ ⑧ 5.
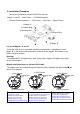
. Installation Procedure ※The following installation sequence MUST be followed. (Nipple ‘A’ and ‘B’ → Brace Plate → VGA RAM Heatsinks → Thermal Grease Application → VGA Cooler → VGA Card → Supply Power) 1) Nipple ‘A’ 2) Rubber Ring 3) Mounting Hole 4) Rubber Ring A B Nipples 5) Nipple ‘B’ 6.1) Install Nipples ‘A’ and ‘B’ Check the VGA card for compatible installation hole positions. Install Nipple ‘A’ and Nipple ‘B’ on the heatsink Mounting Holes as shown in the diagram.
2) Screwdriver 3) Bolt 'B' 1) Brace Plate 6.2) Install the Brace Plate 4) Nipple ‘B’ Use each Bolt 'B' to attach the Brace Plate to each Nipple ‘B’ as shown in the diagram. 6.3) Attach the VGA RAM Heatsinks Remove the Film from the Thermal Tapes on the bottom of the RAM Heatsinks and attach the heatsinks on the VGA RAM. 3) RAM Heatsink 4) VGA RAM 5) Nipple ‘A’ 6) VGA Chipset 1) Thermal Tape 2) Film Note 1) If Thermal Grease or other residue remains on the RAM, the Thermal Tapes will not stick.
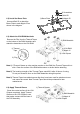
6.5) Install the FHS Assembly 1) Bolt ‘A’ Align the FHS Assembly’s base on the center of the VGA Chipset. Screw each Bolt ‘A’ on each Nipple ‘A’ slightly, and tighten each Bolt ‘A’ a few turns at a time, alternating between each bolt, until the Clip is completely attached to each Nipple ‘A’. 2) FHS Assembly 3) Clip 4) Nipple ‘A’ Note) 5) VGA Chipset Make sure that the heatsink's base and the VGA Chipset are completely in contact with each other. 6.
www.fatal1ty.com www.zalman.co.kr www.zalmanusa.com Fatal1ty and the Fatal1ty logo are trademarks of Fatal1ty, Inc. under the master license of Auravision, Inc. Zalman and the Zalman logo are trademarks of Zalman Tech Co., Ltd. ©2005 Zalman Tech Co., Ltd. All rights reserved.