User Manual Benutzerin‐ formation Dishwasher PVX1556 Geschirrspü‐ ler
Contents Safety information Safety instructions Product description Control panel Programmes Settings Options 2 3 4 5 5 6 9 Before first use Daily use Hints and tips Care and cleaning Troubleshooting Technical information 9 10 12 13 15 18 Subject to change without notice. Safety information Before the installation and use of the appliance, carefully read the supplied instructions. The manufacturer is not responsible for any injuries or damages that are the result of incorrect installation or usage.
• • • • • • • • Obey the maximum number of 13 place settings. If the supply cord is damaged, it must be replaced by the manufacturer, its Authorised Service Centre or similarly qualified persons in order to avoid a hazard. Put the cutlery in the cutlery basket with the sharp ends pointing down or put them in the cutlery drawer in a horizontal position with the sharp edges down. Do not leave the appliance with the open door unattended to avoid stepping accidentally onto it.
• • • • Disposal Warning! Dangerous voltage. • If the water inlet hose is damaged, immediately close the water tap and disconnect the mains plug from the mains socket. Contact the Authorised Service Centre to replace the water inlet hose. Use • • Do not drink and play with the water in the appliance. Do not remove the dishes from the appliance until the programme is complete. Some detergent may remain on the dishes. The appliance can release hot steam if you open the door while a programme operates.
11 Lower basket 12 Upper basket Control panel 1 2 1 On/off button 2 Programme buttons 3 Delay button 4 3 4 Indicators Indicators Indicator Description End indicator. XtraDry indicator. Rinse aid indicator. It is always off while the programme operates. Salt indicator. It is always off while the programme operates.
Programme 3) Degree of soil Type of load • All Programme phases • Options Prewash 1) With this programme, you have the most efficient use of water and energy consumption for crockery and cutlery with normal soil. This is the standard programme for test institutes. 2) With this programme, you can wash a half-load dishwasher with fresh soil. It gives good washing results in a short time.
How to enter user mode The higher the content of these minerals, the harder your water is. Water hardness is measured in equivalent scales. Make sure the appliance is in programme selection mode. The water softener should be adjusted according to the hardness of the water in your area. Your local water authority can advise you on the hardness of the water in your area. It is important to set the right level of the water softener to assure good washing results.
The rinse aid is automatically released during the hot rinse phase. When rinse aid chamber is empty, the rinse aid indicator is turned on notifying to refill rinse aid. If the drying results are satisfactory while using multi-tablets only, it is possible to deactivate the notification for refilling rinse aid. However, for best drying performance, always use rinse aid. If standard detergent or multi-tablets without rinse aid are used, activate the notification to keep the rinse aid refill indicator active.
Caution! Do not try to close the appliance door within 2 minutes after automatic opening. This can cause damage to the appliance. If, afterwards, the door is closed for another 3 minutes, the running programme ends. How to deactivate AirDry Make sure the appliance is in user mode. 1. AirDry is automatically activated with all programmes (if applicable). excluding Press The indicators off. , • The indicator still flashes.
How to fill the salt container 1. 2. 3. How to fill the rinse aid dispenser Turn the cap of the salt container counterclockwise and remove it. Put 1 litre of water in the salt container (only for the first time). Fill the salt container with 1 kg of salt (until it is full). A B C 4. 5. Carefully shake the funnel by its handle to get the last granules inside. Remove the salt around the opening of the salt container. Caution! Only use rinse aid specifically designed for dishwashers. 1. 2. 3. 4. 6.
Using the detergent A B 2. Press repeatedly until the indicator related to the desired number of hours is on (3h or 6h). The delay indicator is on. 3. Close the appliance door to start the countdown. While the countdown is running, it is possible to increase the delay time but not to change the selection of the programme and options. When the countdown is completed, the programme starts. Opening the door while the appliance operates C Caution! Only use detergent specifically designed for dishwashers.
Hints and tips General 2. The following hints will ensure optimal cleaning and drying results in daily use and also help to protect the environment. 3. • • • • • • Remove larger residues of food from the dishes into the waste bin. Do not pre-rinse dishes by hand. When needed, use the prewash programme (if available) or select a programme with a prewash phase. Always use the whole space of the baskets.
Care and cleaning Warning! Before maintenance, deactivate the appliance and disconnect the mains plug from the main socket. Dirty filters and clogged spray arms decrease the washing results. Make a check regularly and, if necessary, clean them. Cleaning the filters 4. Wash the filters. 5. Make sure that there are no residues of food or soil in or around the edge of the sump. Put back in place the flat filter (A). Make sure that it is correctly positioned under the 2 guides.
Caution! An incorrect position of the filters can cause bad washing results and damage to the appliance. 4. Cleaning the upper spray arm To engage again the spray arm to the basket, press the spray arm upwards in the direction indicated by the lower arrow and simultaneously turn it counterclockwise until it locks into place. We recommend to clean regularly the upper spray arm to avoid soil to clog the holes. Clogged holes can cause unsatisfactory washing results. 1. 2. Pull out the upper basket.
Troubleshooting If the appliance does not start or it stops during operation, before you contact an Authorised Service Centre, check if you can solve the problem by yourself with the help of the information in the table. With some problems the end indicator flashes intermittently indicating a malfunction. The majority of problems that can occur can be solved without the need to contact an Authorised Service Centre. Warning! Repairs not properly done may result in serious risk to the safety of the user.
Problem and alarm code Possible cause and solution The appliance door is difficult to close. • Rattling/knocking sounds from inside the appliance. • • • • The appliance trips the circuit-beaker. • The appliance is not levelled. Loosen or tighten the adjustable feet (if applicable). Parts of the tableware are protruding from the baskets. The tableware is not properly arranged in the baskets. Refer to basket loading leaflet. Make sure that the spray arms can rotate freely.
Problem The dishes are wet. Possible cause and solution • • • • • For the best drying performance activate the option XtraDry and set AirDry . The programme does not have a drying phase or has a drying phase with low temperature. The rinse aid dispenser is empty. The quality of the rinse aid can be the cause. The quality of the multi-tablets can be the cause. Try a different brand or activate the rinse aid dispenser and use rinse aid and multi-tablets together. The interior of the appliance is wet.
Technical information Dimensions Width / height / depth (mm) 596 / 818 - 898 / 550 Electrical connection 1) Voltage (V) 220 - 240 Frequency (Hz) 50 bar (minimum and maximum) 0.5 - 8 Water supply pressure MPa (minimum and maximum) 0.05 - 0.8 Water supply Cold water or hot water 2) max 60 °C Capacity Place settings 13 Power consumption Left-on mode (W) 5.0 Power consumption Off-mode (W) 0.10 1) Refer to the rating plate for other values.
Inhaltsverzeichnis Sicherheitshinweise Sicherheitsanweisungen Gerätebeschreibung Bedienfeld Programme Einstellungen Optionen 19 20 22 22 23 24 27 Vor der ersten Inbetriebnahme Täglicher Gebrauch Tipps und Hinweise Reinigung und Pflege Fehlersuche Technische Daten 27 28 30 31 33 36 Änderungen vorbehalten. Sicherheitshinweise Lesen Sie vor der Montage und dem Gebrauch des Geräts zuerst die Gebrauchsanleitung.
• • • • • • • • • • Nehmen Sie keine technischen Änderungen am Gerät vor. Der Betriebswasserdruck (Mindest- und Höchstdruck) muss zwischen 0.5 (0.05) / 8 (0.8) bar (MPa) liegen Beachten Sie, dass die Höchstzahl an Maßgedecken 13 beträgt. Wenn das Netzkabel beschädigt ist, muss es vom Hersteller, seinem autorisierten Kundenservice oder einer gleichermaßen qualifizierten Person ausgetauscht werden, um Gefahrenquellen zu vermeiden.
• • • Ziehen Sie nicht am Netzkabel, wenn Sie das Gerät von der Stromversorgung trennen möchten. Ziehen Sie stets am Netzstecker. Das Gerät entspricht den EC-Richtlinien. Nur Großbritannien und Irland. Dieses Gerät ist mit einem 13 A-Netzstecker ausgestattet. Muss die Sicherung im Netzstecker ausgetauscht werden, setzen Sie immer eine 13 A-Sicherung des Typs ASTA (BS 1362) ein. Wasseranschluss • • • • Achten Sie darauf, die Wasserschläuche nicht zu beschädigen.
Gerätebeschreibung 1 2 3 12 11 1 2 3 4 5 6 7 10 Oberster Sprüharm Oberer Sprüharm Unterer Sprüharm Filter Typenschild Salzbehälter Lüftungsschlitze 9 8 5 7 6 8 9 10 11 12 Klarspülmittel-Dosierer Reinigungsmittelbehälter Besteckkorb Unterkorb Oberkorb 4 Bedienfeld 1 1 Taste „Ein/Aus“ 2 Programmwahltasten 3 Taste Delay 22 2 4 Kontrolllampen 3 4
Kontrolllampen Kontrolllampe Beschreibung Kontrolllampe Programmende. Kontrolllampe XtraDry. Kontrolllampe Klarspülmittel. Sie erlischt während des Programmbetriebs. Kontrolllampe Salz. Sie erlischt während des Programmbetriebs.
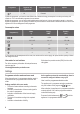
Programm1) Wasserverbrauch (l) Energieverbrauch (kWh) Dauer (Min.) 12.5 - 14.5 1.4 - 1.7 170 - 190 15 1.7 170 10 0.9 30 4 0.1 14 1) Druck und Temperatur des Wassers, die Schwankungen in der Stromversorgung, die ausgewählten Optionen und die Geschirrmenge können die Werte verändern. Informationen für Prüfinstitute Möchten Sie Informationen zum Leistungstest erhalten, schicken Sie eine E-Mail an: Notieren Sie die Produktnummer (PNC), die Sie auf dem Typenschild finden. info.
Wasserhärte Deutsche Wasserhärtegrade (°dH) Französische Wasserhärtegrade (°fH) mmol/l Clarke Wasserhärtegrade Einstellung für den Wasserenthärter 47 - 50 84 - 90 8.4 - 9.0 58 - 63 10 43 - 46 76 - 83 7.6 - 8.3 53 - 57 9 37 - 42 65 - 75 6.5 - 7.5 46 - 52 8 29 - 36 51 - 64 5.1 - 6.4 36 - 45 7 23 - 28 40 - 50 4.0 - 5.0 28 - 35 6 19 - 22 33 - 39 3.3 - 3.9 23 - 27 5 1) 15 - 18 26 - 32 2.6 - 3.2 18 - 22 4 11 - 14 19 - 25 1.9 - 2.5 13 - 17 3 4 - 10 7 - 18 0.7 - 1.
• Die Kontrolllampe Einstellung an. zeigt die aktuelle – Leuchtet die Kontrolllampe Klarspülmittelnachfüllanzeige eingeschaltet. , ist die So schalten Sie den Signalton für das Programmende ein – Leuchtet die Kontrolllampe nicht, ist die Klarspülmittelnachfüllanzeige ausgeschaltet. 2. 3. Es ertönt auch ein Signalton, wenn das Programm beendet ist. Standardmäßig ist dieser Signalton ausgeschaltet, es ist jedoch möglich, ihn einzuschalten. Drücken Sie zum Ändern der Einstellung.
AirDry wird bei allen Programmen mit Ausnahme von • (falls vorhanden) automatisch eingeschaltet. Vorsicht! Haben Kinder Zugang zum Gerät, wird empfohlen AirDry auszuschalten, da das Öffnen der Tür eine Gefahr darstellen könnte. Stellen Sie sicher, dass sich das Gerät im Benutzermodus befindet. 1. Drücken Sie , , und erlöschen. Zur Verbesserung der Trocknungsleistung beachten Sie die XtraDry-Option oder schalten Sie AirDry ein. So schalten Sie AirDry aus Die Kontrolllampen 2. 3.
Salzbehälter Füllen des Klarspülmittel-Dosierers Vorsicht! Verwenden Sie ausschließlich speziell für Geschirrspüler bestimmtes grobkörniges Salz. Mit feinem Salz besteht erhöhte Korrosionsgefahr. A B Das Salz wird für die Regenerierung des Filterharzes im Wasserenthärter und zur Erzielung guter Spülergebnisse im täglichen Gebrauch benötigt. So füllen Sie den Salzbehälter 1. 2. 3. Drehen Sie den Deckel des Salzbehälters gegen den Uhrzeigersinn und entfernen Sie ihn.
Stellen Sie sicher, dass sich das Gerät im Programmwahlmodus befindet. • Füllen Sie den Salzbehälter auf, wenn die Kontrolllampe Salz leuchtet. • Leuchtet die Kontrolllampe Klarspülmittel, füllen Sie den Klarspülmittel-Dosierer. 3. Beladen Sie die Körbe. 4. Füllen Sie Reinigungsmittel ein. 5. Stellen Sie je nach Beladung und Verschmutzungsgrad das passende Programm ein. Verwenden des Reinigungsmittels A B C Vorsicht! Verwenden Sie nur Reinigungsmittel für Geschirrspüler. 1. 2. 3. 4.
Programmende Nach Abschluss des Programms leuchtet die Kontrolllampe 1. . 2. ausgeschaltet wird. Wenn Sie die Tür öffnen, bevor die Funktion AUTO OFF eingeschaltet wird, wird das Gerät automatisch ausgeschaltet. Schließen Sie den Wasserhahn. Drücken Sie die Taste Ein/Aus oder warten Sie, bis das Gerät über die Funktion AUTO OFF Tipps und Hinweise Allgemeines Die folgenden Hinweise stellen optimale Reinigungsund Trocknungsergebnisse im täglichen Gebrauch sicher, und tragen auch zum Umweltschutz bei.
• Vergewissern Sie sich, dass sich die Sprüharme ungehindert bewegen können, bevor Sie ein Programm starten. • • Das Programm eignet sich für die Beladung und den Verschmutzungsgrad. Die Reinigungsmittelmenge stimmt. Vor dem Starten eines Programms Entladen der Körbe Kontrollieren Sie folgende Punkte: 1. • • • • • Die Filter sind sauber und ordnungsgemäß eingesetzt. Der Deckel des Salzbehälters ist fest geschlossen. Die Sprüharme sind nicht verstopft.
Reinigen des oberen Sprüharms Wir empfehlen den oberen Sprüharm regelmäßig zu reinigen, um zu verhindern, dass Verunreinigungen die Löcher verstopfen. Verstopfte Löcher können die Ursache für nicht zufriedenstellende Spülergebnisse sein. 1. 2. 5. 6. 7. 8. Achten Sie darauf, dass sich keine Lebensmittelreste oder Verschmutzungen in oder um den Rand der Wanne befinden. Setzen Sie den flachen Filter (A) wieder ein. Stellen Sie sicher, dass er korrekt unter den beiden Führungen eingesetzt wurde. 3.
• Benutzen Sie keine Scheuermittel, scheuernde Reinigungsschwämmchen oder Lösungsmittel. Reinigung des Geräteinnenraums • • • Reinigen der Außenseiten • • Reinigen Sie das Gerät mit einem weichen, feuchten Tuch. Verwenden Sie ausschließlich Neutralreiniger. Reinigen Sie das Gerät und die Gummidichtung der Tür sorgfältig mit einem weichen, feuchten Tuch. Wenn Sie regelmäßig Kurzprogramme verwenden, können diese zu Fett- und Kalkablagerungen im Gerät führen.
Störung und Alarmcode Es läuft kein Wasser in das Gerät. • Die Kontrolllampe Programmende blinkt einmal. • Der Signalton ertönt einmal. Mögliche Ursache und Abhilfe • • • • • Das Gerät pumpt das Wasser nicht ab. • Die Kontrolllampe Programmende blinkt zweimal. • Der Signalton ertönt zweimal. • • Stellen Sie sicher, dass der Siphon nicht verstopft ist. Vergewissern Sie sich, dass der Ablaufschlauch nicht geknickt oder zu stark gekrümmt ist. Das Wasserauslauf-Schutzsystem ist eingeschaltet.
Wenden Sie sich an einen autorisierten Kundendienst, wenn Alarmcodes angezeigt werden, die nicht in der Tabelle angegeben sind. Die Spül- und Trocknungsergebnisse sind nicht zufriedenstellend Störung Nicht zufriedenstellende Spülergebnisse. Nicht zufriedenstellende Trocknungsergebnisse. Mögliche Ursache und Abhilfe • • • • • • • • Weiße Streifen oder blau schimmernder Belag auf Gläsern und Geschirr. • Wasserflecken und andere Flecken auf Gläsern und Geschirr. • Das Geschirr ist nass.
Störung Am Ende des Programms befinden sich Reinigungsmittelreste im Behälter. Mögliche Ursache und Abhilfe • • • Das Reinigungsmittel-Tab blieb im Behälter stecken und wurde daher nicht vollständig vom Wasser mitgenommen. Das Wasser kann das Reinigungsmittel nicht aus dem Behälter ausspülen. Achten Sie darauf, dass der Sprüharm nicht blockiert oder verstopft ist. Stellen Sie sicher, dass die im Korb eingeordneten Gegenstände ein Öffnen des Reinigungsmittelbehälters nicht verhindern. Gerüche im Gerät.
Leistungsaufnahme Aus-Zustand (W) 0.10 1) Weitere Angaben finden Sie auf dem Typenschild. 2) Wenn Sie Heißwasser mit umweltfreundlichen, alternativen Energiequellen (z. B. Solaranlagen oder Windkraft) aufbereiten, können Sie durch den Anschluss des Geräts an die Heißwasserversorgung Energie sparen. UMWELTTIPPS nicht mit dem Hausmüll. Bringen Sie das Gerät zu Ihrer örtlichen Sammelstelle oder wenden Sie sich an Ihr Gemeindeamt. Recyceln Sie Materialien mit dem Symbol .
www.electrolux.