D GB Bedienungsanleitung (Teil 1) Instruction book (Part 1) Geschirrspüler Dishwasher 2 14
Instruction Book - part 1 - Before use - Maintenance - Installation DISHWASHER Contents Important safety information 15 Before use Setting the water softener Filling with salt Filling with rinse aid and adjusting the dose Use of detergent 16 16 17 18 19 Hints and tips 20 Maintenance and cleaning Internal cleaning Cleaning the filters External cleaning Prolonged periods of non-operation Frost precautions Moving the machine 21 21 21 22 22 22 22 Something not working 23 Installation Water supply co
Important safety information It is most important that this instruction book should be retained with the appliance for future reference. Should the appliance be sold or transferred to another owner, or should you move house and leave the appliance, always ensure that the book is left with the appliance in order that the new owner can get to know the functioning of the appliance and the relevant safety information. This information has been provided in the interest of your safety.
Before use Before using your dishwasher for the first time: 1. Ensure that the electrical and water connections comply with the installation instructions 2. Remove all packaging from inside the appliance 3. Set the water softener 4. Pour 1 litre of water inside the salt container and then fill with salt 5. Fill the rinse aid dispenser.
Filling with salt Attention! Only use salt specifically designed for use in dishwashers. All other types of salt not specifically designed for use in dishwasher, especially table salt, will damage the water softener. Only fill with salt just before starting a washing programme (not the Rinse and Hold programme). This will prevent any grains of salt or salty water, which may have been spilled, remaining on the bottom of the machine, which may cause corrosion. SR15 1. Unscrew the cap of the salt container.
Rinse aid Rinse aid is automatically added during the last rinse, ensuring thorough rinsing, and spot and streak free drying. The dispenser, which is positioned inside the door, holds about 110 ml of rinse aid, which is sufficient for 16 - 40 dishwashing programmes, depending upon the dosage setting. Filling with rinse aid 1. Open the container by turning the lid (A) anticlockwise. 2. Add the rinse aid until the container is completely full. The indicator (B) will be completely dark. 3.
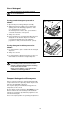
Use of detergent Only use detergents specifically designed for use in dishwashers. If using powder detergents proceed as follows: Min = 15 g Max = 30 g D 1. Open the dispenser lid by pulling the catch (D). 2. Add the detergent according to the recommended quantity given in the "Washing programmes" chart (see "Instruction Book - part 2"). As all detergents are not the same, you should also consult the instructions on the packet. M M IN AX 3. Always close the lid. DE17 4.
Hints and tips To save energy Items not suitable for dishwashers Place dishes in the machine immediately after every meal and wait until the dishwasher is full before washing. The following items should not be washed in the dishwasher (unless they are sold as dishwasher proof): If necessary run the Rinse and Hold programme (see "Washing Programmes" chart) so that any food scraps do not become caked on the dishes while you are waiting to run the complete wash programme.
Maintenance and cleaning Internal cleaning Ensure that the seals around the door, the detergent and rinse aid dispensers are cleaned regularly with a damp cloth. We recommend every 3 months to run a 65°C wash programme without dishes using detergent. Cleaning the filters The filters in the base of the washing compartment are to large extent self-cleaning. Nevertheless the filters should be checked and cleaned from time to time. Dirty filters will degrade the washing result. 1.
External cleaning Clean the external surfaces of the machine and control panel with a damp soft cloth. If necessary use only neutral detergents. Never use abrasive products, scouring pads or solvent (acetone, trichloroethylene etc....). Prolonged periods of non-operation If you are not using the machine for any period of time you are advised to: 1. Unplug the appliance and then turn off the water. 2. Fill the rinse aid dispenser. 3. Leave the door ajar to prevent the formation of any unpleasant smells. 4.
Something not working Certain problems are due to lack of simple maintenance or oversights, which can be solved easily without calling out an engineer. Before contacting your local Service Force Centre, please carry out the checks listed below. Symptom Solution The machine will not start ● ● ● The machine does not fill with water ● ● ● ● ● The door has not been properly closed. The plug is not properly inserted in the power socket. There is a power failure. Ensure the water tap is open.
Installation Any electrical work required to install this appliance should be carried out by a qualified electrician or competent person. Any plumbing work required to install this appliance should be carried out by a qualified plumber or competent person. Remove all packaging before positioning the machine. If possible, position the machine next to a water tap and a drain. Levelling Good levelling is essential for correct closure and sealing of the door.
Water outlet hose connection 2 3 18 Ø Ø 21 min 4 cm 1 The end of the drain hose can be connected in the following ways: 2. Hooked over the edge of the sink using the special curved plastic guide (if provided). 3. To a stand pipe provided with vent-hole, minimum internal diameter 4 cm. min 30 cm max 100 cm max 100 cm 1. To the sink outlet spigot, securing it if necessary with a clip. CS09 Ensure the hose is not bent or squashed as this could prevent or slow down the discharge of water.
152981 68/0 0 05/01