MIXED FUEL COOKER ZCM 611 INSTRUCTION BOOKLET Please read this instruction booklet before using the appliance GB
Important Safety Information You MUST read these warnings carefully before installing or using the hob. If you need assistance, contact our Customer Care Department on 08705 727727 Installation • • • • • • This cooker must be installed by qualified personnel, according to the manufacturer’s instructions and to the relevant British Standards. This cooker is heavy. Take care when moving it. Any gas installation must be carried out by a registered CORGI installer.
Contents For the User For the Installer Important Safety Information 2 Instructions for the Installer 19 Description of the Cooker 3 Important Safety Requirements 19 Controls 5 Installation 20 Electric Oven 6 Electrical connections 22 Before the First Use of the Cooker 6 Commissioning 23 24 Hour Clock and Timer 7 Conversion from Natural Gas to LPG 23 Using the Oven 10 Using the Fan Oven 11 Hints and Tips 12 Defrosting 13 Grilling 14 Maintenance and Cleaning 15 Cleaning
Control Panel 1 2 OVEN TIMER 3 1. 2. 3. 4. 5. 4 5 6 7 Cooker Operation Pilot Light Oven Thermostat Pilot Light Electric ignition push button Back left burner control knob (semi-rapid) Front left burner control knob (rapid) The Oven Cavity Grill element 8 10 9 6. Front right burner control knob (auxiliary) 7. Back right burner control knob (semi-rapid) 8. Oven function control knob 9. Oven thermostat control knob 10.
Controls Hob burners ! • • • • To light a burner: Push the electric ignition button which is marked with a little spark ( ). At the same time, push in and turn the relevant control knob anticlockwise to maximum position. Then adjust the flame as required. If the burner does not ignite, turn the control knob to zero, and try again. When switching on the mains, after installation or a power cut, it is quite normal for the spark generator to be activated automatically.
Electric Oven Oven Function Control Knob Oven Light - The oven light will be on without any cooking function Defrost Setting - This setting is intended to assist in thawing of frozen food. Fan cooking - This allows you to roast or roast and bake simultaneously using any shelf, without flavour transference. Grill - The heat comes only from the top element. Thermostat Control Knob Turn the thermostat control knob clockwise to select temperatures between 50°C and 250°C (max).
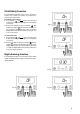
24 Hour Clock and Timer 1. DECREASE CONTROL ( ) 2. INCREASE CONTROL ( ) COOKPOT SYMBOL ( ) PUSH BOTH CLOCK SETTING SYMBOL ( ) CHILD SAFETY SYMBOL ( ) Setting the time of day When the power supply is first switched on, or after a power failure, 0.00 and AUTO will flash alternatively in the display. To set the correct time of day: 1. Press button “ ” and “ ” together (See Fig. 1). 2. Release buttons, then press button “ ”: 12.00 will show in the display (See Fig. 2). 3.
Setting the timer The timer can be used to time a set cooking period. At the end of the cook time the timer will automatically switch off the oven if in use. The timer gives an audible signal at the end of any period of cooking up to 23 hours and 59 minutes. To set the timer: 1. Press button “ ”: the display will read 0.00 and the cookpot symbol ( ) will come on in the display (See Fig. 3). 2. Release button “ ” , then press and hold button “ ”. The AUTO symbol will come on in the display.
Child Safety Function To avoid children switching on the oven, it is possible to lock the oven controls. To lock the oven controls, the oven must be switched off. To lock the oven controls: 1. Press buttons “ ” and “ ” at the same time and keep them pressed until "ON" appears on the display (see Fig. 6). 2. Release the buttons, then press button “ ”: "OF" and the key symbol ( ) will show in the display (see Fig. 7). Release the button: after a few seconds the display will revert to the time of day (see Fig.
Using the Oven Always cook with the oven door closed. Stand clear when opening the drop down oven door. Do not allow it to fall open - support the door using the door handle, until it is fully open. The oven has four shelf levels, and is supplied with two shelves. The shelf positions are counted from the bottom of the oven as shown in the diagram. It is important that these shelves are correctly positioned as shown in the diagram. Do not place cookware directly on the oven base.
Using the Fan Oven The air inside the oven is heated by the element around the fan situated behind the back panel. The fan circulates hot air to maintain an even temperature inside the oven. The advantages of cooking with this function are: • Lower Temperatures Fan oven cooking generally requires lower temperatures than conventional cooking. Follow the temperatures recommended in the cooking chart. Remember to reduce temperatures by about 20-25°C for your own recipes which use conventional cooking.
Roasting Chart When roasting, ensure the meat is cooked thoroughly, use a meat thermometer if preferred to check the centre temperature has reached the required temperature (see table below). Meat Cooking Time When roasting, ensure the meat is cooked thoroughly, use a meat thermometer if preferred to check the centre temperature has reached the required temperature (see table below).
Defrosting The oven fan operates without heat and circulates the air, at room temperature, inside the oven. This increases the speed of defrosting. However, please note that the temperature of the kitchen will influence the speed of defrosting. This function is particularly suitable for delicate food which could be damaged by heat, e.g. cream filled gateaux, iced cakes, pastries, bread and other yeast products. ! How to Use Defrosting 1.
Grilling Grilling must be carried out with the oven door closed. The grill pan handles must be removed from the pan. ! How to Use the Grill 1. Turn the oven control function knob to . 2. Turn the thermostat control knob on the required temperature. 3. Adjust the grid and grill pan runner position to allow for different thicknesses of food. Position the food close to the element for faster cooking and further away for more gentle cooking.
Maintenance and Cleaning Before any maintenance or cleaning can be carried out, you must DISCONNECT the cooker from the electricity supply. The Hob Top The hob is best cleaned whilst it is still warm, as spillage can be removed more easily than if it is left to cool. Regularly wipe over the hob top using a soft cloth well wrung out in warm water to which a little wasing up liquid has been added.
Cleaning the Oven The oven should be kept clean at all times. A build-up of fats or other foodstuffs could result in a fire, especially in the grill pan. Cleaning materials Before using any cleaning materials on your oven, check that they are suitable and that their use is recommended by the manufacturer. Cleaners that contain bleach should NOT be used as they may dull the surface finishes. Harsh abrasives should also be avoided.
Something not working If the aplliance is not working correctly, please carry out the following checks, before contacting your local Service Centre. IMPORTANT: If you call out an engineer to a fault listed below, or to repair a fault caused by incorrect use or installation, a charge will be made even if the appliance is under guarantee.
Customer Care Department For general enquiries concerning your Zanussi appliance or for further information on Zanussi products, please contact our Customer Care Department by letter or telephone at the address below or visit our website at www.zanussi.co.uk Customer Care Department Zanussi 55-77 High Street Slough Berkshire SL1 1DZ 08705 727727 (*) * calls to this number may be recorded for training purposes.
Instructions for the Installer Technical Data Hob Appliance Class 2 sub class 1 and Class 1 APPLIANCE CATEGORY: II 2H3+ APPLIANCE GAS SUPPLY: Natural Gas 20 mbar Rear left burner (semi-rapid) Front left burner (rapid) Rear right burner (semi-rapid) Front right burner (auxiliary) Dimensions Height Depth Width Oven Capacity NATURAL GAS 20 mbar VALUE = 49.
Positioning the Cooker Caution: Some soft or badly fitted floor coverings can be damaged when the cooker is moved across their surface for cleaning. It is advisable to ensure that the floor covering in the area below the cooker is either securely fixed so as not to ruck up when the cooker is moved or, if preferred, removed. Installation Positioning the Appliance (Fig.
FO 0179 Fig. 2 Fitting the Stability Bracket (Not supplied) If the cooker has to be installed with a flexible supply pipe, it is necessary that a stability device is fitted. (See "Important Safety Requirements"). If a stability bracket should be fitted by the installer, these instructions should be read in conjunction with the leaflet packed with the stability bracket. Connecting to Gas This cooker is designed to be installed with an appliance flexible connection.
Electrical connections Any electrical work required to install this cooker should be carried out by a qualified electrician or competent person, in accordance with the current regulations. THIS COOKER MUST BE EARTHED. The manufacturer declines any liability should these safety measures not be observed. Permanent Connection In the case of a permanent connection, it is necessary that you install a double pole switch between the cooker and the electricity supply (mains), with a minimum gap of 3 mm.
Commissioning When the hob has been fully installed it will be necessary to check the minimum flame setting. To do this, follow the procedure below. - Turn the gas tap to the MAX position and ignite. Set the gas tap to the MIN flame position then turn the control knob from MIN to MAX several times. If the flame is unstable or is extinguished follow the procedure below. ! Procedure: - - Re-ignite the burner and set to MIN. Remove the control knob.
ZCM 611 0,79 kWh 54,8 45 min. 860 cm ² CUSTOMER CARE Zanussi Grafiche MDM - Forlì 55-77 High Street Slough Berkshire, SL1 1DZ Tel: 08705 727727 © Electrolux plc 2003 From the Electrolux Group. The world’s No.1 choice. The Electrolux Group is the world’s largest producer of powered appliances for kitchen, cleaning and outdoor use.