
User manual


7
24 Hour Clock and Timer
Fig. 1
Fig. 2
Setting the time of day
When the power supply is first switched on, or after a
power failure, 0.00 and AUTO will flash alternatively in the
display.
To set the correct time of day:
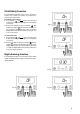
1. Press button “ ” and “ ” together (See Fig. 1).
2. Release buttons, then press button “ ”: 12.00 will
show in the display (See Fig. 2).
3. Within 5 seconds press and hold either button “ ”
to increase or button “ ” to decrease the time until
the correct time of day on the 24 hour clock is reached.
To reset the correct time of day:
1. Press button “ ” and “ ” together. Then press and
hold either button “ ” to increase or button “ ” to
decrease the time until the correct time of day on the
24 hour clock is reached.
NOTE: The increase and decrease control buttons
operate slowly at first and then more rapidly. They
should be pressed separately.
1. DECREASE CONTROL ( )
2. INCREASE CONTROL ( )
COOKPOT SYMBOL (
)
PUSH BOTH CLOCK SETTING SYMBOL ( )
CHILD SAFETY SYMBOL (
)