User manual EN Oven ZOU270
Contents Safety information _ _ _ _ _ _ _ _ _ _ _ _ _ _ _ _ _ _ Product description _ _ _ _ _ _ _ _ _ _ _ _ _ _ _ _ _ Before first use _ _ _ _ _ _ _ _ _ _ _ _ _ _ _ _ _ _ _ Daily use _ _ _ _ _ _ _ _ _ _ _ _ _ _ _ _ _ _ _ _ _ _ Clock functions _ _ _ _ _ _ _ _ _ _ _ _ _ _ _ _ _ _ _ Using the accessories _ _ _ _ _ _ _ _ _ _ _ _ _ _ _ _ Helpful hints and tips _ _ _ _ _ _ _ _ _ _ _ _ _ _ _ _ 2 4 4 5 6 7 8 Care and cleaning _ _ _ _ _ _ _ _ _ _ _ _ _ _ _ _ _ What to do if… _ _ _ _ _ _ _ _ _ _ _ _ _ _ _ _ _ _ Ins
to the appliance, only use an appliance with the appliances from the same manufacturer. • Always close the appliance door when you cook, even while grilling. Electrical connection Care and cleaning • The appliance must be earthed. • Make sure that the electrical data on the rating plate agree with your domestic power supply. • Information on the voltage is on the rating plate. • Always use a correctly installed shockproof socket. • Do not use multi-way plugs, connectors and extension cables.
not be used for the full or partial illumination of a household room. • If it becomes necessary to replace the lamp use one of the same power and specifically designed for household appliances only. • Disconnect the appliance from the power supply before the replacement of the oven lamp. There is the risk of electrical shock. Service centre • Use only original spare parts. Disposal of the appliance • To prevent the risk of physical injury or damage – Disconnect the appliance from the power supply.
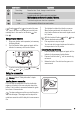
Pre-heating 1. 2. 3. 4. When you connect the appliance to the electrical supply or in case of a power cut, the Time function indicator flashes automatically. To set the current time use " + " or " - " button. After approximately 5 seconds, the flashing stops and the display shows the time of day set. For time change you must not set an automatic function (Duration or End ) at the same time. Set function and maximum temperature. Let the appliance operate without the food for approximately 1 hour.
Oven function Application Top Heat Bottom Heat Tor brown bread, cakes and pastries and for bakes. To bake cakes with crispy or crusty bases and to preserve food. Single Circuit Grill To grill flat food items in small quantities in the middle of the grill. To make toast. Dual Circuit Grill To grill flat food items in large quantities. To make toast. Main oven functions Oven function Application OFF position Light Thermaflow® Defrost The appliance is OFF. To light up the oven interior.
Clock function Time of day Minute minder Application Shows the time. To set, change or check the time. To set a countdown time. A signal sounds, after the time period is completed. This function has no effect on the operation of the oven. Duration To set how long the oven has to be in operation. End To set the switch-off time for an oven function. The indicator for related clock function comes on.
Inserting the oven shelf and deep roasting pan together Put the oven shelf on the deep roasting pan. Push the deep roasting pan between the guide-bars of one of the oven levels. Grilling set The grilling set includes the roasting pan grid and the deep roasting pan. You can use the roasting pan grid on the two sides. Warning! Risk of burns when removing the accessories from a hot oven.
Tips on baking Baking results Possible cause Remedy The cake is not browned sufficiently below Incorrect oven level Put the cake on a lower oven level The cake sinks (becomes soggy, lumpy, streaky) Oven temperature too high Use a lower setting The cake sinks (becomes soggy, lumpy, streaky) Baking time is too short Set a longer baking time Do not set higher temperatures to decrease baking times The cake sinks (becomes soggy, lumpy, streaky) Too much liquid in the mixture Use less liquid.
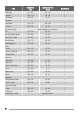
Temperature [°C] Approx Cook Time (mins) Shelf Position - Meringues 90 - 100 150 - 180 1 - Flapjack 160 - 170 25 - 30 1 - Shortbread 130 - 150 45 - 65 1 - Beef/Lamb 150 - 170 150 - 180 1 - Chicken 160 - 180 75 - 90 1 Food Casseroles: Convenience Foods Follow manufacturer´s instructions. Fish 170 - 190 20 - 30 1 Fish Pie (Potato Topped) 190 - 200 20 - 30 1 Fruit Pies, Crumbles 190 - 200 30 - 50 1 Milk Puddings 150 - 170 90 - 120 1 Pasta Lasagne etc.
Main oven Baking Shelf Positions are not critical but ensure that oven shelves are evenly spaced when more than one is used (e.g.
Roasting Roasting dishes • Use heat-resistant ovenware to roast (please read the instructions of the manufacturer). • Large roasting joints can be roasted directly in the deep roasting pan or on the oven shelf above the deep roasting pan. (If present) • Roast lean meats in a roasting tin with a lid. This well keep the meat more succulent. • All types of meat, that can be browned or have crackling, can be roasted in the roasting tin without the lid.
Food Grill Time (mins in total) Chops - Lamb 15 - 25 - Pork 20 - 25 Fish - Whole Trout/ Makarel 10 -12 Fillets - Plaice/Cod Kebabs 4-6 12 - 18 Kidneys - Lamb/Pig 6 - 10 Sausages 20 - 30 Steaks - Rare - Medium - Well Done Toasted Sandwiches Defrosting • Put the food out of the packaging and set it on a plate on the oven shelf. • Do not cover with a plate or bowl. This can extend the time to defrost very much. • Put the oven shelf in the first shelf level from the bottom.
Shelf Support Rails Removing the shelf support rails 1 Pull the front of the shelf support rail away from the side wall. 2 Pull the rear shelf support rail away from the side wall and remove it. Installing the shelf support rails Install the shelf support rails in opposite sequence. The rounded ends of the shelf support rails must point to the front! Oven Ceiling You can fold down the heating element on the oven ceiling to clean the oven ceiling easily.
3. 4. 45° Hold the door glass panels on their top edge one by one and pull them upwards out of the guide Clean the door glass panels. To install panels follow the procedure in reverse. Insert the smaller panel first, then the larger. Oven lamp 4. 5. Hold of the oven door with one hand on each side and pull it away from the oven at an upwards angle. Put the oven door with the outer side down on a soft and level surface to prevent scratches. Now you can remove the inner glass panels and clean them.
Problem Possible cause Remedy The oven does not heat up The oven is not switched on Switch on the oven The oven does not heat up The clock is not set Set the clock The oven does not heat up The necessary settings are not set Control the settings The oven does not heat up The fuse in the fuse box is released Control the fuse. If the fuse is released more than one time, refer to a qualified electrician.
15x 2x 2x 2x 3,5x16 Drill with drilling machine at high revolution and lowest torque. Electrical installation Warning! Only a qualified and competent person must do the electrical installation.
The manufacturer is not responsible if you do not follow safety precautions from chapter "Safety". This appliance is supplied without a main plug and a main cable. Applicable cable types : H07 RN-F, H05 RN-F, H05 RRF, H05 VV-F, H05 V2V2-F (T90), H05 BB-F Electrical Installation • Enquiries regarding the installation of the cooker point, if required, should be made to your Regional Electricity Company to ensure compliance with their regulations.
GB IE GREAT BRITAIN & IRELAND - Guarantee/Customer Service Standard guarantee conditions: We, Electrolux, undertake that if within 12 months of the date of the purchase this Electrolux appliance or any part thereof is proved to be defective by reason only of faulty workmanship or materials, we will, at our option repair or replace the same FREE OF CHARGE for labour, materials or carriage on condition that: • Appliance has been correctly installed and used only on the electricity supply stated on the rati
892944474-A-202011 www.zanussi.