DISHWASHER DA 4452 15296832/0 INSTRUCTION BOOK en
Contents Safety instructions 3 Description of the appliance 4 The control panel 4 Prior to using for the first time Setting the water softener Filling with salt Rinse aid 5 5 5 6 In daily use Loading cutlery and dishes The lower basket The cutlery basket The upper basket Adjusting the height of the upper basket Use of detergent 7 7 7 7 8 8 8 Washing programmes 10 Starting a washing programme 11 Maintenance and cleaning Cleaning the filters Prolonged periods of non-operation Frost precautions M
Safety instructions It is most important that this instruction book should be retained with the appliance for future reference. Should the appliance be sold or transferred to another owner, or should you move house and leave the appliance, always ensure that the book is left with the appliance in order that the new owner can get to know the functioning of the appliance and the relevant safety information. ● This information has been provided in the interest of your safety.
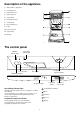
Description of the appliance 1. Water hardness adjustment 2. Levelling spacers 3. Upper basket stop 4. Upper spray arm 5. Salt container 6. Detergent dispenser 7. Control panel 8. Rinse aid dispenser 9. Filters 10. Lower spray arm 11. Upper basket 12.
Prior to using for the first time Before using your dishwasher for the first time: Filling with salt 1. Ensure that the electrical and water connections comply with the installation instructions. Only use salt specifically designed for use in dishwashers. All other types of salt not specifically designed for use in a dishwasher, especially table salt, will damage the water softener. Only fill with salt just before starting one of the washing programmes (not the "Rinse and Hold" programme).
Rinse aid Adjusting the dose Rinse aid is automatically added during the last rinse, ensuring thorough rinsing, and spot and streak free drying. The dispenser, which is positioned inside the door, holds about 110 ml of rinse aid, which is sufficient for 16 - 40 dishwashing programmes, depending upon the dosage setting. According to the finish and drying results obtained, adjust the dose of rinse aid by means of the 6 position selector (C) (position 1 minimum dosage, position 6 maximum dosage).
In daily use ● Check if it’s necessary to refill with special salt or rinse aid ● Load cutlery and dishes into the dishwasher. ● Fill with dishwasher detergent . ● Select a wash programme suitable for the cutlery and dishes. ● Start the wash programme. ● Loading cutlery and dishes When loading the dishes and cutlery, please note: - Dishes and cutlery must not impede the rotation of the spray arms . - Load hollow items such as cups, glasses, pans, etc.
The upper basket Use of detergent The upper basket is designed for plates (dessert plates, saucers, dinner plates of up to 24 cm in diameter), salad bowls, cups and glasses. Arrange items on and underneath the cup rack so that water can reach all surfaces. Glasses with long stems can be placed upside down in the cup rack. Light items (plastic bowls etc.) must be loaded in the upper basket and arranged so they do not move. Only use detergents specifically designed for use in dishwashers.
Use of "3 in 1" combi detergent tablets General advice These products are tablets with combined detergent/rinse-aid and salt functions. 1. Before using these products you should first check that the water hardness in your supply is compatible with the use of these products as per the detergent manufacturers (on the product packaging). 2. These products should be strictly used according to the detergent manufacturers instructions.
Washing programmes Programme Degree of soil and type of load Normal 65° Normal soil. with prewash Crockery, cutlery, pots and pans Eco 50° no prewash Rinse and Hold Cycle description Cold prewash Main wash up to 65°C 1 cold rinse 1 hot rinse Drying A (2) Consumption values Programme duration (in minutes) Energy Water consumption consumption (in kWh) (in litres) 71 - 81 1,1 16 65 - 75 1,0 16 B Main wash up to 65°C 1 cold rinse 1 hot rinse Drying 65 - 75 1,0 13 Normal soil.
Starting a washing programme 1. Check that the baskets have been loaded correctly and that the spray arms can rotate freely 2. Turn on the water tap 3. Setting and starting the programme Turn the programme selector dial clockwise until the letter of the programme you wish to select corresponds with the marker on on the control panel (see "Washing programmes" chart). Close the dishwasher door.
Maintenance and cleaning Clean the external surfaces of the machine and control panel with a damp soft cloth. If necessary use only neutral detergents. Never use abrasive products, scouring pads or solvent (acetone, trichloroethylene etc....). 9. Put the filter combination in place and lock by turning the handle clockwise to the stop. During this process ensure that the flat filter does not protrude above the base of the washing compartment.
Something not working Certain problems are due to the lack of simple maintenance or oversights, which can be solved with the help of the instructions given here, without calling out an engineer. The dishwasher will not start or stops during operation. Press the On/Off push button to switch the dishwasher off and carry out the following suggested corrective actions. Fault Possible cause Solutions The dishwasher door has not been properly closed. Close the door. The main plug is not plugged in.
If after all these checks, the problem persists, contact your local consumer services department, quoting the model (Mod.), product number (PNC) and serial number (S.N.). This information can be found on the rating plate located on the side of the dishwasher door (see picture). Service and spare parts This product should be serviced by an authorised service engineer, and only genuine spare parts should be used. Under no circumstances should you attempt to repair the machine yourself.
Water outlet hose connection Electrical connection The end of the drain hose can be connected in the following ways: Information concerning the electrical connection is given on the rating plate on the edge of the dishwasher’s door on the right. 1. To the sink outlet spigot, securing it if necessary with a clip. Before plugging the appliance into the wall socket, make sure that: 2. Hooked over the edge of the sink using the special curved plastic guide provided. 1.
From the Electrolux Group. The world’s No.1 choice. The Electrolux Group is the world’s largest producer of powered appliances for kitchen, cleaning and outdoor use. More than 55 million Electrolux Group products (such as refrigerators, cookers, vacuum cleaners, chain saws and lawn mowers) are sold each year to a value of approx. 14 billion USD in more than 150 countries around the world.