GESCHIRRSPÜLER DISHWASHER DE 4844 D Bedienungsanleitung GB Instruction book
Contents For the user For the installer Important safety information 27 Description of the appliance 28 The control panel 29 Before use Setting the water softener Rinse aid 30 30 33 Using your appliance Loading your appliance Adjusting the height of the upper basket Use of detergent 35 35 36 37 Hints and tips 38 Washing programmes 39 Operating sequence 40 Maintenance and cleaning Internal cleaning Cleaning the filters External cleaning Prolonged periods of non-operation Frost precautions M
Important safety information It is most important that this instruction book should be retained with the appliance for future reference. Should the appliance be sold or transferred to another owner, or should you move house and leave the appliance, always ensure that the book is left with the appliance in order that the new owner can get to know the functioning of the appliance and the relevant safety information. This information has been provided in the interest of your safety.
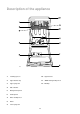
Description of the appliance IN132 1. Levelling spacers 10. Upper basket 2. Upper basket stop 11. "WRD" detergent dispenser 3. Upper spray arm 12. Worktop 4. Salt container 5. Detergent dispenser 6. Control panel 7. Rinse aid dispenser 8. Filters 9.
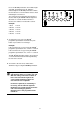
The control panel 1. On/Off indicator light 7. Indicator lights Phase indicator lights 2. On/Off push button Washing phase illuminates when the washing phase is running 3. Door handle Drying phase illuminates when the drying phase is running 4. Programme selection push buttons End of programme illuminates when the washing programme has ended Salt and rinse aid indicator lights 5.
Before use Before using your dishwasher for the first time: 1. Ensure that the electrical and water connections comply with the installation instructions 2. Remove all packaging from inside the appliance 3. Set the water softener 4. Pour 1 litre of water inside the salt container and then fill with salt 5. Fill the rinse aid dispenser.
Press the 70° 80I push button, the indicator light of the 65° push button turns off, while the indicator light of the 70° 80I push button remains fixed for about 5 seconds and then starts to flash indicating the current level The current level is indicated by the number of flashes made by the 70° 80I indicator light, that alternates 5 seconds off with a number of flashes, this continues for about 60 seconds.
Filling with salt Only use salt specifically designed for use in dishwashers. All other types of salt not specifically designed for use in a dishwasher, especially table salt, will damage the water softener. Only fill with salt just before starting one of the complete washing programmes. This will prevent any grains of salt or salty water, which may have been spilled, remaining on the bottom of the machine for any period of time, which may cause corrosion. To fill: 1.
Rinse aid Rinse aid is automatically added during the last rinse, ensuring thorough rinsing, and spot and streak free drying. The dispenser, which is positioned inside the door, holds about 110 ml of rinse aid, which is sufficient for 16 - 40 dishwashing programmes, depending upon the dosage setting. Filling with rinse aid 1. Open the container by turning the lid (A) anticlockwise. A BR01 2. Add the rinse aid until the container is completely full. The indicator (B) will be completely dark. 3.
3. Press the 65° push button, the correspondent indicator light keeps flashing while the indicator light of the 70° 80I push button turns off. At the same time the indicator light "end of programme" starts to flash. 4. Press the 65° push button again, the "end of programme" indicator light turns off, this means that the rinse aid indicator light has been deactivated. SO398 5. To memorise the operation, switch off the dishwasher by pressing the On/Off push button.
Using your appliance Loading your appliance Before placing dishes in the machine, remove any scraps of food, to avoid clogging the filters and consequently reducing the performance. Do not load very small items which can fall through the baskets. Open the door and slide out the baskets to load the dishes. UI61 The lower basket The lower basket is designed to take saucepans, lids, plates, salad bowls, cutlery etc.
The upper basket The upper basket is designed for plates (dessert plates, saucers, dinner plates of up to 24 cm in diameter), salad bowls, cups and glasses. Arrange items so that water can reach all surfaces. Glasses with long stems can be placed upside down in the cup racks. The cup rack on the left folds upwards to increase your loading flexibility. Light items (plastic bowls etc.) should be loaded in the upper basket and arranged so they do not move.
Use of detergent Only use detergents specifically designed for use in dishwashers. Min = 15 g Max = 30 g D If using powder detergents proceed as follows: 1. Open the dispenser lid by pulling the catch (D). 2. Add the detergent according to the instructions given in the Washing programmes chart. As all detergents are not the same, you should also consult the instructions on the packet. M M IN AX 3. Always close the lid. DE17 4.
Hints and tips To save energy Items not suitable for dishwashers Place dishes in the machine immediately after every meal and wait until the dishwasher is full before washing. Do not prewash dishes under running water. Select the QUICK 60° A 30 programme when dishes are not very soiled, following the instructions given in the "Washing programmes" chart. Select the half load option if only a few dishes need washing. Remember to load the dishes in both baskets.
Washing programmes Type of load Degree of soil Required push buttons Recommended quantity of detergent wash * WRD Intensive Heavy soil. Crockery, cutlery, pots and pans On/Off + 70° 80I Normal soil. Crockery and cutlery On/Off + 65° 60° A 30I Fresh soil. Crockery and cutlery On/Off + 60° A 30I *** Eco 50° Normal soil.
Operating sequence 1. Check the filters 8a. Setting and starting the programme without delay start Ensure they are clean and properly positioned (see "Maintenance and cleaning"). 2. Press the push button corresponding to the required programme: the indicator light corresponding to the programme illuminates and the phase indicator lights for that programme start flashing. Select, if required, the half load option.
During the countdown the only indicator lights illuminated are the programme light and the light of the number of hours to the start of the programme. Switch off the dishwasher by pressing the On/Off push button. Wait 15/20 minutes before opening the dishwasher’s door; in this way you will avoid burning yourself removing the dishes and avoid also the damage of the nearby furniture caused by the escape of steam.
Maintenance and cleaning Internal cleaning Ensure that the seals around the door, the detergent and rinse aid dispensers are cleaned regularly with a damp cloth. We recommend every 3 months to run a 65°C wash programme without dishes using detergent. Cleaning the filters The filters in the base of the washing compartment are to large extent self-cleaning. Nevertheless the filters should be checked and cleaned from time to time. Dirty filters will degrade the washing result. 1.
Check that the WRD is not clogged with detergent residue. If necessary rinse it under running water after having removed it from the basket by twisting it anticlockwise and pulling it upwards. Fasten it back onto the support by turning it clockwise. Never use your dishwasher without the WRD dispenser. Since WRD also ensures correct distribution of the water to the upper spray arm, running the dishwasher without it will impair the washing results.
Something not working Certain problems are due to lack of simple maintenance or oversights, which can be solved easily without calling out an engineer. The dishwasher is fitted with a number of alarm systems which can help you to quickly determine the cause of any problems. The dishwasher will not start or stops during operation. All push buttons are inoperative except for the On/Off push button.
If after all these checks, the problem persists, contact your local Service Force Centre, quoting the model and serial number. This information can be found on the rating plate located on the right hand side of the dishwasher door (see picture). Service and spare parts Prod.No. ........ Ser. No. ......... Mod. ........ RA01 This product should be serviced by an authorised Service engineer, and only genuine spare parts should be used.
Hints for test centres Before starting any test it is necessary to fill completely with salt the salt container and with rinse aid the rinse aid dispenser.
Installation instructions Any electrical work required to install this appliance should be carried out by a qualified electrician or competent person. Any plumbing work required to install this appliance should be carried out by a qualified plumber or competent person. Remove all packaging before positioning the machine. If possible, position the machine next to a water tap and a drain. Water supply connections Your dishwasher can be connected to either a cold or hot water supply of max. 60°C.
Water outlet hose connection 2 3 Ø Ø 1. To the sink outlet spigot, securing it if necessary with a clip. 18 21 1 min 4 cm The end of the drain hose can be connected in the following ways: 3. To a stand pipe provided with vent-hole, minimum internal diameter 4 cm. min 30 cm max 100 cm max 100 cm 2. Hooked over the edge of the sink using the special curved plastic guide provided. CS09 Ensure the hose is not bent or squashed as this could prevent or slow down the discharge of water.
Fitting under a counter (kitchen worktop or sink) By removing the machine’s worktop, you can install it under a close fitting sink unit or a pre-existing top, providing the dimensions of the recess correspond to those shown in the picture. Proceed as follows: - Remove the machine’s worktop by unscrewing the two front retaining screws, pull from the front and slide out the rear slots, lifting the worktop. 570- 820 600 450 Insert the machine after adjusting height and levelling with the adjustable feet.
From the Electrolux Group. The world’s No.1 choice. The Electrolux Group is the world’s largest producer of powered appliances for kitchen, cleaning and outdoor use. More than 55 million Electrolux Group products (such as refrigerators, cookers, vacuum cleaners, chain saws and lawn mowers) are sold each year to a value of approx. 14 billion USD in more than 150 countries around the world.