User Manual GETTING STARTED? EASY.
GA NAAR ONZE WEBSITE VOOR: Advies over gebruik, brochures, het oplossen van problemen, service- en reparatieinformatie: www.zanussi.com/support Wijzigingen voorbehouden. INHOUDSOPGAVE 1. VEILIGHEIDSINFORMATIE............................................................................................2 2. VEILIGHEIDSVOORSCHRIFTEN...................................................................................4 3. MONTAGE .....................................................................................
• • • • • complexe beperkingen dienen altijd uit de buurt van het apparaat te worden gehouden, tenzij ze voortdurend onder toezicht staan. Laat kinderen niet spelen met het apparaat. Houd alle verpakkingen uit de buurt van kinderen en verwijder ze op gepaste wijze. WAARSCHUWING: Houd kinderen en huisdieren uit de buurt van het apparaat als het in werking is of afkoelt. Makkelijk toegankelijke onderdelen worden heet tijdens gebruik.
• • Als het netsnoer beschadigd is, moet de fabrikant, een erkende serviceverlener of een gekwalificeerd persoon deze vervangen teneinde gevaarlijke situaties te voorkomen. Om de inschuifrails te verwijderen trekt u eerst de voorkant van de inschuifrail en dan de achterkant uit de zijwanden. Installeer de inschuifrails in de omgekeerde volgorde. 2. VEILIGHEIDSVOORSCHRIFTEN 2.1 Installatie WAARSCHUWING! Alleen een erkende installatietechnicus mag het apparaat installeren.
• • • • • • • • moet worden vervangen, dan moet dit gebeuren door onze Klantenservice. Laat de stroomkabel niet in aanraking komen met de deur van het apparaat of de niche onder het apparaat, met name niet als deze werkt of als de deur heet is. De schokbescherming van delen onder stroom en geïsoleerde delen moet op zo'n manier worden bevestigd dat het niet zonder gereedschap kan worden verplaatst. Steek de stekker pas in het stopcontact als de installatie is voltooid.
• • • • • – leg geen aluminiumfolie op de bodem van de ruimte in het apparaat. – plaats geen water direct in het hete apparaat. – haal vochthoudende schotels en eten uit het apparaat als u klaar bent met koken. – wees voorzichtig bij het verwijderen of bevestigen van accessoires. Verkleuring van het email of roestvrij staal is niet van invloed op de werking van het apparaat. Gebruik een diepe pan voor vochtige taarten. Fruitsappen kunnen permanente vlekken maken.
3. MONTAGE 3.1 Inbouwen WAARSCHUWING! Raadpleeg de hoofdstukken Veiligheid. (*mm) 540 21 min. 550 20 600 558 19 114 min. 560 9 589 598 570 3 594 (*mm) 540 21 min. 550 590 20 558 19 114 min. 560 589 598 570 9 3 594 3.
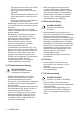
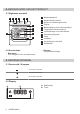
4. BESCHRIJVING VAN HET PRODUCT 4.1 Algemeen overzicht 1 2 3 4 5 6 7 12 4 8 9 3 10 2 11 1 4.2 Accessoires • 1 2 3 4 5 6 7 8 9 10 11 12 • Bakrooster Voor kookgerei, bak- en braadvormen. Bedieningspaneel Aan/uit-lampje/symbool Knop voor verwarmingsfuncties Display Bedieningsknop (voor de temperatuur) Temperatuurindicator/symbool Luchtopeningen voor koelventilator Verwarmingselement Lamp Ventilator Verwijderbare inschuifrail Rekstanden Bakplaat Voor gebak en koekjes. 5. BEDIENINGSPANEEL 5.
6. VOOR HET EERSTE GEBRUIK WAARSCHUWING! Raadpleeg de hoofdstukken Veiligheid. 6.1 Voorafgaand aan het eerste gebruik De oven kan een vreemde geur en rook afgeven tijdens het voorverwarmen. Zorg ervoor dat de kamer goed is geventileerd. Stap 1 Stel de klok in 1. , - druk hierop om de tijd in te stellen. Na ongeveer 5 se‐ conden stopt het knipperen en geeft de klok de tijd weer. 1. 2. Stap 2 Stap 3 De oven reinigen Verwarm de lege oven voor Haal alle accessoires en verwij‐ 1.
Verwarmings‐ functie Toepassing Verwarmings‐ functie Deze functie is ontworpen om tijdens de bereiding energie te besparen. Bij het gebruik van deze functie kan de temperatuur in de ruimte verschillen van de ingestelde temperatuur. Het ver‐ warmingsvermogen kan worden verminderd. Raadpleeg voor meer informatie het hoofdstuk "Dagelijks gebruik", opmerkin‐ gen op: Warmelucht (vochtig) .
8.2 Instellen: Klokfuncties Instellen: Tijdstip van de dag - knippert als je de oven aansluit op het stopcontact, als er een stroomstoring is geweest of als de timer niet is ingesteld. , - druk hierop om de tijd in te stellen. Na ongeveer 5 seconden stopt het knipperen en geeft de klok de tijd weer. Wijzigen: Tijdstip van de dag Stap 1 Stap 2 - druk hier herhaaldelijk op om het tijdstip van de dag te wijzigen. - begint te knipperen. , - druk hierop om de tijd in te stellen.
9. GEBRUIK VAN DE ACCESSOIRES WAARSCHUWING! Raadpleeg de hoofdstukken Veiligheid. 9.1 Accessoires plaatsen Een kleine inkeping bovenaan verhoogt de veiligheid. Deze inkepingen voorkomen Bakrooster: Plaats het rooster tussen de geleidestangen van de inschuifrailen zorg ervoor dat de pootjes om‐ laag wijzen. Bakplaat: Schuif de plaat tussen de geleidestangen van de inschuifrail. Bakrooster, Bakplaat: Plaats de plaat tussen de geleiders van de in‐ schuifrails en het bakrooster op de geleiders erbo‐ ven.
10. EXTRA FUNCTIES 10.1 Koelventilator Als de oven in werking is, wordt de koelventilator automatisch ingeschakeld om de oppervlakken van de oven koel te houden. Als u de oven uitschakelt, kan de koelventilator blijven werken totdat de oven is afgekoeld. oververhitting veroorzaken. Om dit te voorkomen is de oven voorzien van een veiligheidsthermostaat die de stroomtoevoer onderbreekt. Zodra de temperatuur is gedaald, wordt de oven automatisch weer ingeschakeld. 10.
11.
BROOD EN PIZZA Boven- /onderwarm‐ Hetelucht te (min) (°C) (°C) Broodjes, 6 - 8 broodjes 190 2 180 2 (1 en 3) 25 - 40 Bakplaat Pizza 190 1 190 1 20 - 30 Braadpan Scones 200 3 190 2 10 - 20 Bakplaat Gebruik de taartvorm.
Boven- /onderwarmte Hetelucht VLEES (min) (°C) (°C) Varkensbraadstuk, met zwoerd 180 2 170 2 120 - 150 Varkensschenkel, 2 stuks 180 2 160 2 100 - 120 Lamsbout 190 2 190 2 110 - 130 Hele kip 200 2 200 2 70 - 85 Hele kalkoen 180 1 160 1 210 - 240 Hele eend 175 2 160 2 120 - 150 Hele gans 175 1 160 1 150 - 200 Konijn, in stukken gesneden 190 2 175 2 60 - 80 Haas, in stukken gesneden 190 2 175 2 150 - 200 Hele fazant 190 2 175 2 90 - 120 Boven- /o
GRILLEN (kg) (min) 1e kant (min) 2e kant Kippenborst, 4 stuks 0,4 12 - 15 12 - 14 Hamburgers, 6 0,6 20 - 30 - Visfilet, 4 stuks 0,4 12 - 14 10 - 12 Geroosterde sandwiches, 4 - 6 - 5-7 - Geroosterd brood, 4 - 6 - 2-4 2-3 11.4 Turbo grill Verwarm de lege oven voor. Stel de temperatuur in op 200 °C. Gebruik de derde rekstand.
(kg) Vlees Ontdooitijd (min.) Nadooitijd (min) 20 - 30 Halverwege de bereidings‐ tijd omdraaien. 1 100 - 140 0,5 90 - 120 Room 2 x 0,2 80 - 100 10 - 15 Room kan ook met nog licht bevroren deeltjes goed worden geklopt. Forel 0,15 25 - 35 10 - 15 - Aardbeien 0,3 30 - 40 10 - 20 - Boter 0,25 30 - 40 10 - 15 - Taart 1,4 60 60 - 11.6 Warmelucht (vochtig) - aanbevolen accessoires Gebruik de donkere en niet-reflecterende bakjes en schalen.
(°C) (min) Brownie bakplaat of lekschaal 180 2 30 - 40 Soufflé, 6 stuks keramieken vormpjes op rooster 200 3 30 - 40 Luchtige vlaaibodem flanvorm op rooster 170 2 20 - 30 Victoriataart met jam‐ vulling ovenschaal op rooster 170 2 35 - 45 Gepocheerde vis, 0,3 kg bakplaat of lekschaal 180 3 35 - 45 Hele vis, 0,2 kg bakplaat of lekschaal 180 3 35 - 45 Visfilet, 0,3 kg pizzavorm op rooster 180 3 35 - 45 Gepocheerd vlees, 0,25 kg bakplaat of lekschaal 200 3 40 - 50 Sjasl
(°C) (min) Biscuitge‐ bak, taart‐ vorm Ø26 cm Boven- /onder‐ warmte Bakrooster 2 170 35 - 45 - Zandtaart‐ deeg Boven- /onder‐ warmte Bakplaat 3 150 20 - 35 Verwarm de oven 10 minuten voor. Geroosterd brood, 4 - 6 stuks Grill Bakrooster 3 max. 2 - 4 minuten eer‐ ste kant; 2 - 3 mi‐ nuten tweede kant Verwarm de oven 3 minuten voor. Runderbur‐ ger, 6 stuks, 0,6 kg Grill Rooster en lekbak 3 max.
12.2 Hoe te verwijderen: Inschuifrails/ Verwijder de inschuifrails om de oven te reinigen. Stap 1 Schakel de oven uit en wacht tot deze afgekoeld is. Stap 2 Trek de inschuifrail bij de voorkant uit de zijwand. Stap 3 Trek de inschuifrail bij de achterkant uit de zijwand en verwijder deze. Stap 4 Installeer de inschuifrails in de omge‐ keerde volgorde. 1 2 12.3 Hoe te verwijderen en installeren: Deur De ovendeur beschikt over twee glasplaten.
Stap 5 Draai de bevestigingen 90° en verwij‐ der ze uit hun zittingen. Stap 6 De glasplaat eerst voorzichtig optillen en dan verwijderen. 90° 1 2 Stap 7 Reinig de glasplaten met een sopje. Droog de glasplaten voorzichtig af. Reinig de glasplaten niet in de vaatwasser. Stap 8 Installeer na het reinigen de glasplaat en de ovendeur. Als de deur correct wordt geïnstalleerd, klikt de rand van de deur. Zorg ervoor dat u de interne glasplaat correct in de uitsparingen plaatst. A 12.
Achterlamp Stap 1 Draai de glazen afdekking om die te verwijderen. Stap 2 Reinig het glazen deksel. Stap 3 Vervang de lamp door een geschikte hittebestendige lamp van 300 °C. Stap 4 Installeer het glazen deksel. 13. PROBLEEMOPLOSSING WAARSCHUWING! Raadpleeg de hoofdstukken Veiligheid. Probleem 13.1 Wat te doen in de volgende gevallen... Controleer of de vol‐ gende zaken gel‐ den... Op het display wordt "12.00" weergegeven.
Energie-efficiëntieklasse A Energieverbruik bij een standaardbelasting, stand boven + onder‐ warmte 0.83 kWh/cyclus Energieverbruik bij een standaardbelasting, stand hetelucht 0.75 kWh/cyclus Aantal ruimten 1 Warmtebron Elektriciteit Volume 57 l Soort oven Inbouwoven Massa ZOHEE2X1 28.6 kg ZOHIE2X1 28.6 kg * Voor de Europese Unie overeenkomstig EU-verordeningen 65/2014 en 66/2014. Voor de Republiek Belarus overeenkomstig STB 2478-2017, aanhangsel G; STB 2477-2017, bijlagen A en B.
niet weg met het huishoudelijk afval. Breng het product naar het milieustation bij u in de buurt of neem contact op met de gemeente.
VISIT OUR WEBSITE TO: Get usage advice, brochures, trouble shooter, service and repair information: www.zanussi.com/support Subject to change without notice. CONTENTS 1. SAFETY INFORMATION.............................................................................................. 26 2. SAFETY INSTRUCTIONS............................................................................................ 28 3. INSTALLATION...........................................................................................
• • • • • Do not let children play with the appliance. Keep all packaging away from children and dispose of it appropriately. WARNING: Keep children and pets away from the appliance when it operates or when it cools down. Accessible parts become hot during use. If the appliance has a child safety device, it should be activated. Children shall not carry out cleaning and user maintenance of the appliance without supervision. 1.
2. SAFETY INSTRUCTIONS 2.1 Installation WARNING! Only a qualified person must install this appliance. • • • • • • • • • Remove all the packaging. Do not install or use a damaged appliance. Follow the installation instructions supplied with the appliance. Always take care when moving the appliance as it is heavy. Always use safety gloves and enclosed footwear. Do not pull the appliance by the handle. Install the appliance in a safe and suitable place that meets installation requirements.
Cable types applicable for installation or replacement for Europe: • WARNING! Risk of damage to the appliance. H07 RN-F, H05 RN-F, H05 RRF, H05 VV-F, H05 V2V2-F (T90), H05 BB-F For the section of the cable refer to the total power on the rating plate. You can also refer to the table: Total power (W) Section of the cable (mm²) maximum 1380 3 x 0.75 maximum 2300 3x1 maximum 3680 3 x 1.5 The earth cord (green / yellow cable) must be 2 cm longer than phase and neutral cables (blue and brown cables).
• • • • Be careful when you remove the door from the appliance. The door is heavy! Clean regularly the appliance to prevent the deterioration of the surface material. Clean the appliance with a moist soft cloth. Use only neutral detergents. Do not use abrasive products, abrasive cleaning pads, solvents or metal objects. If you use an oven spray, follow the safety instructions on its packaging. 2.
(*mm) 540 21 min. 550 20 590 558 19 114 min. 560 589 598 570 9 3 594 3.2 Securing the oven to the cabinet 4. PRODUCT DESCRIPTION 4.1 General overview 1 2 3 4 5 6 7 12 4 8 9 3 10 2 1 4.2 Accessories • Wire shelf For cookware, cake tins, roasts.
5. CONTROL PANEL 5.1 Sensor fields / Buttons To set the time. To set a clock function. To set the time. 5.2 Display A A. Clock functions B. Timer B 6. BEFORE FIRST USE WARNING! Refer to Safety chapters. 6.1 Before first use The oven can emit an odour and smoke during preheating. Make sure that the room is ventilated. 1. Step 1 Step 2 Step 3 Set the clock Clean the oven Preheat the empty oven , - press to set the time. After approximately 5 sec.
7. DAILY USE WARNING! Refer to Safety chapters. Heating func‐ tion 7.1 How to set: Heating function Step 1 Turn the knob for the heating functions to select a heating function. Step 2 Turn the control knob to select the tem‐ perature. Step 3 When the cooking ends, turn the knobs to the off position to turn off the oven. 7.2 Heating functions Heating func‐ tion Application Defrost To turn on the lamp.
8. CLOCK FUNCTIONS 8.1 Clock functions Clock function Application To set, change or check the time of day. Time of Day To set how long the oven works. Duration Minute Minder To set a countdown. This function has no effect on the operation of the oven. You can set this function at any time, also when the oven is off. 8.2 How to set: Clock functions How to set: Time of Day - flashes when you connect the oven to the electrical supply, when there was a power cut or when the timer is not set.
How to set: Minute Minder Step 2 , - press to set the time. The function starts automatically after 5 sec. When the set time ends, the signal sounds. Step 3 Press any button to stop the signal. Step 4 Turn the knobs to the off position. How to cancel: Clock functions Step 1 Step 2 - press repeatedly until the clock function symbol starts to flash. Press and hold: . The clock function turns off after few seconds. 9. USING THE ACCESSORIES WARNING! Refer to Safety chapters. devices.
Wire shelf, Baking tray: Push the tray between the guide bars of the shelf support and the wire shelf on the guide bars above. 10. ADDITIONAL FUNCTIONS 10.1 Cooling fan 10.2 Safety thermostat When the oven operates, the cooling fan turns on automatically to keep the surfaces of the oven cool. If you turn off the oven, the cooling fan can continue to operate until the oven cools down. Incorrect operation of the oven or defective components can cause dangerous overheating.
11.
BREAD AND PIZZA Conventional Cook‐ ing True Fan Cooking (min) (°C) (°C) Pizza 190 1 190 1 20 - 30 Deep pan Scones 200 3 190 2 10 - 20 Baking tray Use the cake mould.
Conventional Cooking True Fan Cooking MEAT (min) (°C) (°C) Pork shoulder, with rind 180 2 170 2 120 - 150 Pork shin, 2 pieces 180 2 160 2 100 - 120 Leg of lamb 190 2 190 2 110 - 130 Whole chicken 200 2 200 2 70 - 85 Whole turkey 180 1 160 1 210 - 240 Whole duck 175 2 160 2 120 - 150 Whole goose 175 1 160 1 150 - 200 Rabbit, cut in pieces 190 2 175 2 60 - 80 Hare, cut in pieces 190 2 175 2 150 - 200 Whole pheasant 190 2 175 2 90 - 120 Conventio
GRILL (kg) (min) 1st side (min) 2nd side Burgers, 6 0.6 20 - 30 - Fish fillet, 4 pieces 0.4 12 - 14 10 - 12 Toasted sandwiches, 4 - 6 - 5-7 - Toast, 4 - 6 - 2-4 2-3 11.4 Turbo Grilling Preheat the empty oven. Set the temperature to 200 °C. Use the third shelf position. (min) (kg) 1st side 2nd side Rolled joint, turkey 1 30 - 40 20 - 30 Chicken, half, 2 1 25 - 30 20 - 30 Chicken drumsticks, 6 pieces - 15 - 20 15 - 18 Quail, 4 pieces 0.
(kg) Defrosting time (min) Further defrosting time (min) Cream 2 x 0.2 80 - 100 10 - 15 Cream can also be whip‐ ped when still slightly fro‐ zen in places. Trout 0.15 25 - 35 10 - 15 - Strawberries 0.3 30 - 40 10 - 20 - Butter 0.25 30 - 40 10 - 15 - Gateau 1.4 60 60 - 11.6 Moist Fan Baking - recommended accessories Use the dark and non-reflective tins and containers. They have better heat absorption than the light colour and reflective dishes.
(°C) Poached fish, 0.3 kg baking tray or dripping pan (min) 180 3 35 - 45 Whole fish, 0.2 kg baking tray or dripping pan 180 3 35 - 45 Fish fillet, 0.3 kg pizza pan on wire shelf 180 3 35 - 45 Poached meat, 0.25 kg baking tray or dripping pan 200 3 40 - 50 Shashlik, 0.
Beef burger, Grill 6 pieces, 0.6 kg Wire shelf 3 and dripping pan (°C) (min) max. 20 - 30 Put the wire shelf on the third level and the dripping pan on the second level of the oven. Turn the food halfway through the cooking time. Preheat the oven for 3 minutes. 12. CARE AND CLEANING WARNING! Refer to Safety chapters. 12.1 Notes on cleaning Clean the front of the oven with a soft cloth with warm water and a mild detergent. Clean and check the door gasket around the frame of the cavity.
Step 1 Turn off the oven and wait until it is cold. Step 2 Pull the front of the shelf support away from the side wall. Step 3 Pull the rear end of the shelf support away from the side wall and remove it. Step 4 Install the shelf supports in the oppo‐ site sequence. 1 2 12.3 How to remove and install: Door The oven door has two glass panels. You can remove the oven door and the internal glass panel to clean it.
Step 5 Turn the fasteners by 90° and remove them from their seats. Step 6 First lift carefully and then remove the glass panel. 90° 1 2 Step 7 Clean the glass panels with water and soap. Dry the glass panels carefully. Do not clean the glass panels in the dishwasher. Step 8 After cleaning, install the glass panel and the oven door. When installed correctly the door trim clicks. Make sure that you install the internal glass panel in the seats correctly. A 12.
Problem Check if... Problem Check if... The oven does not heat up. The fuse is blown. The lamp does not work. The lamp is burnt out. The door gasket is dam‐ aged. Do not use the oven. Contact an Authorised Service Centre. The display shows "12.00". There was a power cut. Set the time of day. 13.2 Service data If you cannot find a solution to the problem yourself, contact your dealer or an Authorised Service Centre. The necessary data for the service centre is on the rating plate.
14.2 Energy saving The oven has features which help you save energy during everyday cooking. Make sure that the oven door is closed when the oven operates. Do not open the oven door too often during cooking. Keep the door gasket clean and make sure it is well fixed in its position. Use metal cookware to improve energy saving. When possible, do not preheat the oven before cooking. Keep breaks between baking as short as possible when you prepare a few dishes at one time.
VISITEZ NOTRE SITE WEB POUR : Obtenir des conseils d’utilisation, des brochures, un dépanneur, des informations sur le service et les réparations : www.zanussi.com/support Sous réserve de modifications. TABLE DES MATIÈRES 1. INFORMATION SUR LA SÉCURITÉ............................................................................ 48 2. CONSIGNES DE SÉCURITÉ........................................................................................50 3. INSTALLATION................................................
• • • • • de 8 ans et les personnes ayant un handicap très important et complexe doivent être tenus à l'écart de l’appareil, à moins d'être surveillés en permanence. Ne laissez pas les enfants jouer avec l'appareil. Ne laissez pas les emballages à la portée des enfants et jetez-les convenablement. AVERTISSEMENT : Tenez les enfants et les animaux éloignés de l'appareil lorsqu'il est en cours de fonctionnement ou lorsqu'il refroidit. Les parties accessibles deviennent chaudes en cours d'utilisation.
• Pour retirer les supports de grille, tirez d'abord sur l'avant de ceux-ci, puis sur l'arrière, pour les écarter des parois extérieures. Réinstallez les supports de grille en répétant cette procédure dans l'ordre inverse. 2. CONSIGNES DE SÉCURITÉ 2.1 Installation AVERTISSEMENT! L'appareil doit être installé uniquement par un professionnel qualifié. • • • • • • • • • Retirez l'intégralité de l'emballage. N'installez pas et ne branchez pas un appareil endommagé.
• • • • • • • porte de l'appareil ou de la niche d'encastrement sous l'appareil, particulièrement lorsqu'il est en marche ou que la porte est chaude. La protection contre les chocs des parties sous tension et isolées doit être fixée de telle manière qu'elle ne puisse pas être enlevée sans outils. Ne branchez la fiche secteur dans la prise secteur qu'à la fin de l'installation. Assurez-vous que la prise secteur est accessible après l'installation.
• • • • • – ne placez jamais de feuilles d'aluminium directement sur le fond de la cavité de l'appareil. – ne versez jamais d'eau directement dans l'appareil lorsqu'il est chaud. – une fois la cuisson terminée, ne laissez jamais d'aliments ou de plats humides à l'intérieur de l'appareil. – faites attention lorsque vous retirez ou remettez en place les accessoires. La décoloration de l'émail ou de l'acier inoxydable est sans effet sur les performances de l'appareil.
3. INSTALLATION 3.1 Encastrement AVERTISSEMENT! Reportez-vous aux chapitres concernant la sécurité. (*mm) 540 21 600 min. 550 20 558 19 114 min. 560 9 589 598 570 3 594 (*mm) 540 21 min. 550 590 20 558 19 114 min. 560 589 598 570 9 3 594 3.
4. DESCRIPTION DE L'APPAREIL 4.1 Présentation générale 1 2 3 4 5 6 7 12 4 8 9 3 10 2 11 1 4.2 Accessoires • Grille métallique Pour les plats à rôti, à gratin et les moules à gâteau/pâtisserie.
6. AVANT LA PREMIÈRE UTILISATION AVERTISSEMENT! Reportez-vous aux chapitres concernant la sécurité. 6.1 Avant la première utilisation Une odeur et de la fumée peuvent s'échapper du four durant le préchauffage. Assurez-vous que la pièce est ventilée. Étape 1 Étape 2 Réglez l’horloge. 1. , - appuyez pour régler l’heure. Après environ 5 s, le symbole cesse de clignoter et l'heure s'affiche. Étape 3 Nettoyez le four 1. 2. Retirez les supports de grille amovibles et tous les accessoi‐ res du four.
Mode de cuis‐ son Chaleur tournante humide Cuisson de sole Décongélation Application Mode de cuis‐ son Cette fonction est conçue pour économiser de l'énergie en cours de cuisson. Lorsque vous utilisez cette fonction, la tempé‐ rature à l'intérieur de la cavité peut différer de la température sélectionnée. La puissance peut être réduite. Pour plus d’infor‐ mations, consultez le chapitre « Utilisation quotidienne », Re‐ marques sur : Chaleur tournante humide.
8.2 Comment régler : Fonctions de l’horloge Comment régler : Heure - clignote lorsque vous branchez le four à l'alimentation électrique, lorsqu'il y a eu une coupure de courant ou que le minuteur n'est pas réglé. , - appuyez pour régler l’heure. Après environ 5 s, le symbole cesse de clignoter et l'heure s'affiche. Comment modifier : Heure Étape 1 Étape 2 - appuyez à plusieurs reprises pour modifier l'heure actuelle. - commence à clignoter. , - appuyez pour régler l’heure.
9. UTILISATION DES ACCESSOIRES AVERTISSEMENT! Reportez-vous aux chapitres concernant la sécurité. 9.1 Insertion des accessoires Une petite indentation sur le dessus apporte plus de sécurité. Les indentations sont Grille métallique: Poussez la grille entre les barres de guidage des supports de grille et assurez-vous que les pieds sont orientés vers le bas. Plateau de cuisson: Poussez le plateau entre les rails du support de grille.
10. FONCTIONS SUPPLÉMENTAIRES 10.1 Ventilateur de refroidissement Lorsque le four fonctionne, le ventilateur de refroidissement se met automatiquement en marche pour refroidir les surfaces du four. Si vous éteignez le four, le ventilateur de refroidissement continue à fonctionner jusqu'à ce que le four refroidisse. surchauffe dangereuse. Pour éviter cela, le four dispose d'un thermostat de sécurité interrompant l'alimentation électrique.
11.
Chauffage Haut/ Bas Chaleur tournante PAIN ET PIZZA (min) (°C) (°C) Pain de seigle, le pré‐ chauffage n’est pas né‐ cessaire 190 1 180 1 30 - 45 Moule à pain Petits pains, 6 - 8 petits pains 190 2 180 2 (1 et 3) 25 - 40 Plateau de cuisson Pizza 190 1 190 1 20 - 30 Plat à rôtir Scones 200 3 190 2 10 - 20 Plateau de cuisson Utilisez le moule à gâteaux.
Chauffage Haut/ Bas Chaleur tournante VIANDE (min) (°C) (°C) Palette de porc, avec couenne 180 2 170 2 120 - 150 Jarret de porc, 2 morceaux 180 2 160 2 100 - 120 Gigot d’agneau 190 2 190 2 110 - 130 Poulet entier 200 2 200 2 70 - 85 Dinde entière 180 1 160 1 210 - 240 Canard entier 175 2 160 2 120 - 150 Oie entière 175 1 160 1 150 - 200 Lapin, en morceaux 190 2 175 2 60 - 80 Lièvre, en morceaux 190 2 175 2 150 - 200 Faisan entier 190 2 175 2 90
GRIL (kg) (min) 1ère face (min) 2e face Hamburgers, 6 0,6 20 - 30 - Filet de poisson, 4 morceaux 0,4 12 - 14 10 - 12 Sandwiches toastés, 4 - 6 - 5-7 - Toasts, 4 - 6 - 2-4 2-3 11.4 Turbo gril Préchauffez le four à vide. Réglez la température sur 200 °C. Utilisez le troisième niveau de la grille.
(kg) Durée de décon‐ Décongélation com‐ gélation (min) plémentaire (min) Crème 2 x 0,2 80 - 100 10 - 15 La crème fraîche peut aussi être battue même si elle n'est pas complète‐ ment décongelée. Truite 0,15 25 - 35 10 - 15 - Fraises 0,3 30 - 40 10 - 20 - Beurre 0,25 30 - 40 10 - 15 - Gâteau 1,4 60 60 - 11.6 Chaleur tournante humide - accessoires recommandés Utilisez les moules et récipients foncés et non réfléchissants.
(°C) (min) Brownie Plateau de cuisson ou plat à rôtir 180 2 30 - 40 Soufflé, (6 pièces) ramequins en céramique sur une grille métallique 200 3 30 - 40 Fond de tarte en gé‐ noise moule à tarte sur une grille métallique 170 2 20 - 30 Génoise Victoria Plat de cuisson sur la grille métallique 170 2 35 - 45 Poisson poché, 0,3 kg Plateau de cuisson ou plat à rôtir 180 3 35 - 45 Poisson entier, 0,2 kg Plateau de cuisson ou plat à rôtir 180 3 35 - 45 Filet de poisson, 0,3 kg plaque
(°C) (min) Petits gâ‐ Chauffage teaux, 20 par Haut/ Bas plateau Plateau de cuisson 3 170 20 - 30 - Tourte aux pommes, 2 moules Ø20 cm Chauffage Haut/ Bas Grille métal‐ 1 lique 170 80 - 120 - Génoise, moule à gâ‐ teau de 26 cm Chauffage Haut/ Bas Grille métal‐ 2 lique 170 35 - 45 - Sablé Chauffage Haut/ Bas Plateau de cuisson 150 20 - 35 Préchauffez le four pendant 10 minutes. Toasts, 4 6 morceaux Gril Grille métal‐ 3 lique max.
Nettoyez la cavité après chaque utilisation. L’accumulation de graisse ou d’autres résidus peut provoquer un incendie. Utilisation quoti‐ dienne De l'humidité peut se déposer dans l'enceinte du four ou sur les vitres de la porte. Pour dimi‐ nuer la condensation, laissez fonctionner le four pendant 10 minutes avant la cuisson. Ne conservez pas les aliments dans le four pendant plus de 20 minutes. Sécher la cavité avec un chiffon doux après chaque utilisation.
Étape 3 Fermez la porte du four à la première position d'ouverture (mi-parcours). Puis soulevez et tirez la porte vers l'avant et retirez-la de son logement. Étape 4 Mettez la porte sur un chiffon doux sur une surface stable et relâchez le systè‐ me de verrouillage pour retirer le pan‐ neau de verre interne. Étape 5 Faites pivoter les fixations de 90° et retirez-les de leurs logements. Étape 6 Soulevez doucement puis sortez le panneau de verre.
Avant de remplacer l'éclairage : Étape 1 Étape 2 Étape 3 Éteignez le four. Attendez que le four ait refroidi. Débranchez le four de l'alimentation secteur. Placez un chiffon au fond de la cavi‐ té. Lampe arrière Étape 1 Tournez le diffuseur en verre pour le retirer. Étape 2 Nettoyez le diffuseur en verre. Étape 3 Remplacez l'éclairage par une ampoule adaptée résistant à une température de 300 °C. Étape 4 Remettez en place le diffuseur en verre. 13.
14. RENDEMENT ÉNERGÉTIQUE 14.1 Informations produit et Fiche d’informations produit* Nom du fournisseur Zanussi Identification du modèle ZOHEE2X1 944068087 ZOHIE2X1 944068089 Index d'efficacité énergétique 94.9 Classe d’efficacité énergétique A Consommation d'énergie avec charge standard et mode tradition‐ nel 0.83 kWh/cycle Consommation d'énergie avec charge standard et mode air pulsé 0.
Maintien des aliments au chaud Sélectionnez la température la plus basse possible pour utiliser la chaleur résiduelle et maintenir le repas au chaud. Chaleur tournante humide Fonction conçue pour économiser de l'énergie en cours de cuisson. 15. EN MATIÈRE DE PROTECTION DE L'ENVIRONNEMENT Recyclez les matériaux portant le symbole . Déposez les emballages dans les conteneurs prévus à cet effet.
BESUCHEN SIE UNSERE WEBSITE, UM: Anwendungshinweise, Prospekte, Informationen zu Fehlerbehebung, Service und Reparatur zu erhalten: www.zanussi.com/support Änderungen vorbehalten. INHALTSVERZEICHNIS 1. SICHERHEITSHINWEISE............................................................................................ 72 2. SICHERHEITSANWEISUNGEN................................................................................... 74 3. MONTAGE.......................................................................
• • • • • verbundenen Gefahren verstanden haben. Kinder unter 8 Jahren und Personen mit schweren Behinderungen oder Mehrfachbehinderung müssen vom Gerät ferngehalten werden, wenn sie nicht ständig beaufsichtigt werden. Kinder dürfen nicht mit dem Gerät spielen. Halten Sie sämtliches Verpackungsmaterial von Kindern fern und entsorgen Sie es ordnungsgemäß. WARNUNG: Halten Sie Kinder und Haustiere während des Betriebs oder der Abkühlphase vom Gerät fern.
• gleichermaßen qualifizierten Person ausgetauscht werden, um Gefahren durch elektrischen Strom zu vermeiden. Ziehen Sie die Einhängegitter erst vorne und dann hinten von der Seitenwand weg und nehmen Sie sie heraus. Führen Sie zum Einsetzen der Einhängegitter die oben aufgeführten Schritte in umgekehrter Reihenfolge durch. 2. SICHERHEITSANWEISUNGEN 2.1 Montage WARNUNG! Die Montage des Geräts darf nur von einer qualifizierten Fachkraft durchgeführt werden.
• • • • • • • Gerät nicht berührt oder in ihre Nähe gelangt, insbesondere wenn das Gerät eingeschaltet oder die Tür heiß ist. Alle Teile, die gegen direktes Berühren schützen, sowie die isolierten Teile müssen so befestigt werden, dass sie nicht ohne Werkzeug entfernt werden können. Stecken Sie den Netzstecker erst nach Abschluss der Montage in die Steckdose. Stellen Sie sicher, dass der Netzstecker nach der Montage noch zugänglich ist.
• • • • • – Füllen Sie kein Wasser in das heiße Gerät. – Lassen Sie nach Abschluss des Garvorgangs kein feuchtes Geschirr oder feuchte Speisen im Gerät stehen. – Gehen Sie beim Herausnehmen oder Einsetzen des Zubehörs sorgfältig vor. Verfärbungen der Email- oder Edelstahlbeschichtung haben keine Auswirkung auf die Leistung des Geräts. Verwenden Sie für feuchte Kuchen das tiefe Blech. Fruchtsäfte können bleibende Flecken verursachen. Dieses Gerät ist nur zum Kochen bestimmt.
3. MONTAGE 3.1 Montage WARNUNG! Siehe Kapitel Sicherheitshinweise. (*mm) 540 21 600 min. 550 20 558 19 114 min. 560 9 589 598 570 3 594 (*mm) 540 21 min. 550 590 20 558 19 114 min. 560 589 598 570 9 3 594 3.
4. GERÄTEBESCHREIBUNG 4.1 Gesamtansicht 1 2 3 4 5 6 7 12 4 8 9 3 10 2 11 1 4.2 Zubehör • Kombirost Für Kochgeschirr, Kuchenformen, Braten. • 1 2 3 4 5 6 7 8 9 10 11 12 Bedienfeld Betriebskontrolllampe/-symbol Einstellknopf für die Ofenfunktionen Display Einstellknopf (für die Temperatur) Temperaturanzeige/-symbol Lüftungsöffnungen für das Kühlgebläse Heizelement Lampe Ventilator Einhängegitter, herausnehmbar Einschubebenen Backblech Für Kuchen und Plätzchen. 5. BEDIENFELD 5.
6. VOR DER ERSTEN INBETRIEBNAHME WARNUNG! Siehe Kapitel Sicherheitshinweise. 6.1 Vor der ersten Inbetriebnahme Der Backofen kann während des Aufheizens Geruch und Rauch verströmen. Stellen Sie sicher, dass der Raum belüftet ist. 1. Schritt 1 Schritt 2 Schritt 3 Stellen Sie die Uhrzeit ein Reinigen Sie den Backofen Heizen Sie den leeren Backofen vor , - zum Einstellen der Zeit drücken. Nach etwa 5 Sek. hört die Anzeige auf zu blinken und das Display zeigt die Zeit an. 1. 2.
Ofenfunktion Anwendung Ofenfunktion Zum Backen auf bis zu zwei Einschubebenen gleichzeitig und zum Dörren von Lebensmit‐ teln. Stellen Sie eine 20 - 40 °C nied‐ rigere Backofentemperatur als bei Ober-/Unterhitze ein. Heißluft Feuchte Umluft Diese Funktion ist entwickelt worden, um während des Gar‐ vorgangs Energie zu sparen. Wenn Sie diese Funktion nut‐ zen, kann die Temperatur im Garraum von der eingestellten Temperatur abweichen. Die Wärmeleistung kann geringer sein.
8.2 Einstellung: Uhrfunktionen Einstellung: Uhrzeit blinkt, wenn Sie den Backofen an die Stromversorgung anschließen, nach einem Stromausfall und wenn der Timer nicht eingestellt ist. , – zum Einstellen der Zeit drücken. Nach etwa 5 Sek. hört die Anzeige auf zu blinken, und das Display zeigt die Zeit an. Änderung: Uhrzeit Schritt 1 Schritt 2 – wiederholt drücken, um die Tageszeit zu ändern. – beginnt zu blinken. , – zum Einstellen der Zeit drücken. Nach etwa 5 Sek.
9. VERWENDUNG DES ZUBEHÖRS WARNUNG! Siehe Kapitel Sicherheitshinweise. 9.1 Einsetzen des Zubehörs Die kleine Einkerbung auf der Oberseite erhöht die Sicherheit. Diese Einkerbungen Kombirost: Schieben Sie den Kombirost zwischen die Füh‐ rungsschienen der Einhängegitter mit den Füßen nach unten zeigend. Backblech: Schieben Sie das Blech zwischen die Führungs‐ stäbe der Einhängegitter.
10. ZUSATZFUNKTIONEN 10.1 Kühlgebläse Wenn der Backofen in Betrieb ist, wird das Kühlgebläse automatisch eingeschaltet, um die Ofenoberflächen zu kühlen. Wenn Sie den Backofen ausschalten kann das Kühlgebläse weiter laufen, bis der Ofen abgekühlt ist. gefährlichen Überhitzung führen. Um dies zu verhindern, ist der Backofen mit einem Sicherheitsthermostat ausgestattet, der die Stromzufuhr unterbrechen kann. Die Wiedereinschaltung des Backofens erfolgt automatisch bei Temperaturabfall. 10.
11.2 Backen und Braten Ober-/Unterhitze CHEN Heißluft KU‐ (Min.
Ober-/Unterhitze Heißluft BROT UND PIZZA (Min.) (°C) (°C) Roggenbrot, Vorheizen ist nicht erforderlich 190 1 180 1 30 – 45 Brotform Brot/Brötchen, 6 - 8 Bröt‐ chen 190 2 180 2 (1 und 3) 25 – 40 Backblech Pizza 190 1 190 1 20 – 30 Tiefes Blech Scones 200 3 190 2 10 – 20 Backblech Verwenden Sie die Kuchenform. Ober-/Unterhitze CHEN Heißluft OBSTKU‐ (Min.
Ober-/Unterhitze Heißluft FLEISCH (Min.
GRILL (kg) (Min.) Erste Seite (Min.) Zweite Seite Spieße, 4 - 10 - 15 10 - 12 Hähnchenbrust, 4 Stück 0.4 12 - 15 12 - 14 Frikadellen, 6 0.6 20 - 30 - Fischfilet, 4 Stück 0.4 12 - 14 10 - 12 Belegte Toastbrote, 4 - 6 - 5-7 - Toast, 4 - 6 - 2-4 2-3 11.4 Heißluftgrillen Leeren Backofen vorheizen. Stellen Sie die Temperatur auf 200 °C ein. Nutzen Sie die dritte Einschubebene. (Min.
(kg) Fleisch Auftauzeit (Min.) Zusätzliche Auftau‐ zeit (Min.) 1 100 – 140 0,5 90 – 120 20 – 30 Nach der Hälfte der Gar‐ dauer wenden. Sahne 2 x 0,2 80 – 100 10 – 15 Sahne lässt sich auch mit noch leicht gefrorenen Stellen gut aufschlagen. Forelle 0,15 25 – 35 10 – 15 – Erdbeeren 0,3 30 – 40 10 – 20 – Butter 0,25 30 – 40 10 – 15 – Torte 1,4 60 60 – 11.6 Feuchte Umluft - Empfohlenes Zubehör Verwenden Sie die dunklen und nicht reflektierenden Formen und Behälter.
(°C) Soufflé, 6 Stück Keramikförmchen auf Kombi‐ rost (Min.
(°C) (Min.) Mürbeteig‐ gebäck Ober-/Unterhit‐ ze Backblech 3 150 20 - 35 Backofen 10 Min. vor‐ heizen. Toast, 4 - 6 Stück Grill Kombirost 3 Max. 2 - 4 Minuten auf Backofen 3 Min. vor‐ der ersten Seite, 2 heizen. - 3 Minuten auf der zweiten Seite Hamburger Grill aus Rind‐ fleisch, 6 Stück, 0,6 kg Kombirost und Fett‐ pfanne 3 Max. 20 - 30 Kombirost in die dritte und Fettpfanne in die zweite Einschubebene des Backofens ein‐ schieben.
12.2 Entfernen: Einhängegitter Entfernen Sie Einhängegitter zur Reinigung des Backofens. Schritt 1 Schalten Sie den Backofen aus und warten Sie, bis er abgekühlt ist. Schritt 2 Ziehen Sie das Einhängegitter vorne von der Seitenwand weg. Schritt 3 Ziehen Sie das Einhängegitter hinten von der Seitenwand weg und nehmen Sie es heraus. Schritt 4 Führen Sie zum Einsetzen der Ein‐ hängegitter die oben aufgeführten Schritte in umgekehrter Reihenfolge durch. 2 1 12.
Schritt 5 Drehen Sie die Befestigungen um 90° und nehmen Sie sie aus der Halte‐ rung. Schritt 6 Heben Sie die Glasscheibe vorsichtig an und entfernen Sie sie. 90° 1 2 Schritt 7 Reinigen Sie die Glasscheiben mit Wasser und Spülmittel. Trocknen Sie die Glasscheiben sorgfäl‐ tig ab. Reinigen Sie die Glasscheiben nicht im Geschirrspüler. Schritt 8 Setzen Sie nach der Reinigung die Glasscheibe und die Backofentür ein Bei korrektem Einbau macht die Türabdeckung ein Klickgeräusch.
Hintere Lampe Schritt 1 Drehen Sie die Glasabdeckung und nehmen Sie sie ab. Schritt 2 Reinigen Sie die Glasabdeckung. Schritt 3 Ersetzen Sie die Lampe durch eine geeignete, bis 300 °C hitzebeständige Lampe. Schritt 4 Bringen Sie die Glasabdeckung wieder an. 13. FEHLERSUCHE WARNUNG! Siehe Kapitel Sicherheitshinweise. 13.1 Was tun, wenn... In allen Fällen, die nicht in dieser Tabelle aufgeführt sind, wenden Sie sich bitte an einen autorisierten Kundendienst. Störung Prüfen Sie, ob...
Energieverbrauch bei Standardbeladung, Ober-/Unterhitze 0.83 kWh/Programm Energieverbrauch bei Standardbeladung, Umluft 0.75 kWh/Programm Anzahl der Garräume 1 Wärmequelle Strom Fassungsvermögen 57 l Backofentyp Einbau-Backofen Gewicht ZOHEE2X1 28.6 kg ZOHIE2X1 28.6 kg * Für die Europäische Union gemäß EU-Richtlinien 65/2014 und 66/2014. Für die Republik Weißrussland gemäß STB 2478-2017, Anhang G; STB 2477-2017, Anlagen A und B. Für die Ukraine gemäß 568/32020.
mit diesem Symbol nicht mit dem Hausmüll. Bringen Sie das Gerät zu Ihrer örtlichen Sammelstelle oder wenden Sie sich an Ihr Gemeindeamt.
VISITE O NOSSO WEBSITE PARA: Resolver problemas e obter conselhos de utilização, catálogos e informações sobre assistência e reparações: www.zanussi.com/support Sujeito a alterações sem aviso prévio. ÍNDICE 1. INFORMAÇÕES DE SEGURANÇA..............................................................................96 2. INSTRUÇÕES DE SEGURANÇA................................................................................. 98 3. INSTALAÇÃO.......................................................................
• • • • • complexas afastadas do aparelho, a menos que constantemente vigiadas. Não permita que crianças brinquem com o aparelho. Mantenha todos os materiais de embalagem fora do alcance das crianças e elimine-os de forma apropriada. AVISO: Mantenha as crianças e os animais domésticos afastados do aparelho quando ele estiver a funcionar ou a arrefecer. As partes acessíveis ficam quentes durante a utilização. Se o aparelho tiver um dispositivo de segurança para crianças, recomendamos que o active.
• Para remover os apoios para prateleiras, puxe primeiro a parte da frente e depois a parte de trás do apoio para prateleiras para fora da parede lateral. Instale os apoios para prateleiras na sequência inversa. 2. INSTRUÇÕES DE SEGURANÇA 2.1 Instalação AVISO! A instalação deste aparelho tem de ser efetuada por uma pessoa qualificada. • • • • • • • • • Retire a embalagem toda. Não instale nem utilize o aparelho se estiver danificado. Siga as instruções de instalação fornecidas com o aparelho.
• • • • • • • As protecções contra choques eléctricos das peças isoladas e não isoladas devem estar fixas de modo a não poderem ser retiradas sem ferramentas. Ligue a ficha à tomada elétrica apenas no final da instalação. Certifique-se de que a ficha fica acessível após a instalação. Se a tomada eléctrica estiver solta, não ligue a ficha. Não puxe o cabo de alimentação para desligar o aparelho. Puxe sempre a ficha.
• • • • • A eventual descoloração do esmalte ou do aço inoxidável não afeta o desempenho do aparelho. Utilize um recipiente profundo quando cozer bolos muito húmidos. Caso contrário, os sucos da fruta podem provocar manchas permanentes. Este aparelho serve apenas para cozinhar. Não pode ser usado para outras funções como, por exemplo, aquecimento de divisões. Cozinhe sempre com a porta do forno fechada.
3. INSTALAÇÃO 3.1 Encastre AVISO! Consulte os capítulos relativos à segurança. (*mm) 540 21 600 min. 550 20 558 19 114 min. 560 9 589 598 570 3 594 (*mm) 540 21 min. 550 590 20 558 19 114 min. 560 589 598 570 9 3 594 3.
4. DESCRIÇÃO DO PRODUTO 4.1 Visão geral 1 2 3 4 5 6 7 12 4 8 9 3 10 2 11 1 4.
6. ANTES DA PRIMEIRA UTILIZAÇÃO AVISO! Consulte os capítulos relativos à segurança. 6.1 Antes da primeira utilização O forno pode emitir algum odor e fumo durante o pré-aquecimento. Certifique-se de que o espaço é ventilado. Passo 1 Passo 2 Acertar o relógio 1. , - prima para definir o tempo. Após cerca de 5 segun‐ dos, o piscar pára e o visor mostra o tempo Passo 3 Limpeza do forno 1. 2. Pré-aqueça o forno vazio Remova todos os acessórios e 1. apoios para prateleiras amoví‐ veis do forno.
Tipo de aqueci‐ Aplicação mento Tipo de aqueci‐ Aplicação mento Esta função foi concebida para poupar energia durante o cozi‐ nhado. Quando utilizar esta fun‐ Ventilado com Re‐ ção, a temperatura na cavidade sistência pode diferir a temperatura defi‐ nida. A potência do aquecimen‐ to pode ser reduzida. Para mais informações consulte o capítulo “Utilização diária”, notas sobre: Ventilado com Resistência. Para cozer bolos com bases es‐ taladiças e conservar alimentos.
8.2 Como definir: Funções de relógio Como definir: Hora do dia – fica a piscar quando ligar o forno à corrente elétrica depois de uma falha de corrente ou se o temporizador não estiver configurado. , – premir para definir a hora. A luz intermitente para depois de cerca de 5 segundos e o visor mostra a hora. Como alterar: Hora do dia Passo 1 Passo 2 – premir repetidamente para alterar a hora do dia. – começa a piscar. , – premir para definir a hora.
9. UTILIZAR OS ACESSÓRIOS AVISO! Consulte os capítulos relativos à segurança. 9.1 Inserir acessórios Um pequeno entalhe na parte inferior aumenta a segurança. Estes entalhes são Prateleira em grelha: Introduza a prateleira entre as barras-guia dos apoios para prateleiras e certifique-se de que os pés de apoio ficam para baixo. Tabuleiro para assar: Introduza o tabuleiro entre as barras-guia do apoio para prateleiras.
10. FUNÇÕES ADICIONAIS 10.1 Ventoinha de arrefecimento Quando o forno está a funcionar, a ventoinha de arrefecimento é ativada automaticamente para manter as superfícies do forno frias. Se desligar o forno, a ventoinha de arrefecimento pode continuar a funcionar aé o forno arrefecer. sobreaquecimento perigoso. Para evitar isso, o forno possui um termóstato de segurança que corta a alimentação elétrica. O forno volta a ativar-se automaticamente quando a temperatura baixar. 10.
11.
PÃO E PIZZA Cozedura Convenci‐ Aquecimento Ventilado onal (min) (°C) Pão branco, 1 - 2 unida‐ des, 0,5 kg cada (°C) 190 1 190 1 60 - 70 - Pão de centeio, não é ne‐ 190 cessário pré-aquecer 1 180 1 30 - 45 Forma retan‐ gular Pãezinhos, 6 - 8 pãezi‐ nhos 190 2 180 2 (1 e 3) 25 - 40 Tabuleiro pa‐ ra assar Pizza massa fina 190 1 190 1 20 - 30 Tabuleiro pa‐ ra grelhar Scones 200 3 190 2 10 - 20 Tabuleiro pa‐ ra assar Utilize uma forma de bolo.
Cozedura Convenci‐ Aquecimento Venti‐ onal lado CARNE (min) (°C) (°C) Carne assada, mal passada 210 200 44 - 50 Carne assada, média 210 200 51 - 55 Carne assada, bem passada 210 200 55 - 60 CARNE Cozedura Convencional Aquecimento Ventila‐ do (min) (°C) (°C) Pá de porco, com courato 180 2 170 2 120 - 150 Perna de porco, 2 unidades 180 2 160 2 100 - 120 Perna de borrego 190 2 190 2 110 - 130 Frango inteiro 200 2 200 2 70 - 85 Peru inteiro 180 1 160 1 210 - 240
GRELHAR (kg) (min) 1.º lado (min) 2.º lado Bifes do lombo, 4 unidades 0,8 12 - 15 12 - 14 Bife de vaca, 4 unidades 0,6 10 - 12 6-8 Salgados, 8 - 12 - 15 10 - 12 Costeleta de porco, 4 unidades 0,6 12 - 16 12 - 14 1/2 Frango, 2 1 30 - 35 25 - 30 Espetadas, 4 - 10 - 15 10 - 12 Peito de frango, 4 unidades 0,4 12 - 15 12 - 14 Hambúrgueres, 6 0,6 20 - 30 - Filete de peixe, 4 unidades 0,4 12 - 14 10 - 12 Sandes tostadas, 4 - 6 - 5-7 - Tosta, 4 - 6 - 2-4 2-3 11.
11.5 Descongelar (kg) Tempo de des‐ congelação (min.) Tempo extra de des‐ congelação (min.) Frango 1 100 - 140 20 - 30 Coloque o frango sobre um pires virado ao contrá‐ rio e este sobre um prato grande. Vire a meio do tempo. Carne 1 100 - 140 20 - 30 Vire a meio do tempo. 0,5 90 - 120 Natas 2 x 0,2 80 - 100 10 - 15 Também é possível bater as natas quando ainda es‐ tão ligeiramente congela‐ das.
(°C) (min.
(°C) Legumes mediterrâni‐ cos, 0,7 kg (min.) tabuleiro para assar ou tabu‐ 180 leiro para recolha de gorduras 4 35 - 40 11.8 Informação para testes Testes de acordo com a norma IEC 60350-1.
12.1 Notas sobre a limpeza Limpe a parte da frente do forno com um pano macio com água morna e um detergente su‐ ave. Limpe e verifique a junta da porta em torno da moldura da cavidade. Utilize uma solução de limpeza para limpar as superfícies metálicas. Agentes de lim‐ peza Limpe manchas com um detergente suave. Limpe a cavidade após cada utilização. A acumulação de gordura ou outros resíduos pode provocar incêndios.
CUIDADO! Não utilize o forno sem os painéis de vidro. Passo 1 Abra completamente a porta e segure Passo 2 em ambas as dobradiças. Passo 3 Feche a porta do forno até meio, pa‐ rando na primeira posição de abertu‐ ra. Em seguida, levante e puxe a por‐ ta e remova-a dos encaixes. Passo 4 Coloque a porta num pano macio nu‐ ma superfície estável e liberte o siste‐ ma de bloqueio para remover o painel de vidro interno.
12.4 Como substituir: Lâmpada AVISO! Risco de choque elétrico. A lâmpada pode estar quente. Antes de substituir a lâmpada: Passo 1 Passo 2 Passo 3 Desligue o forno. Aguarde até que o forno esteja frio. Desligue o forno da corrente elétri‐ ca. Coloque um pano no fundo da cavi‐ dade. Lâmpada posterior Passo 1 Rode a proteção de vidro para a retirar. Passo 2 Limpe a proteção de vidro. Passo 3 Substitua a lâmpada por uma lâmpada adequada, resistente ao calor até 300 °C.
Recomendamos que anote os dados aqui: Número do produto (PNC) ......................................... Número de série (S.N.) ......................................... 14. EFICIÊNCIA ENERGÉTICA 14.
cozedura. O calor residual no interior do forno concluirá a cozedura. Utilize o calor residual para aquecer outros pratos. Ventilado com Resistência Função concebida para poupar energia durante a cozedura. Manter os alimentos quentes Para utilizar o calor residual para manter uma refeição quente, seleccione a regulação de temperatura mais baixa possível. 15. PREOCUPAÇÕES AMBIENTAIS Recicle os materiais que apresentem o símbolo . Coloque a embalagem nos contentores indicados para reciclagem.
VISITE NUESTRO SITIO WEB PARA: Obtener consejos, folletos, soluciones a problemas e información de servicio y reparación: www.zanussi.com/support Salvo modificaciones. CONTENIDO 1. INFORMACIÓN SOBRE SEGURIDAD.......................................................................120 2. INSTRUCCIONES DE SEGURIDAD.......................................................................... 122 3. INSTALACIÓN.........................................................................................................
• • • • • personas con minusvalías importantes y complejas, salvo que estén bajo supervisión continua. No deje que los niños jueguen con el aparato. Mantenga todo el material de embalaje fuera del alcance de los niños y deséchelo de forma adecuada. ADVERTENCIA: Mantenga a los niños y mascotas alejados del aparato cuando esté funcionando o enfriándose. Las partes accesibles se calientan durante el uso. Si este aparato tiene un bloqueo de seguridad para niños, debe activarlo.
• Para quitar los carriles laterales, tire primero del frontal del carril y luego separe el extremo trasero de las paredes. Coloque los carriles laterales en el orden inverso. 2. INSTRUCCIONES DE SEGURIDAD 2.1 Instalación ADVERTENCIA! Sólo un técnico cualificado puede instalar el aparato. • • • • • • • • • Retire todo el embalaje. No instale ni utilice un aparato dañado. Siga las instrucciones de instalación suministradas con el aparato. Tenga cuidado al mover el aparato, porque es pesado.
• • • • • • Conecte el enchufe a la toma de corriente únicamente cuando haya terminado la instalación. Asegúrese de tener acceso al enchufe del suministro de red una vez finalizada la instalación. Si la toma de corriente está floja, no conecte el enchufe. No desconecte el aparato tirando del cable de conexión a la red. Tire siempre del enchufe.
• • • • • La pérdida de color del esmalte o el acero inoxidable no afecta al rendimiento del aparato. Utilice una bandeja honda para pasteles húmedos. Los jugos de las frutas podrían ocasionar manchas permanentes. Este aparato está diseñado exclusivamente para cocinar. No debe utilizarse para otros fines, por ejemplo, como calefacción. Cocine siempre con la puerta del horno cerrada.
3. INSTALACIÓN 3.1 Empotrado ADVERTENCIA! Consulte los capítulos sobre seguridad. (*mm) 540 21 600 min. 550 20 558 19 114 min. 560 9 589 598 570 3 594 (*mm) 540 21 min. 550 590 20 558 19 114 min. 560 589 598 570 9 3 594 3.
4. DESCRIPCIÓN DEL PRODUCTO 4.1 Descripción general 1 2 3 4 5 6 7 12 4 8 9 3 10 2 11 1 4.2 Accesorios • 1 2 3 4 5 6 7 8 9 10 11 12 • Parrilla Para bandejas de horno, pastel en molde, asados.
6. ANTES DEL PRIMER USO ADVERTENCIA! Consulte los capítulos sobre seguridad. 6.1 Antes del primer uso El horno puede emitir olores y humos durante el precalentamiento. Asegúrese de que la sala esté ventilada. Paso 1 Paso 2 Ajuste el reloj 1. Paso 3 Limpie el horno 1. , para ajustar la - pulse hora. Después de unos 5 se‐ gundos, el parpadeo cesa y la 2. pantalla indica la hora ajustada. Precaliente el horno vacío Retire todos los accesorios y carriles de apoyo extraíbles del horno.
Función de cocción Aplicación Función de cocción Función diseñada para ahorrar energía durante la cocción. Cuando se utiliza esta función, Horneado húmedo la temperatura del horno puede + ventil. diferir de la temperatura progra‐ mada. La potencia calorífica puede reducirse. Para más in‐ formación, consulte el capítulo “Uso diario”, Notas sobre: Hor‐ neado húmedo + ventil.. Calor inferior Para preparar pasteles con ba‐ ses crujientes y conservar ali‐ mentos.
8.2 Cómo ajustar: Funciones del reloj Cómo ajustar: Hora - parpadea al conectar el horno a la corriente eléctrica si ha habido un corte de corriente o si no está ajusta‐ do el temporizador. , - pulsa para ajustar la hora. Después de unos 5 segundos, el parpadeo cesa y la pantalla indica la hora ajustada. Cómo cambiar: Hora Paso 1 Paso 2 - pulsa repetidamente para cambiar la hora del día. - empieza a parpadear. , - pulsa para ajustar la hora.
9. USO DE LOS ACCESORIOS ADVERTENCIA! Consulte los capítulos sobre seguridad. 9.1 Inserción de accesorios Una pequeña muesca en la parte superior aumenta la seguridad. Las hendiduras Parrilla: Inserte la parrilla entre las guías del carril y asegú‐ rese de que las hendiduras apuntan hacia abajo. Bandeja: Introduzca la bandeja entre las guías del carril de apoyo. Parrilla, Bandeja: Posicione la bandeja entre las guías del carril de apoyo y la parrilla en las guías de encima.
10. FUNCIONES ADICIONALES 10.1 Ventilador de enfriamiento Cuando el horno funciona, el ventilador de enfriamiento se pone en marcha automáticamente para mantener frías las superficies del horno. Una vez apagado el horno, el ventilador sigue funcionando hasta enfriarlo totalmente. sobrecalentamientos peligrosos. Para evitarlo, el horno dispone de un termostato de seguridad que interrumpe la alimentación. El horno se vuelve a encender automáticamente cuando desciende la temperatura. 10.
11.
PAN Y PIZZA Cocción convencio‐ nal (min) (°C) Pan de centeno, no se necesita precalentar Aire caliente (°C) 190 1 180 1 30 - 45 Molde para pan Pan/Rollitos, 6 - 8 paneci‐ 190 llos 2 180 2 (1 y 3) 25 - 40 Bandeja Pizza 190 1 190 1 20 - 30 Bandeja hon‐ da Bollitos 200 3 190 2 10 - 20 Bandeja Use el molde de repostería.
Cocción convencional Aire caliente CARNE (min) (°C) (°C) Paletilla de cerdo, con corteza 180 2 170 2 120 - 150 Morcillo de cerdo, 2 trozos 180 2 160 2 100 - 120 Pata de cordero 190 2 190 2 110 - 130 Pollo entero 200 2 200 2 70 - 85 Pavo entero 180 1 160 1 210 - 240 Pato entero 175 2 160 2 120 - 150 Ganso entero 175 1 160 1 150 - 200 Conejo, en trozos 190 2 175 2 60 - 80 Liebre, en trozos 190 2 175 2 150 - 200 Faisán entero 190 2 175 2 90 - 120
GRILL (kg) (min) 1ª cara (min) 2ª cara Pechuga de pollo, 4 piezas 0,4 12 - 15 12 - 14 Hamburguesas, 6 0,6 20 - 30 - Filete de pescado, 4 piezas 0,4 12 - 14 10 - 12 Sándwiches tostados, 4 - 6 - 5-7 - Tostadas, 4 - 6 - 2-4 2-3 11.4 Grill Turbo Precaliente el horno vacío. Ajuste la temperatura a 200 °C. Use el tercer nivel.
Carne (kg) Tiempo de des‐ congelación (min) Tiempo de descon‐ gelación posterior (minutos) 1 100 - 140 20 - 30 Dele la vuelta a media cocción. 0.5 90 - 120 2 x 0,2 80 - 100 10 - 15 La nata se puede montar perfectamente incluso aunque queden puntos li‐ geramente congelados. Trucha 0.15 25 - 35 10 - 15 - Fresas 0.3 30 - 40 10 - 20 - Mantequilla 0.25 30 - 40 10 - 15 - Pasteles 1.4 60 60 - Nata 11.6 Horneado húmedo + ventil..
(°C) (min) Brownie bandeja o bandeja honda 180 2 30 - 40 Soufflé, 6 piezas ramekin cerámico sobre parri‐ 200 lla 3 30 - 40 Base de masa brisé molde de base sobre parrilla 170 2 20 - 30 Tarta Victoria bandeja de hornear sobre pa‐ rrilla 170 2 35 - 45 Pescado pochado, 0,3 kg bandeja o bandeja honda 180 3 35 - 45 Pescado entero, 0,2 kg bandeja o bandeja honda 180 3 35 - 45 Filete de pescado, 0,3 kg molde para pizza sobre parri‐ lla 180 3 35 - 45 Carne pochada, 0,25 kg bande
(°C) (min) Pastelillos, 20 unidades por bandeja Cocción con‐ vencional Bandeja de cocción 3 170 20 - 30 - Tarta de manzana, 2 moldes, Ø 20 cm Cocción con‐ vencional Parrilla 1 170 80 - 120 - Bizcocho, Cocción con‐ molde de re‐ vencional postería Ø26 cm Parrilla 2 170 35 - 45 - Mantecados Bandeja de cocción 3 150 20 - 35 Precaliente el horno 10 minutos. Tostadas, 4 - Grill 6 trozos Parrilla 3 máx.
Limpie todos los accesorios después de cada uso y déjelos secar. Use un paño suave hu‐ medecido en agua caliente y detergente suave. No lave los accesorios en el lavavajillas No limpie los accesorios no adherentes utilizando un limpiador abrasivo ni objetos afilados. Accesorios 12.2 Cómo quitar: Apoyos de baldas Para limpiar el horno, retire los carriles de apoyo. Paso 1 Apague el horno y espere a que esté frío. Paso 2 Tire de la parte delantera del carril de apoyo para separarlo de la pared late‐ ral.
Paso 3 Cierre la puerta del horno a medio ca‐ mino hasta la primera posición de apertura. A continuación levante la puerta y tire hacia adelante para de‐ sencajarla. Paso 4 Ponga la puerta en un paño suave so‐ bre una superficie estable y libere el sistema de bloqueo para quitar el pa‐ nel de vidrio interno. Paso 5 Gire los pasadores en un ángulo de 90° y extráigalos de sus asientos Paso 6 Levante con cuidado primero y retire después el panel de cristal.
Bombilla trasera Paso 1 Gire la tapa de cristal para extraerla. Paso 2 Limpie la tapa de cristal. Paso 3 Cambie la bombilla por otra apropiada termorresistente hasta 300 °C. Paso 4 Coloque la tapa de cristal. 13. SOLUCIÓN DE PROBLEMAS ADVERTENCIA! Consulte los capítulos sobre seguridad. 13.1 Qué hacer si... En cualquier caso no incluido en esta tabla, por favor contacte con un Centro de Servicio Autorizado. Problema Compruebe que... El horno no calienta. Ha saltado el fusible.
Clase de eficiencia energética A Consumo de energía con carga estándar, modo convencional 0.83 kWh/ciclo Consumo de energía con carga estándar, modo con ventilador 0.75 kWh/ciclo Número de cavidades 1 Fuente de calor Electricidad Volumen 57 l Tipo de horno Horno empotrado Masa ZOHEE2X1 28.6 kg ZOHIE2X1 28.6 kg * Para la Unión Europea según los Reglamentos de la UE 65/2014 y 66/2014. Para la República de Bielorrusia según STB 2478-2017, apéndice G; STB 2477-2017, anexos A y B.
de aparatos eléctricos y electrónicos. No deseche los aparatos marcados con el símbolo domésticos. Lleve el producto a su centro de reciclaje local o póngase en contacto con su oficina municipal.
867360243-A-402020 WWW.ZANUSSI.