1t is most important that this instruction beak should be retained with the appliance for future reference. Should the appliance be sold or transferred to another owner, or should you move house and leave the appliance, always ensnare that the beak is supplied with the appliance i over that the new owner can get to know the sanctioning of the appliance and the relevant warnings.
CONTENTS Specifications General Features Installation Electrical Connections Getting To Know Your Machine The Drying Times Using Your Machine Maintenance and Cleaning ‘What Happens If Something Goes Wrong? Peace Of Mind For Twelve Months Page 4 Page 5 Page 6 Page 8 Page 9 Page 10 Page 11 Page 12 Page 14 Page 15
TC 460 Dimensions With worktop Height: ‘Width: Depth: ‘Without worktop Height: Width: Depth Depth with open door: Wash Load: Nominal Voltage: Drive Motor: Heating Element: Total Power Absorbed: 850 mm 597 mm 600 mm.
7~ 1. Worktop 9 2. Water Reservoir Indicator Lamp 3. Doer Opening Button 4. Mains On Light $. Ow/Off Dial Time Selector Dial 6. Programmer Chart 7. Fluff Filter 8. Door Catch 9. Rating Plate 10. Ventilator Grille 11. Air Condenser 12. Water Reservoir Container 13.
This tumble dryer can be positioned without the need for any special type of installation as the operation of the condenser unit means that there is no steam to vent. You will, however, need to ensure that there is a continuous air supply and the hot air which is discharged through the venting slots at the base of the machine must not be restricted.
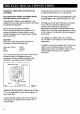
10. Fix door stopper “A” in hole by 90° rotation. 11, Remove plug from hole “d” and hook door stopper into the hole. Ensure you have the hook the correct way round to catch the door as is opens. Instructions For Building In Under A Counter The appliance can be integrated in fitted kitchens or instated s a build-under unit after removal of the worktop. Proceed as follows: * Unplug the appliance. * Unscrew the mounting screws at the rear of the appliance (Fig. 3. ™ Serews™ Py Fig.
'WARNING: THIS APPLIANCE MUST BE FARTED. The manufacturer declines any liability should this safety measure not be observed. ¥ the plug that is fitted fo your appliance is not suitable for your socket outlet, it must be cut off and the appropriate plug fitted. Remove the fuse from the cut off plug. The cut off plug should then be disposed of to prevent the hazard of electric shocks in case it should be plugged into 2 amp socket in another part of your home.
worms e b 1 Programmer chart @% "T‘w L1 4 Mains On Light {green} 2 Water Reservoir Indicator Light (red) ~ The pilot it indicates operating status. The indicator lamp will show that the water container is full or improperly fitted. The programmer will be interrupted.
Time Controlled Programmed The door of the machine ean be opened at any time The programmer glide is designed to help you. during the programmer if you want to feel the This dryer has two drying times of up to 120 and 8¢ dryness of the fabrics. Do not over-dry the fabric, minutes, giving 3 high or low heat temperature a8 it gives it a rough feel, also it will be difficult to according to the fabric type.
Sorting The Load ‘The maximum load you can dry in your fumble dryer cotton, linen and other saving fabrics, 2 kg (4.5 1b) of synthetics and (5 16} of absorbent fabrics such as toweling. 8 kg If you are using a washing machine, all you have to do is transfer the clothes, after the spin cycle from the washing machine to the tumble dryer. Sort the laundry according to fabric.
IMPORTANT Make sure that the machine is unplugged before undertaking any kind of maintenance. Cleaning The Fluff Filter The fluff filter should be cleaned after every dyeing process. A considerable amount of fluff accumulates ‘but this is not due to extra wear caused by the drying process. During drying on o washing lies Huff attached to the surface of the clothes is blown away by the wind and s therefore into noticeable, see Fig. 5 Container Fig.
Wipe the outside of the condenser and remove any fluff Clean the condenser with a brush or & hand shower attachment (Fig. 9).
if the machine is not working... Is the machine properly plugged in? 1s the fuse okay? Is the door closed properly? Is the programmer properly set? Is the Water Reservoir Container empty or properly inserted? (if NOT, the “Water Reservoir” indicator tamp tights up). The machine does net dry satisfactorily...
1 NI IV RIS Gaussian Standard Guarantee Conditions This guarantee is in addition to your statutory and other legal rights which will not be excluded or in any way diminished by the return of this guarantee card.