TUMBLE DRYER TC 481 W DOOR OPEN kg 5 kg 2.
Important Safety Information It is most important that this instruction book should be retained with the appliance for future reference. Should the appliance be sold or transferred to another owner, or should you move house and leave the appliance, always ensure that the book is supplied with the appliance in order that the new owner can get to know the functioning of the appliance and the relevant warnings. These warnings have been provided in the interest of safety.
Contents For the Installer For the User Important Safety Information Installation Child Safety ■ Use ■ ■ Your New Tumble Dryer Description of the Appliance The Control Panel 2 2 2 2 12 Technical Specifications 12 13 13 13 14 15 Positioning Stacking kit (optional accessory) ■ Connecting a drain hose ■ Door reversal ■ Electrical connection ■ ■ 4 4 5 ■ Water full indicator light 5 ■ Mains-on light 5 ■ Time selector dial/ON-OFF switch 5 Programme Chart Operating Sequence Installation Instruct
i Your New Tumble Dryer This tumble dryer will give your wash that soft, relaxed feel whatever the weather. Extremely high quality standards both during development and manufacturing guarantee a long service life for your appliance. Maximum economy in the operation of your dryer is achieved through very frugal electricity consumption and short drying times.
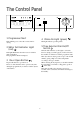
The Control Panel DOOR OPEN IRON DRY Spun at rpm 800 / 900 kg 5 kg 2.
Programme Chart Cotton and linen Selector dial up to 120 minutes (high temperature section) Type of laundry: Cotton Towelling Shirts Sheets Hand towels Tablecloths Table napkins Amount of laundry in kg Degree of drying Store dry (wardrobe dry) Iron dry (not completely dry; suitable for ironing) Drying time in minutes for laundry spun at 800/900 rpm 1000/1200 rpm 5.0 90-110 85-105 2.5 60-75 55-70 5.0 75-95 65-90 2.
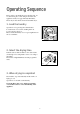
Operating Sequence Before using your tumble dryer for the first time, we recommend to place a few damp cloths inside the appliance and dry for approximately 20 minutes. There may be dust inside a brand new tumble dryer. 1. Load the laundry Open the door by pressing the relevant button. Load the items one at a time, shaking them out loosely and close the door. Please check the laundry does not get caught between the door and filter. P0871 2.
i Hints & Tips on Drying Before placing articles of laundry in your tumble dryer, check the care labels to ensure they are recommended for tumble drying. ■ Care Labels you may find on your laundry ■ normal drying (high temperature) ■ delicate drying (low temperature) ■ do not tumble dry ■ Do not overload the appliance. ■ Here is a list of the approximate weight of some common laundry items.
Maintenance and Cleaning You must disconnect the appliance from the electricity supply, before you can carry out any cleaning or maintenance work. Cleaning the condenser unit Clean the air condenser periodically, 3 or 4 times a year depending on how frequently the dryer is used. Pull out the condenser, holding it at the top, and remove all fluff. Clean it with a brush and rinse it under the shower if necessary. External cleaning Use only soap and water and then dry thoroughly.
Something Not Working Certain problems are due to lack of simple maintenance or oversights, which can be solved easily without calling out an engineer. Before contacting your local Service Centre, please carry out the checks listed below. IMPORTANT: if you call out an engineer to a fault listed below, or to repair a fault caused by incorrect use or installation, a charge will be made even if the appliance is under guarantee.
Peace of Mind for Twelve Months Standard guarantee conditions Exclusions We, Zanussi Limited undertake that if, within 12 months of the date of the purchase, this Zanussi appliance or any part thereof is proved to be defective by reason only of faulty workmanship or materials, we will, at our option, repair or replace the same FREE OF ANY CHARGE for labour, materials or carriage on condition that: ■ The appliance has been correctly installed and used only on the electricity supply stated on the rating pla
Installation Instructions It is dangerous to alter the specifications or attempt to modify this product in any way. Care must be taken to ensure that the appliance does not stand on the electrical supply cable. Any electrical work required to install this appliance should be carried out by a qualified electrician or competent person. Technical Specifications DIMENSIONS Height Width Depth POWER SUPPLY VOLTAGE TOTAL POWER ABSORBED MAXIMUM RECOMMENDED LOAD 85 cm (33.5”) 60 cm (23.6”) 60 cm (23.
Positioning Connecting a drain hose It is recommended that, for your convenience, the dryer is positioned close to your washing machine. The tumble dryer must be installed in a clean place, where dirt does not build up. Air must be able to circulate freely all round the appliance. Do not obstruct the front ventilation grille or the air intake grilles in the back of the machine. To keep vibration and noise to a minimum when the dryer is in use, it should be placed on a firm, level surface.
Door Reversal Instructions The appliance is supplied with the door opening from right to left. If you wish to change the opening direction, proceed as follows (see picture A): 1. Unhook door stopper «A» from its seat «a» and loosen from hole «b» by a 90° rotation. 2. Remove the plastic plug from hole «c» by a 90° rotation and re-fix in hole «b». 3. Unscrew hinge «B» (loosen the 2 screws, holding the door securely) and lower the door from the top pivot. 4.
Electrical connection Any electrical work required to install this appliance should be carried out by a qualified electrician or competent person. WARNING: THIS APPLIANCE MUST BE EARTHED. The manufacturer declines any liability should this safety measure not be observed. Before switching on, make sure the electricity supply voltage is the same as that indicated on the appliance’s rating plate. (See picture). The appliance is supplied with a 13amp plug fitted.
Z