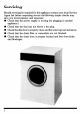
.. Servicing Should servicing be required for this appliance contact your local Service Agent but before requesting service the following simple checks may save you inconvenience and expenses: ® Check that the power supply is working (by plugging in another appliance.) ® Check that the fuse has not blown in the plug. ® Check that the door is properly closed and the water taps are turned on. @ Check that the drain filter or water inlets are not blocked.
Contents Installation Location Page Electrical connection Page Operation Sorting and loading the laundry Page Selecting the drying programmed Page Starting Page Stopping Page Drying programmed Page Maintenance Cleaning the filter Page Cleaning the dampness control sensors Page Some useful hints Page Something not working Page Directions for the. installer Page B Deadwood Technical data Width Depth Height Capacity Supply voltage Power absorbed: mortar ventilator heating element Total power absorbed 60 cms.
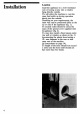
Installation Location Install the appliance in a well ventilated room or having at any rate & window facing directly outside. This will allow the machine to vent the steam that builds up during operation directly into the outside. Depending on your requirements, the steam vent can be positioned either at the rear or side of the appliance (fig. 1). The unused outlet should be closed by means of the special cover supplied with the appliance (fig. 2).
Attention Be absolutely sure not to connect the steam vent to a chimney for the exhaust of fumes from the combustion of a heating system. This dryer can also be fitted under the work top of a kitchen unit or stacked on top of a washing machine having front controls {see instructions on page 15). The appearance should be carefully leveled by means of the adjustable front feet which make it possible to compensate for any floor unevenness.
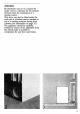
Electrical connection Warning: this appliance must be earthed. The manufacturer declines to accept any liability should this safety measure not be observed. Important The wires in this mains lead are colored in accordance with the following code: GREEN AND YELLOW EARTH, BLUE NEUTRAL, BROWN LIVE.
Sorting and loading the laundry Open the loading door by pulling the small handle to the left and turning it outwards at the same time (Fig, 4). Before using the appliance for the first time, clean the inside of the drum with & piece of cloth slightly soaked in a little alcohol. Sort the laundry according to type of fabric (this sorting operation will already have been done if you are using a washing machine for your laundering).
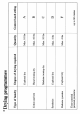
Selecting an electronic control programmer By means of the electronic control circuit incorporated in this machine, drying of the laundry is automatically controlled. This special feature operates independently of the quantity of laundry loaded in the drum and its dampness. All you have ta do mitosis set the programmer selector knob onto the teller corresponding to the type of laundry to be dried and to the degree of drying required.
Starting the machine After connecting the machine to the electric supply, proceed as follows: Turn the control knob (5) clockwise until the index coincides with the letter of the selected programmer (in the case of the personal time-controlled programmer, set the index on the required drying time); Push in the start button (1). At this point, the operating pilot lamp (2) will light up and the machine starts carrying out the drying cycle.
Maintenance Cleaning the filter Incorporated in the lower rim of the porthole is a large-surface filter to trap all fluff that normally developed during the drying cycle. This filter should be cleaned at the end of every drying cycle (Fig. 5). The fluff that accumulates on the walls of the filter is not due o an excessive wear of the fabrics caused by the dryer, but it is due to a perfectly normal wear of the fabrics.
Cleaning the dampens control Sensors ‘The dampness control sensors are located inside the round pastie rim of the porthole. You should clean periodically the entire inner surface of the round rim using a piece of cloth slightly sacked in a little cleaning alcohol (Fig. 7). Some useful hints Tablecloths, bed sheets and similar cotton and linen items should be dried to the point where they are ready for ironing {damp for ironing).
Something not working... If any malfunction is detected, check the following points in an effort to remove the trouble, if at all possible: ® The machine will not start: Check the following points: ~1s the loading door correctly closed; is the plug correctly inserted into the wall socket; the fuses of the electric installation are not blown.
Directions for the installer Fixed steam vent installation Fittings to be used: Plastic hose with 100 mm dia. Remove the ring nut (A Fig. 8) from the exhaust connector of the machine. Screw it on to the end of the hose and refit the resulting assembly to the steam vent connector of the machine. Under work top installation Fittings to be used: Protection panel Remove the work top from the dryer by unscrewing the two rear fixing screws. Fit the protection panel (B) by means of the 4 screws as shown in Fig.
Stacked installation ‘With washing machines models ZYST-Z918 T-Z 919 T following fittings must be used. For other models instructions have to be requested to IAZ International (UK) Ltd. Protection panel; Kit including two small blocks, two brackets and the fixing screws. Remove the work top from the washing machine by unscrewing the rear fixing S Crews. Fix protection panel B as shown in Fig. 10 and replace the two small plastic blocks with the two supplied in the fittings kit.
ZANINESS! ELECTROMAGNETIC Industries Gaussian spa GAUSSIAN GUARANTEE CONDITIONS This guarantee is in addition to your statutory and other legal rights which will not be excluded or in any way diminished by the return of the enclosed card.