Gebrauchsanlei tung Kühlschrank o o c o c ZBA 3154A Gebruiksaanwij zing Koelkast Mode d’emploi Refrigerateur Operating instruction Refrigerator
DE Bevor Sie Ihr Gerät anschließend in Betrieb nehmen, lesen Sie bitte zuerst die Gebrauchsanleitung durch, die Sicherheitshinweise und wichtige Informationen enthält. Nur so können Sie das Gerät sicher und zuverlässig nutzen und werden viel Freude daran haben. Folgende Zeichen werden Ihnen helfen, sich in der Gebrauchsanleitung besser zurecht zu finden.
DE Sicherheitshinweise Bevor Sie Ihr neues Kältegerät in Betrieb nehmen, lesen Sie bitte diese Gebrauchsanweisung aufmerksam durch. Diese sind Sicherheitshinweise. Wir ersuchen Sie daher, die folgenden Punkte vor der Installation des Gerätes und seiner Inbetriebnahme aufmerksam durchzulesen. Es wird empfohlen, diese Gebrauchsanweisung gut aufzubewahren und bei einem eventuellen Verkauf des Gerätes dem neuen Besitzer auszuhändigen.
DE Umweltnormen Das Gerät darf nicht mit dem Hausmüll oder Sperrmüll entsorgt werden. Auskunft über Abholtermine oder Sammelplätze gibt die örtliche Gemeindeverwaltung an. Informationen für Sicherheitsvorschriften von Isobutan Warnung Entsorgung Ihr Gerät enthält im Kältekreislauf Isobutan (R 600a); bei diesem Stoff besteht Feuer- und Explosionsgefahr. Verpackungsmaterialien Belüftungsöffnungen der Geräteverkleidung oder des Aufbaus von Einbaumöbeln nicht verschließen.
DE In diesem Falle den Thermostatknopf auf wärmere Temperaturen stellen, damit das automatische Abtauen, mit folglich geringerem Stromverbrauch, gewährleistet werden kann. Keine warmen Speisen in das Gerät stellen. Warme Speisen erst abkühlen lassen. Den Verflüssiger, das Metallgitter an der Geräterückseite, mit einem Staubsauger oder einer Bürste immer sauber halten. Richtiges Kühlen Keine warmen Speisen oder dampfenden Flüssigkeiten in den Kühlschrank einstellen.
DE unterbrochen - die Innentemperatur steigt und somit erfolgt ein Abtauen. Hat sich eine Reif- und Eisschicht in geringerem. Nach dem Abtauen aktiviert der Temperaturregler den Kühlprozeß. Hat sich eine Reif- und Eisschicht gebildet, kann diese mit einem Kunststoffschaber entfernt werden, wenn sie nicht zu dick ist.
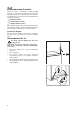
DE Eine defekte Innenbeleuchtung beeinträchtigt die Funktionsfähigkeit des Gerätes nicht. Wechsel der Glühlampe Wenn die Glühlampe defekt ist, können Sie diese leicht selbst austauschen: Ziehen Sie den Netzstecker. Drehen Sie die Schraube der Abdeckung heraus und ziehen Sie die Abdeckung in Pfeilrichtung ab. Jetzt können Sie die defekte Glühlampe ersetzen. (Typ: Mignon 322, 230 V, 15 W, Sockel E 14) Setzen Sie die Abdeckung der Glühlampe zurück und schrauben Sie die Schraube wieder ein.
DE Kundendienst und Ersatzteile Sollten Sie nach o.e. Prüfungen zu keinem Resultat kommen, so wenden Sie sich bitte an unseren nächsten Kundendienst. Um ein rasches Beheben des Schadens zu ermöglichen, ist es beim Anruf an den Kundendienst notwendig anzugeben: Modellbezeichnung Erzeugnis-Nummer (PNC) Fertigungs-Nummer (S-No.) Diese Angaben finden Sie auf dem Typschild links ander Innenseite des Gerätes. Damit Sie die Daten schnell bei der Hand haben, empfehlen wir, sie hier einzutragen.
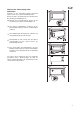
DE Wechsel des Türanschlags beim Gefrierfach Nachdem Sie den Türanschlag draußen gewechselt haben, müssen Sie es auch beim Gefrierfach tun. Gehen Sie bitte in der Reihenfolge der nachstehenden Beschreibung und Abbildungen vor: Mit Hilfe eines Schraubenziehers drücken Sie die innere Zunge des unteren Scharnierträgers ein. Den unteren Scharnierträger zusammen mit der Gefrierfachtür auskippen und den Scharnierträgen entfernen.
DE Installation Vor der Installation sicherstellen, dass das Gerät nicht beschädigt ist. Mögliche Transportschäden sind dem Händler unverzüglich mitzuteilen. Während das Gerät in Betrieb ist, werden der Verflüssiger und der Kompressor, die sich auf der Rückseite des Gerätes befinden, heiß. Aus Gründen der Sicherheit muss eine Mindestbelüftung gesichert sein. Siehe Aufstellungsanweisungen.
DE Ferner ist auch am hinteren Einbauschrankteil ein Lüftungskamin mit folgenden Massen notwendig: Tiefe 50 mm Breite 540 mm 2. Tür öffnen und Gerät gegenüber der Bandseite an die Möbelseitenwand rücken. Gerät mit den 4 beiliegenden Schrauben (I) befestigen. 3. Fugenabdeckprofil am Gerät, wie in Abbildung gezeigt ankleben. 1.
DE Scharnier mit Stift bedeckt, die in der Abbildung gekennzeichneten Teile heraus. Dies wird durch die vorgestanzten Ausbruchlinien erleichtert. "Entfernen Sie das mit DX gekennzeichnete Teil, wenn der Stift am rechten Scharnier angebracht werden soll, andernfalls das mit SX gekennzeichnete Teil." IIn die Befestigungs- und Scharnierlöcher beiliegende Abdeckkappen (C-D) eindrücken. Belüttungsgitter (B) und Scharnierabdeckungen (E) aufstecken. 7.
DE 10. Den Winkel wieder auf der Schiene anbringen und mit den mitgelieferten Schrauben befestigen. Für eine allfällig notwendige Ausrichtung der Möbeltür, den Spielraum der Langlöcher nutzen. Nach Beendigung der Arbeiten den einwandfreien Verschluss der Gerätetür überprüfen. 11. Die Abdeckung (Hd) in den Winkel (Hb) eindrücken, bis sie einrastet.
NL Lees deze gebruiksaanwijzing aandachtig door voordat u het apparaat installeert en in gebruik neemt. U vindt hierin aanwijzingen m.b.t. de veiligheid, praktische informatie, informatie m.b.t. het milieu en tips. Als u het apparaat volgens de aanwijzingen gebruikt, zal het naar volle tevredenheid werken. M.b.v. onderstaande symbolen kunt u informatie makkelijk vinden: Aanwijzingen m.b.t. de veilligheid Aanwijzingen die belangrijk zijn voor uw veiligheid of voor het functioneren van het apparaat.
NL Veiligheidsinformatie Deze informatie werd voorzien ten behoeve van uw veiligheid. Lees dit alvorens het apparaat te installeren of te gebruiken. Bewaar deze gebruiksaanwijzing voor toekomstige raadpleging. Als het apparaat van eigenaar verandert, dient de gebruiksaanwijzing meegeleverd te worden. Algemene aanwijzingen m.b.t. de veiligheid Bewaar deze gebruiksaanwijzing goed en geef hem door aan een evt. volgende eigenaar van het apparaat.
NL Veiligheidsmaatregelen voor isobutaan Afvalverwerking Verpakkingsinformatie van het apparaat De materialen met het symbool worden. kunnen gerecycled >PE< voor polyethyleen, bijv. inpakmateriaal >PS< voor polystyreen, bijv. opvulmateriaal (altijd CFC-vrij) >POM< voor polyoxymethyleen, bijv. plastic clips. Alle materialen zijn milieuvriendelijk! Waarschuwing Het koelmiddel van het apparaat is isobutaan (R 600a) dat in hoge mate brandbaar en explosief is.
NL Om het plateau op een andere hoogte terug te plaatsen, doet u hetzelfde in omgekeerde volgorde. Het glazen legplateau boven de groentenlades en het flessenrek moeten altijd op dezelfde plaats blijven om een goede luchtcirculatie te garanderen. Deurplateaus Om de opslag van voedselverpakkingen van verschillende afmeting te kunnen ondersteunen, kan het middelste deurplateau in hoogte versteld worden.
NL Controleer regelmatig of het dooiwaterafvoergootje niet verstopt is. Als het afvoergootje verstopt is, kan het dooiwater schade veroorzaken aan de isolatie van het apparaat. Na het ontdooien de binnenzijde van vries- en koelruimte droog wrijven, de stekker weer in het stopcontact steken en de levensmiddelen weer in het apparaat leggen. Zet na het ontdooien de temperatuurregelaar op de hoogste stand, zodat het apparaat zo snel mogelijk weer de geschikte bewaartemperatuur kan bereiken.
NL Het oplossen van problemen Sommige problemen kunnen gemakkelijk verholpen worden voordat u de Technische Service belt. Volg de onderstaande instructies: PROBLEEM OPLOSSING De deur sluit niet Zorg dat het apparaat vlak staat als dit niet het geval is. Het gewicht is groter dan de opslaglimiet van de deur aan kan, dus verspreid het gewicht gelijkmatiger of haal producten weg. Het apparaat is niet juist geďnstalleerd. Raadpleeg paragraaf “Inbouwen”.
NL Klantenservice en reserveonderdelen Als u geen oplossing kunt vinden voor een storing in deze bedieningsinstructies, kunt u contact opnemen met de vakhandelaar of de klantenservice en raadpleeg uw Garantiekaart. Selectief bestellen van vervangingsonderdelen kan onnodig portokosten besparen. Geeft om deze reden altijd de volgende informatie van het apparaat door: Modelnaam Modelnummer (PNC) Serienummer (S-No.) Deze informatie bevindt zich op het typeplaatje in de koelkast aan de linkerwand.
NL Deurdraairichting van het vriesvak omzetten Nadat u de buitendeur hebt omgezet, moet ook de deurdraairichting van het vriesvak worden omgezet. Ga te werk zoals in de afbeelding aangegeven. Duwt u met een schroevedraaier het lipje van de sluiting in dat aan de binnenkant van de onderste deurbeugel zit. Kantelt u de onderbeugel samen met het vriesvakdeurtje naar buiten en neem die vervolgens van de pin van het vriesvakdeurtje af.
NL Installatie Elektrische aansluiting Behandel het apparaat uiterst voorzichtig om geen schade aan de koeleenheid te veroorzaken met mogelijk vloeistoflekkage. Tijdens normale bediening worden de condensor en compressor aan de achterkant van het apparaat erg heet. Zorg er altijd voor dat er voldoende ventilatie is, anders leidt dit tot uitval van onderdelen en mogelijk verlies van voedsel. Raadpleeg de installatieinstructies.
NL De nis moet voorzien worden van een ventilatieleiding met de volgende afmetingen: Diepte 50 mm Breedte 540 mm Voor de juiste ventilatie volgt u de aanwijzingen in de afbeelding. 2. Open de deur en duw het apparaat tegen de zijkant van het keukenkastje dat zich tegenover de apparaatscharnieren bevindt. Maak het apparaat met 4 schroeven (l) vast die in de kit bij het apparaat zijn meegeleverd. 3. Druk de gezamenlijke bedekking aan tussen het apparaat en het keukenkastje. 1.
NL handeling wordt vergemakkelijkt omdat er aan de binnenkant van het scharnierdeksel een groef is aangebracht, waardoor u dit onderdeel makkelijker kunt verwijderen. "Verwijder het onderdeel dat gemarkeerd is met DX, als de scharnierpen in het rechter scharnier is geplaatst, in het tegenovergestelde geval het onderdeel gemarkeerd met SX verwijderen." Breng de afdichtstopsels (C-D) in de gaten in de deklijsten aan. Bevestig het ventilatierooster (B). Breng, onder lichte druk, het dekseltje (E) aan. 7.
NL 11. Plaats bedekking (Hd) op de smalle kant (Hb) totdat het op zijn plaats klikt.
FR Avant l`installation et l`utilisation de l`appareil nous vous conseillons de procéder à la lecture complète du mode d`emploi contenant des prescriptions de sécurité, des informations importantes et des conseils. En respectant les prescriptions du mode d`emploi l`appareil fonctionnera convenablement et à votre satisfaction. Les symboles utilisés: Prescriptions de sécurité Les prescriptions et cautions de ce symbole servent à la protection de l`appareil et de votre personne.
FR Avertissement importants Ces informations ont été rédigées pour votre sécurité. Nous vous prions donc de les lire attentivement avant d'installer et d'utiliser votre appareil. Nous recommandons de conserver cette notice afin de pouvoir la consulter au besoin et de la remettre, le cas échéant, au nouveau propriétaire de l'appareil. Prescriptions générales de sécurité Conservez ce mode d`emploi qui doit toujours suivre l`appareil.
FR Prescriptions de sécurité pour isobutane Élimination Informations l'appareil sur l'emballage Les matériaux marqués du symbole recyclables. de sont >PE< = polyéthylène, p.ex. feuilles d'emballage >PS< = polystyrène, p.ex. matériel de rembourrage (sans CFC) >POM< = polyoxyméthylène, p.ex. clips plastique. Tous les matériaux sont écologiques! Mise en garde L`isobutane (R 600a) constitue l`agent réfrigérant de l`appareil, qui est plus intensément inflammable et explosif.
FR · Si le thermostat est réglé sur la position de froid maximum, lorsque la température ambiante est élevée et que l'appareil est plein, il est possible que le compresseur fonctionne en régime continu. Dans ce cas, il y a un risque de formation excessive de givre sur la paroi postérieure à l'intérieur de l'appareil. Pour éviter cet inconvénient, placez le thermostat sur une position moins élevée de façon à permettre un dégivrage automatique et, par conséquent, des économies de courant.
FR Entretien Débranchez l'appareil avant toute opération. Attention Cet appareil contient des hydrocarbures dans son circuit réfrigérant : l'entretien et la recharge ne doivent donc être effectués que par du personnel autorisé. Décongélation L`humidité à l`intérieur de l`appareil se glace et se précipite sous forme des couches de glace ou de blanc gel.
FR En cas d'anomalie de fonctionnement Certaines anomalies peuvent parfois être facilement résolues sans faire appel à un technicien. Observez les recommandations suivantes : REMÈDE PROBLÈME La porte ne ferme pas Mettez à niveau l'appareil. La porte est surchargée, veillez à mieux répartir le poids sur les balconnets ou à enlever des produits. L'appareil n'est pas bien installé. Voir le chapitre “Encastrement”.
FR Service après-vente et pièces de rechange Une fois que tous ces contrôles ont été effectués, si l'anomalie de fonctionnement persiste, adressez-vous à votre magasin vendeur ou à notre Service après-vente, et consultez le certificat de garantie. Une commande sélective de pièces de rechange peut vous éviter des déplacements inutiles. Pour que l'intervention soit plus rapide, au moment de l'appel, il vaut mieux indiquer : le modèle · le numéro de code produit (PNC) · le numéro de série (S-No.
FR Inversion du sens d'ouverture de la porte du compartiment congélateur Dans le cas de ce type après avoir changer le sens d'ouverture de la porte extérieure il est nécessaire à changer aussi celui de la porte du compartiment congélateur. Exécutez l'opération comme suite: Retirez la charnière inférieure fixant le portillon du compartiment congélateur. Ouvréz le portillon,écartez-le avec précaution de son en cadrement et retirez la charnière inférieure fixant le portillon de l'élément de fixation.
FR Installation Branchement électrique Lors du transport et de l'installation de l'appareil, veiller à n'endommager aucune partie du circuit réfrigérant. Pendant le fonctionnement normal, le condenseur et le compresseur à l'arrière de l'appareil s'échauffent sensiblement. Pour des raisons de sécurité et le bon fonctionnement de l'appareil, la ventilation doit être prévue. Voir les instructions d'installation.
FR Il est nécessaire que la niche d'encastrement soit dotée d'un conduit de ventilation ayant les dimensions suivantes : Profondeur 50 mm Largeur 540 mm 2. Ouvrez la porte et poussez l'appareil dans la direction opposée aux charnières de l'appareil contre le côté du meuble de cuisine. Fixez l'appareil avec les 4 vis (I) incluses dans le kit fourni avec l'appareil. 3. Enfoncez les couvre-joints entre l'appareil et le meuble de cuisine. Pour une ventilation appropriée, suivez les indications de la figure.
FR Cette opération est facilitée par la présence d'une rainure, à l'intérieur du cache charnière, qui facilite le retrait de cette pièce. "Retirez la pièce marquée d'un DX, si le pivot est inséré dans la charnière droite, ou la pièce marquée d'un SX si le pivot est inséré dans la charnière gauche." Appliquez les caches (C-D) sur les ailettes des buté es et dans les trous des charnières. Appliquez la grille d'aération (B) et le couvrecharnières (E). 7.
FR 11. Enfoncez le cache (Hd) sur le petit carré Hb) jusqu'à ce qu'il s'enclenche en place.
GB Instructions for the use of the instructions booklet Notes which are important for your safety or for the proper functioning of the appliance Supplementary information regarding operation and practical applications of the appliance. Tips and notes concerning economical and environmentally sound use of the appliance The symbol on the product or on its packaging indicates that this product may not be treated as household waste.
GB Safety instructions This information has been provided in the interests of your safety. Please read it before installing or using the appliance. Please retain the instruction book for future reference. If owner ship is transferred, please leave the user manual for the new owner. Domestic Use Keep these instructions and they should remain at the appliance when moving away or changing owner. This appliance is designed for storing food, domestic use and being used according to these instructions only.
GB Safety precautions for isobutane Warning The refrigerant of the appliance is isobutane (R 600a) that is inflammable and explosive to a greater extent. Keep ventilation openings, in the appliance enclosure or in the built-in structure, clear of obstruction. Do not use mechanical devices or other means to accelerate the defrosting process, other than those recommended by the manufacturer. Do not damage the refrigerant circuit.
GB Butter & cheese: these should be placed in special airtight containers or wrapped in aluminium foil or polythene bags to keep out as much air as possible. Milk bottles: these should have a top and should be stored in the bottle rack on the door. Bananas, potatoes, onions and garlic, if not packed, must not be kept in the refrigerator. Maintenance Unplug the appliance before carrying out any maintenance operation. Warning Hints Saving Energy Pay careful attention to where the cabinet is placed.
GB Occasionally check defrost water outlet not to be clogged up. The most typical case of clogging up in the defrost water outlet when you put food wrapped in some paper into the appliance and this paper contacts back plate of fresh food compartment and freezes to it. If you remove the food right at this moment the paper will tear and it can cause clogging up in the outlet by getting into it. So you are asked to be careful - because of the above - when placing foods wrapped in paper into the appliance.
GB Something not Working Problems may be due to causes which can easily be solved before calling the Technical Service. Please follow these instructions: SYMPTOM Door does not close SOLUTION Level properly the appliances if it is not well levelled. Weight surpasses the storage limit of the door shelf so spread weight more evenly or take some products out. The appliance is not properly installed. Please look in the “Building-in” section. It is too warm inside the refrigerator Set a lower temperature.
GB Customer service and spare parts If you cannot find the remedy for a malfunction in these operating instructions, please contact your dealer or our customer service department and consult the Guarantee card. Selective ordering of replacement parts can save unnecessary travel and costs. For this reason always provide the following appliance information: Model Name Model Number (PNC) Serial Number (S-No.) This information can be found on the rating plate inside the cabenit on the left hand wall.
GB Change of door opening direction of frozen food compartment After changing the outer door opening direction at this type it is necessary to remount the door of the frozen food compartment as well. Operations and their order can be seen in figure. Press the retaining lever inside the lower doorhinge. Tilt the lower doorhinge out together with the freezer compartment door then remove it from the pin of the freezer compartment door.
GB Installation Electrical connection Take utmost care when handling your appliance so as not to cause any damages to the cooling unit with consequent possible fluid leakages. Before plugging in, ensure that the voltage and frequency shown on the serial number plate correspond to your domestic power supply. During normal operation, the condenser and compressor at the back of the appliance heat up considerably.
GB It is necessary that the niche is provided with a conduct of ventilation having the following dimensions: Depth 50 mm Width 540 mm 3. Press in the joint covers between the appliance and the kitchen furniture. For appropriate venting, follow indications in the figure. 1. Fit the appliance in the niche by making sure that it stands against the interior surface of the unit on the side where the door hinges of the appliances are fitted.
GB 5. Separate parts Ha, Hb, Hc, Hd as shown in the figure. 6. Place guide (Ha) on the inside part of the furniture door, up and down as shown in the figure and mark the position of external holes. After having drilled holes, fix the guide with the screws supplied. 8. Open the appliance door and the furniture door at 90°. Insert the small square (Hb) into guide (Ha). Put together the appliance door and the furniture door and mark the holes as indicated in the figure. 9.
GB 11. Fix cover (Hd) on the small square (Hb) until it clips into place.
RU . , . ! , " . # $ " : % , & " .
RU * = ( & . ( , ! . # ! + $ . ( " + . $ < . " .
RU 0 * # 0 , . PE< = >P ! , . " , PS< = >P , , " ). POM< = >P , . ( ! ( , ! " ' ( " " (R 600a).
RU + ' " %$ . # . "* ". & ! " . # & , . . ! , & . - , , . - , ! .
RU < : & $ . < , , , . % " & . ( %. . " " , " .
RU ) $ , $ : . , $ & , & , , . (% : 322, 230 (, 15 ( , 14). & , . $ .
RU A " , $ . ( ! : # # < *#%+QA ABV A B# +Q(A #%T = ( , ! . " - & " . ( & .
RU # ( $ $ + ! , & - . " . %. . ! , " $ : A A (PNC) # (S-No.) ' , .
RU " & " . A . 4. 180° $ . 1. A Y . 5.
RU * $ , " . " . ( " $ , " $ . # . .
RU ( + : ( (1) 880 1225 50 550 560 560 Z (2) U (3) 1. * , " " & , " . A , " & (1); , " & (2).
RU . ) 4 & (I), $ , " " . 4. ) $ (E) . * & (C, D) , . 5. $ ! , : Ha, Hb, Hc, Hd. 6. $ (Ha) " & , , .
RU 10.# $ & , $ . " " & , $ " , " . ! , " & & . * (Hd) (Hb) , , $ & , . N/Za/21-1. (09.) 11.
RU 63
www.electrolux.